


|
Learning by example is a way of life on the Web. You can always "View Source" for any of the HTML pages you find on the Web, so if someone does something interesting, you can figure out how to do it. With forms, however, learning how to do cool stuff is more difficult because you can't get the scripts people are using to process forms unless people have explicitly made them available.
This chapter contains four forms or scripts for common and useful tasks that you might want to include in your own pages. It also includes instructions and sample code for the following:
| Note |
As I mentioned in the previous chapter, a lot of the sophisticated stuff you might want to do with forms and interactivity in Web pages requires at least some background in programming. The examples in this chapter use Perl, a programming language popular in CGI programming. You should have at least a basic understanding of programming concepts and of CGI as I described it in the previous chapter to be able to get the most out of this chapter. |
| Note |
I had a significant amount of help in this chapter from Eric Murray, who wrote almost all of the CGI scripts for the examples (essentially, if it's in Perl, he wrote it). Many thanks to Eric for developing these examples on top of his normal day job. |
All the examples in this chapter, including the code for the forms and the CGI scripts that drive them are available on the Web from the pages for this book:
http://www.lne.com/Web/Examples/
If you find something in this chapter that you'd like to use, feel free to visit that site. We do ask that if you use the forms in your own Web presentations you link back to our site so that others can find out about it. Further guidelines are contained on the site itself.
In this first example, let's start with something simple that many of you might want: a CGI script that does nothing except take the input from a form, format it, and then e-mail the result to the author.
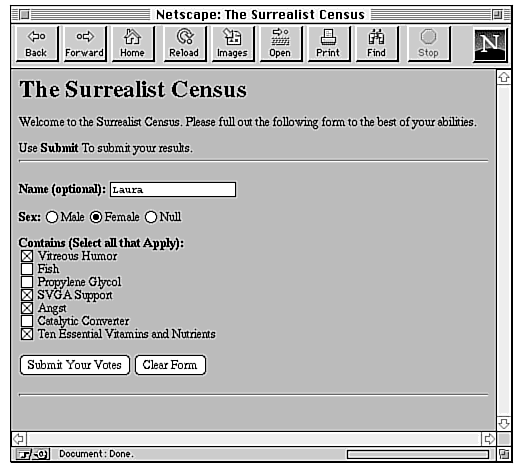
Here's a simple example of how this sort of form and CGI script combination might work. This is a survey form that I used in the first edition of this book as an example of simple form layout. It's called the Surrealist Census, and the form is shown in Figure 20.1.
Figure 20.1 : The Surrealist Census.
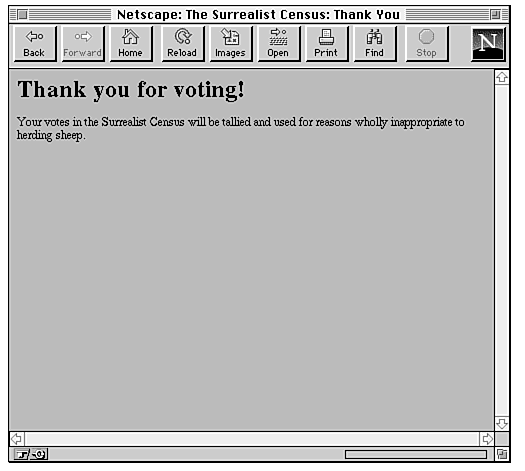
After filling out the form, the reader submits it and gets a friendly response in return (as shown in Figure 20.2).
Figure 20.2 : The page returned from the script.
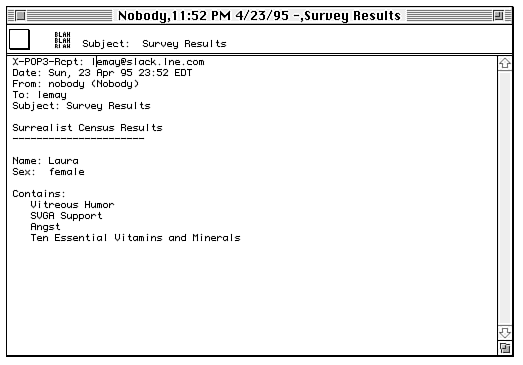
The survey results themselves are sent through e-mail to the person who wrote the original form. Figure 20.3 shows the mail message that person receives.
Figure 20.3 : The mail that the census program sends.
Here's the HTML code for The Surrealist Census form:
<HTML><HEAD>
<TITLE>The Surrealist Census</TITLE>
</HEAD><BODY>
<H1>The Surrealist Census</H1>
<P>Welcome to the Surrealist Census. Please full out the following
form to the best of your abilities.</P>
<P>Use <STRONG>Submit</STRONG> To submit your results.
<HR>
<FORM METHOD="POST" ACTION="/cgi-bin/uncgi/mailcensus">
<P><STRONG>Name: </STRONG><INPUT TYPE="TEXT" NAME="theName"></P>
<P><STRONG>Sex: </STRONG>
<INPUT TYPE="radio" NAME="theSex" VALUE="male">Male
<INPUT TYPE="radio" NAME="theSex" VALUE="female">Female
<INPUT TYPE="radio" NAME="theSex" VALUE="null">Null
</P>
<P><STRONG>Contains (Select all that Apply): </STRONG><BR>
<INPUT TYPE="checkbox" NAME="humor">Vitreous Humor<BR>
<INPUT TYPE="checkbox" NAME="fish">Fish<BR>
<INPUT TYPE="checkbox" NAME="glycol">Propylene Glycol<BR>
<INPUT TYPE="checkbox" NAME="svga">SVGA Support<BR>
<INPUT TYPE="checkbox" NAME="angst">Angst<BR>
<INPUT TYPE="checkbox" NAME="catcon">Catalytic Converter<BR>
<INPUT TYPE="checkbox" NAME="vitamin">Ten Essential Vitamins and Nutrients<BR>
</P>
<P><INPUT TYPE="SUBMIT" VALUE="Submit Your Votes">
<INPUT TYPE="RESET" VALUE="Clear Form"></P>
<FORM>
<HR>
</BODY></HTML>
Here are some things to note about this form:
Now let's move on to the script to process the form. This script, written in the Bourne shell, is a simple example that stores the form data in a temporary file and then mails the contents of that file to someone (here, the Webmaster alias). You could modify this file to simply append the contents of the form to an already existing file, print the results to your favorite printer, or fax them to your friend in Boise. The point is that this script simply collects the form input and outputs it somewhere; it doesn't try to process that input.
The first step is to create a temporary file to store the formatted form data and assign the variable TMP to that file. This line, in particular, creates a temporary file with the process ID of the script appended (the $$ part), in order to create a unique filename and keep from overwriting any other temporary files that this script might be using at the same time.
#!/bin/sh
TMP=/tmp/mailcensus.$$
Now, we'll append a simple heading to the file:
echo "Surrealist Census Results" >> $TMP
echo "-------------------------" >> $TMP
echo >> $TMP
Next, append the values of the theName and theSex fields to that same file, plus a subheading for the Contains portion. Note that the uncgi program appends the WWW_ to the beginning of each variable, as you learned in the previous chapter.
echo "Name: $WWW_theName" >> $TMP
echo "Sex: $WWW_theSex" >> $TMP
echo >> $TMP
echo "Contains:" >> $TMP
The next section prints out the check boxes for the things that this person contains. Here, I test each check box variable and print only the ones that were checked, so the list in the temporary file will contain a subset of the total list (unless all the items were checked). You can choose to modify this script to print the list in a different form-for example, to include all the check box items with a YES or a NO after the name in order to indicate which ones were selected. Because it's up to you to deal with the form input as you see fit, you can choose how you want to present it.
For check boxes, the default value that is sent for a selected check box is "on". Here, we'll test each check box name variable for that value, as in this example:
if [ "$WWW_humor" = "on" ]; then
echo " Vitreous Humor" >> $TMP
fi
if [ "$WWW_fish" = "on" ]; then
echo " Fish" >> $TMP
fi
if [ "$WWW_glycol" = "on" ]; then
echo " Propylene Glycol" >> $TMP
fi
Because each test for each check box is essentially the same thing
with a different name, I'll include only a couple of them here.
If you really want the full script, visit the Web site
and download it from there.
Now that all the data has been collected and formatted, we'll mail it. This line mails the temporary file to the webmaster alias with the subject line Survey Results:
mail -s "Survey Results" webmaster < $TMP
Now remove the temporary file so that you don't have a lot of them cluttering your /tmp directory:
rm $TMP
You might think at this point that you're done, but you still have to return something to the browser so your reader knows everything went OK. Now let's output the standard header and a simple HTML page:
echo Content-type: text/html
echo
echo "<HTML><HEAD>"
echo "<TITLE>The Surrealist Census: Thank You</TITLE>"
echo "</HEAD><BODY>"
echo "<H1>Thank you for voting!</H1>"
echo "<P>Your votes in the Surrealist Census will be tallied and"
echo "used for reasons wholly inappropriate to herding sheep.</P>"
echo "</BODY></HTML>"
Save your file as mailcensus (remember, it was called this in the original HTML for the form?), install it in your cgi-bin directory, and make sure the file is executable. Then, you should be able to run it from the form.
If you download this script and use it on your own system, the first thing you'll probably notice is that the mail it sends you comes from the user Nobody. The first question you'll probably have is "How can I write my script so that the mail is sent from the actual user?"
The answer is that you can't. When the browser sends the data from the form to the server, it sends the name of the system the request came from (in the REMOTE_HOST environment variable). However, it doesn't send the name of the user that sent the form (REMOTE_USER is used for password-protected pages, which you'll learn about in Chapter 28, "Web Server Security and Access Control."
Look at it this way: if the browser did send the e-mail addresses of everyone who sent in your form, you could collect those addresses and send junk mail to everyone who submitted your form, and vice versa for any forms you submit when you explore the Web. Because of these privacy issues, most if not all browser developers have chosen not to send anything concerning the user's e-mail address when a form is submitted.
If you really want someone's e-mail address, ask for it in your form. If your readers want you to reach them, they'll put in their address.
A common modification to this script is to modify it so that it appends the form input to a file rather than mailing it to you. This is particularly useful for very simple text databases such as the address book you'll learn about later in this chapter.
If you decide to have your CGI script write to a file, be aware that CGI scripts on UNIX are run by the server using the surname Nobody (or at least that's the default; your server administrator might have set it up to run under a different name). This is a good thing, because it means that the server can't go berserk and delete everything on the machine. On the other hand, the user Nobody might not have access to the file you want it to write to. In this script, it has access to the temporary file because that file is in the /tmp directory, and everyone has access there.
To solve this problem, make sure that your temporary file is world-writable using the chmod command to change the file permissions (chmod a+w filename is the exact command). Of course, this also means that anyone on your system can write to it (or delete the contents if they so choose), so you might want to hide it somewhere on your system or back it up regularly to a nonwritable file.
Another idea you might have for this script is to make it generic and pass different e-mail addresses as part of the form itself, either as a query string or in a hidden field. Then multiple people can use the same script, and you don't need to clutter the cgi-bin directory with different scripts that all do essentially the same thing. Great idea, right?
Well, not really. The problem with passing an e-mail argument to your script from the form is that anyone can call your script from any form using any e-mail address they want to. Your script will merrily send the data to whatever e-mail address it gets. For example, say someone saved and edited your form so that the mail argument pointed to joe@randomsite.com. That person could then use your mailcensus script to submit your survey data to joe@randomsite.com, potentially thousands of times, running all of them through your mailcensus script; the person could use up your processing time and mailbomb poor Joe, who can only complain to your site because that's the only identifiable header in the mail. To prevent this sort of mischief on your site, you should hardcode the e-mail address in the script itself or provide some way on the server of verifying the address to which the mail is being sent.
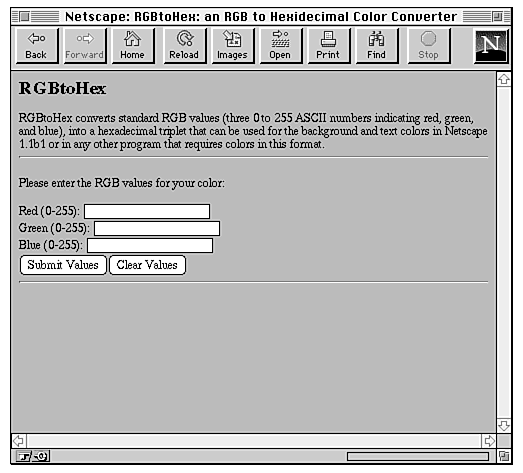
RGBtoHex is a converter that takes three RGB numbers (0-255), which indicate an RGB color, and returns a hexadecimal triplet (#NNNNNN) that you can use for Netscape backgrounds or any other image programs that expect colors to be specified in this way.
The script to do the conversion is actually a very simple one; converting ASCII to Hex is a rather simple task. But this example is written with Perl, and it's a good introduction to the bigger Perl scripts in the remainder of this chapter.
Figure 20.4 shows the form for this example, which has some instructions and then three text fields for the 0 to 255 numbers.
Figure 20.4 : The RGBtoHex form.
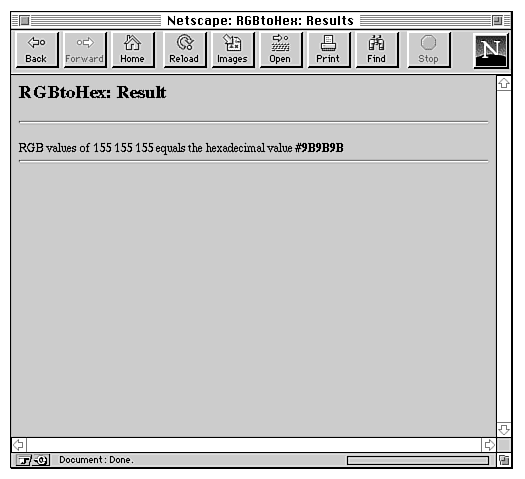
If you enter, for instance, 155 155 155 (a nice light shade of gray) and click Submit Values, you get the result shown in Figure 20.5. You can then copy the hexadecimal triplet into your HTML files or your color programs.
Figure 20.5 : The RGBtoHex result.
The form that calls the RGBtoHex script is quite simple: three text fields and the ubiquitous submit and reset buttons, as in this example:
<HTML><HEAD>
<TITLE>RGBtoHex: an RGB to Hexadecimal Color Converter</TITLE>
</HEAD><BODY>
<H2>RGBtoHex</H3>
<P>RGBtoHex converts standard RGB values (three 0 to 255 ASCII numbers
indicating red, green, and blue), into a hexadecimal triplet that can
be used for the background and text colors in Netscape 1.1 or in any
other program that requires colors in this format.
<HR>
<FORM METHOD=POST ACTION="/cgi-bin/rgb.cgi">
<P>Please enter the RGB values for your color:
<P>Red (0-255): <INPUT TYPE="text" NAME="red"><BR>
Green (0-255): <INPUT TYPE="text" NAME="green"><BR>
Blue (0-255): <INPUT TYPE="text" NAME="blue"><BR>
<INPUT TYPE="submit" VALUE="Submit Values"><INPUT TYPE="reset"
VALUE="Clear Values">
<HR>
</BODY></HTML>
The only things to note here are the names of the text fields: red, green, and blue. Remember, you'll need these for the script. Also, note that the name of the script is rgb.cgi, and it's contained in the cgi-bin directory on your server. You'll need to modify the ACTION part of the form to point to your own script.
The script to translate the RGB ASCII values to a hexadecimal triplet is a simple Perl script that uses the cgi-lib.pl library to decode the form values. (I described cgi-lib.pl in the previous chapter.) Here's a walk-through of the contents of the script.
The first line indicates that this is a Perl script, as opposed to a Bourne shell script. If you have Perl installed on your system in some location other than /usr/local/bin/perl, you'll have to modify this line so that it points to the script:
#!/usr/local/bin/perl
| Note |
If you don't know where Perl is located on your system, try typing which perl at a system prompt. If Perl is installed and in your search path, that command will give you the correct pathname to the Perl program. |
Now include the initial stuff that all CGI scripts require:
require 'cgi-lib.pl';
&ReadParse(*in);
print "Content-Type: text/html\n\n";
#Top of HTML file
print "<HTML><HEAD>\n"
print "<TITLE>RGBtoHex: Results</TITLE></HEAD><BODY>\n";
print "<H2>RGBtoHex: Result</H2>\n";
print "<HR>\n";
These lines do three things:
Onward to the meat of the script. We can't create a triplet unless the reader of the form entered values for all three text fields, so in this section we'll check to make sure that all the fields had values when the form was submitted.
In Perl, using cgi-lib.pl, you get to the value part of the name/value tag by referencing the name of the associate array ($in) and the name of the name key. So $in{'red'} will give you the value that the reader entered into the text field called red. Here, we'll test all those values to make sure they're not empty and print an error if any of them are:
if (($in{'red'} eq '') || ($in{'green'} eq '') ||
($in{'blue'} eq '')) {
print "You need to give all three values!";
} else {
Now move on to the good part of the script. Converting the ASCII values to Hex is actually quite easy. You can do it with almost any scientific calculator, and in Perl it's just a simple formatting option to the printf function (just like in C, if you've used that language). But first, let's print out the leading part of the sentence (here I've put it on two lines; it should actually be a single line in your source code):
print "<P> RGB values of $in{'red'} $in{'green'}
$in{'blue'} equals the hexadecimal value <B>";
Then print the final hex part, a simple Perl printf statement can do just fine, and make sure we have two digits for each part of the triplet:
printf ("#%2.2X%2.2X%2.2X\n",$in{'red'},$in{'green'},$in{'blue'});
}
Finish up with the last of the HTML tags for the document:
print "</B><BODY></HTML>\n";
That's the end of it. Save the script as rgb.cgi, install it into your cgi-bin directory, and off you go.
For the third example, let's work with a more complex and larger script. In this example, we'll be querying information stored in a sort of database-actually, just a flat text file stored on the server. The form enables you to type in keywords to search for, and the script returns an HTML file of matching records.
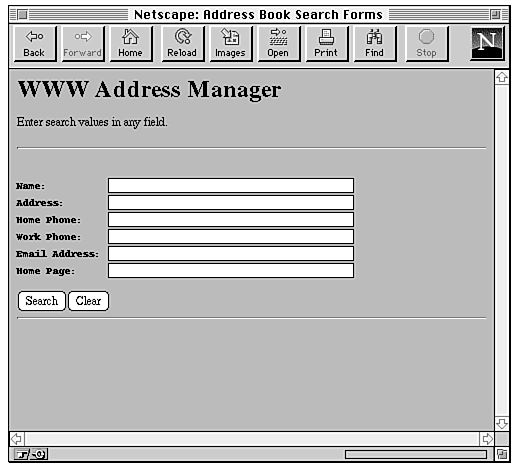
The database for this example is actually just a simple text file full of address data. Each record in the file contains information about an individual person, including address, phone number, e-mail address, and so on (details about the format of the file are in the next section). The search form (shown in Figure 20.6) is a simple set of text fields that enables you to search for keywords in any portion of the database.
Figure 20.6 : The search form.
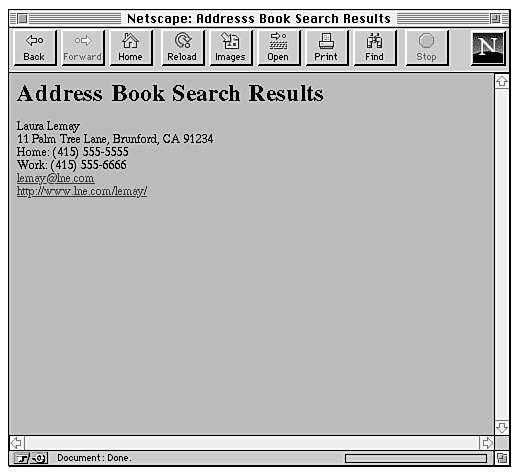
When the form is submitted, the CGI script searches the address file and returns all the records that it finds, including automatically generating links for the e-mail and home page fields, as shown in Figure 20.7.
Figure 20.7 : The search results.
If you request search information in multiple fields in the form, the search script will return all the records that have any of those keywords in them. So, if you type Laura in the Name field and lne.com in the Email field, the script tests each record to see whether it contains Laura or lne.com and returns all the records that contain instances of either of those keywords.
The address book file that the form searches on is a simple text file containing several records for each person, separated by blank lines. A record for the address book looks something like this:
Name: Laura Lemay
Address: 11 Palm Tree Lane, Brunford, CA 91234
Home Phone: (415) 555-5555
Work Phone: (415) 555-6666
Email Address: lemay@lne.com
Home Page: http://www.lne.com/lemay/
Each record is made up of several fields, including Name, Address, and so on. The field name and the field contents are separated by colons. Fields with no information are still specified, but without values after the initial label, like this:
Name: Andrew Fnutz
Address: 5555555 SE North St. West Forward, ND 00554
Home Phone: (411) 555-8888
Work Phone:
Email Address: fnutz@loothmid.zurk.com
Home Page:
The address data is stored somewhere on the server where the script will be able to get to it; in this case I've called it address.data and put it on my Web server. You can create your own address data file or use this one as a test (it's available on the CD-ROM accompanying this book).
The form for searching the address book is quite ordinary-just a simple set of text fields. Nothing new or exciting here. I did use preformatted text in this example so the fields would all line up:
<HTML><HEAD>
<TITLE>Address Book Search Forms</TITLE>
</HEAD><BODY>
<H1>WWW Address Manager</H1>
<P>Enter search values in any field.
<PRE><HR>
<FORM METHOD=POST ACTION="/cgi-bin/address.cgi">
<P><B>Name:</B> <INPUT TYPE="text" NAME="Name" SIZE=40>
<P><B>Address:</B> <INPUT TYPE="text" NAME="Address" SIZE=40>
<P><B>Home Phone:</B> <INPUT TYPE="text" NAME="Hphone" SIZE=40>
<P><B>Work Phone:</B> <INPUT TYPE="text" NAME="Wphone" SIZE=40>
<P><B>Email Address:</B> <INPUT TYPE="text" NAME="Email" SIZE=40>
<P><B>Home Page: </B> <INPUT TYPE="text" NAME="WWW" SIZE=40>
</PRE>
<INPUT TYPE="submit" VALUE="Search"><INPUT TYPE="reset" VALUE="Clear">
<HR>
</FORM></BODY></HTML>
Now onto the script, called address.cgi. This is another Perl script, one more complicated than the RGBtoHex script. But, as with that script, this one starts with the same lines to include cgi-lib.pl, decode the form input, and print out the initial part of the response:
#!/usr/local/bin/perl
require 'cgi-lib.pl';
&ReadParse(*in);
print "Content-type: text/html\n\n";
print "<HTML><HEAD><TITLE>Address Book Search Results</TITLE></HEAD>\n";
print "<BODY><H1>Addresss Book Search Results</H1>\n";
In order to search the address book, the script needs to know the location of the address book. This first line points to the actual file on the local file system that contains the file data (you'll need to change it to point to your own data file). The second line opens that file for reading (you'll need to change it to the actual full pathname of that file on your own system):
$data="/home/www/Web/Books/Examples/Professional/chap20/address/address.data";
open(DATA,"$data") || die "Can't open $data: $!\n</BODY></HTML>\n";
Now comes the hard part. This next (long) section of code, contained in a while loop (while(<DATA>) {...), reads the data file line by line, making several tests on each line. The entire loop accomplishes several things:
Let's start with the opening part of the while loop, and a command (chop) to remove extraneous trailing newlines at the end of the current line:
while(<DATA>) {
chop; # delete trailing \n
Inside the while loop, we'll make several tests. The loop tests each line to see if there are matches with the search criteria. It also tests to see if we've reached a blank line. Remember that blank lines delineate records in the address file, so if the loop finds a blank line, it knows that it has read a full record. In the next block of code, we'll test for that blank line, and make an additional test to see whether any matches were previously found in that record. If there is a blank line and there was a match, this block of code will do the following:
Regardless of whether or not a match was found, the presence of a blank line means the end of a record, so the program also does two other things:
Here's the code that tests for a blank line and a match, processes the record, and clears everything out again:
if (/^\s*$/) { # blank line means end of record
if ($match) {
# if anything matched, print the whole record
&printrecord($record);
$nrecords_matched++;
}
undef $match;
undef $record;
next;
}
Now we'll move on to the actual tests for the field data. The data file itself has each line in a tag: value format-for example, Email: lemay@lne.com. The next line splits the line into those two parts, putting their contents into the tag and value variables:
($tag,$val) = split(/:/,$_,2);
Here are the actual tests. There are six individual tests (one for each kind of field: Name, Address, Home Phone, Work Phone, Email, and Home Page), but because all of them look essentially the same, I'll include only two of them here. You can look at the full file on the CD-ROM for this book if you're interested in the rest of them.
Each of these searches tests the tag variable to see whether we're currently reading a line with the appropriate field name. If so, the script compares the value of the line with the search key it has for that field, if any. If the script finds a match, it sets the match variable. Whether it finds a match or not, the script also copies the line into the record array.
Here are two of the tests, for the Name and Address fields.
if ($tag =~ /^Name/i) {
$match++ if( $in{'Name'} && $val =~ /\b$in{'Name'}\b/i) ;
$record = $val;
next;
}
if ($tag =~ /^Address/i) {
$match++
if( $in{'Address'} && $val =~ /\b$in{'Address'}\b/i) ;
$record .= "\n<BR>$val" if ($val);
next;
}
Finally, here's one other line in the loop before the end. If there are any other lines in the data file that aren't associated with a field, we still want to keep those around; so, if we encounter one, we'll just copy it to the current record as well:
$record .= $_;
}
When the loop is done and we've found everything we're going to find, close the data file:
close DATA;
What happens if no records are found? You might remember way back up at the beginning of the loop that there was a variable for nrecords_matched. If we find a matching record, we set that variable. Conversely, if there aren't any matching records, that variable won't ever be set. So, here, we'll test it and print a message if it wasn't set:
if (! defined $nrecords_matched)
{ print "<H2>No Matches</H2>\n"; }
Finish up with the closing HTML tags:
print "</BODY></HTML>\n";
exit;
But wait; we're not quite done yet. The last part of this script is the subroutine that prints out the record in HTML form:
sub printrecord {
local($buf) = @_;
print "<P>\n$buf\n";
}
This example was pretty simple-just a data file and a search script. With a few more scripts, you could have forms that add, delete, and modify entries to the address book. You could have forms that summarize the information in different layout formats. You could go absolutely berserk and create a form that, given a name, returns the phone number as audio tones, so you could hold your phone up to your speaker and dial it, all from the Web. Well, maybe not. Given how long it would take you to start your Web browser, find the form, type in the name, and wait for the response, actually just dialing the phone would make a lot more sense. At any rate, this one simple script was just a taste of what you can do with a database-like file on your server.
Now that you've got the hang of Perl CGI scripts, let's work through a much more compli-cated example: a guest book page where your readers can post comments about your pages. The script to process the guest book updates the file automatically with the comment.
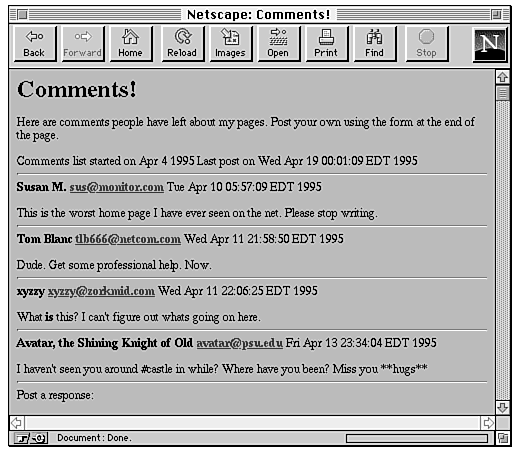
When your readers come across your initial guest book page, they might see something similar to the page shown in Figure 20.8.
Figure 20.8 : The guest book, at the top.
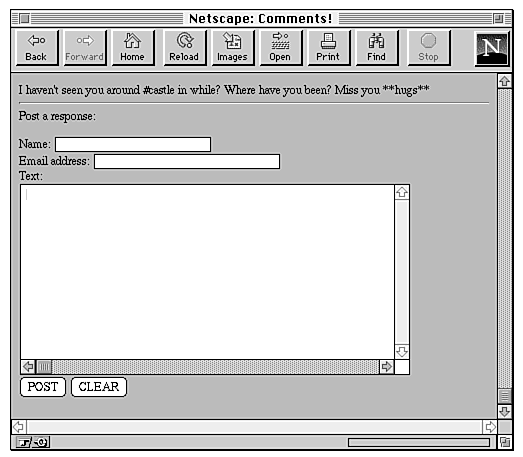
Each post in the guest book has the name, an e-mail address (which is a link to a Mailto URL), and the nice things the reader had to say about your pages. At the bottom of the guest book file is a form in which readers can add their own notes (see Figure 20.9).
Figure 20.9 : The guest book form.
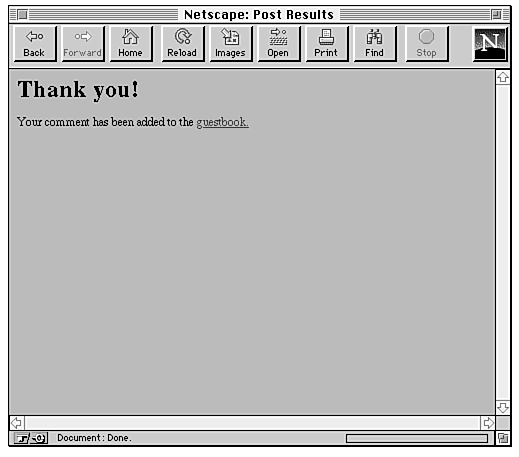
Your readers can type in their names and e-mail addresses, plus some comments (which can include HTML tags if they want), and choose POST. The script updates the file and returns a confirmation (see Figure 20.10).
Figure 20.10 : The confirmation.
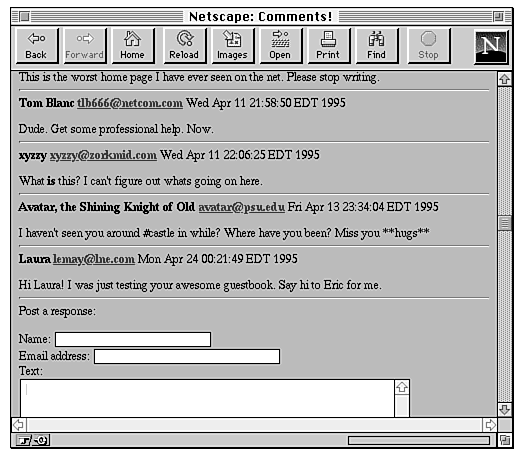
When the reader returns to the guest book, the comment is included in the list (see Figure 20.11).
Figure 20.11 : The guest bok, after the comment is entered.
Unlike other guest book types of applications, the CGI script for this form doesn't just append the new posting to the end of a file separate from the actual form. This one inserts the new posting in the middle of the file, updates the date, creates links to the appropriate places, and formats everything nicely for you. It's a significant bit of CGI coding.
Take a deep breath for this one; it's long and complicated. If you get lost along the way, stop and go back. Remember that these files are up on the Web site so you can look at the big picture at any time.
The HTML for the guest book is basically a plain HTML file with a form at the bottom. In order for the CGI script to know how to update that file, however, this HTML file has some extra stuff, so we're going to go into this one in greater detail.
First, here's the standard HTML stuff:
<HTML>
<HEAD>
<TITLE>Comments!</TITLE>
</HEAD>
</BODY>
This next HTML comment is the first of the bits in the HTML file that help the CGI script put things where they belong. This one, called GUESTBOOK, tells the CGI script that this is indeed a guest book file. You must have this comment somewhere in the HTML file, otherwise the script won't update the file. You can actually put this comment anywhere, but I've put it here up front.
<!--GUESTBOOK-->
Now create a simple heading and note for the start of the guest book:
<H1>Comments!</H2>
<P>Here are comments people have left about my pages.
Post your own using the form at the end of the page.
Add a note about the history of this file. The LASTDATE comment tells the CGI script where to put the new date (which is updated each time someone posts to the guest book):
Comments list started on Apr 4 1995
Last post on <!--LASTDATE-->
Here's what the first posting looks like (the template won't have this first posting). All of the postings in the HTML file will look something like this, with a rule line, the name of the poster, their e-mail address as a Mailto URL, the date, and the body of the posting:
<HR><B>Laura Lemay <A HREF=mailto:lemay@lne.com>lemay@lne.com
</A></B> Tue Apr 18 21:00:15 EDT 1995
<P>Test the guestbook...
After all the postings in the file is a comment called POINTER. This one is important because it tells the CGI script where to insert new postings.
<!--POINTER-->
The rest of the file is the actual form itself:
<HR>
Post a response:
<BR>
<FORM METHOD=POST
ACTION="/cgi-bin/guestbook.cgi/lemay/examples/guestbook.html">
Name: <INPUT TYPE="text" NAME="name" SIZE=25 MAXLENGTH=25>
<BR>
Email address: <INPUT TYPE="text" NAME="address" SIZE=30 MAXLENGTH=30>
<BR>
Text:
<BR>
<TEXTAREA ROWS=15 COLS=60 NAME="body"></TEXTAREA>
<BR>
<INPUT TYPE=submit VALUE="POST">
<INPUT TYPE=reset VALUE="CLEAR">
</FORM> </BODY> </HTML>
Note the call to the CGI script in the ACTION attribute. This is the most important part of the script because it uses the path information to tell the CGI script which file is being updated. You could just hardcode the name of the guest book file into the CGI script itself, but this way you can have multiple guest books and only one script to update them. Here's that ACTION line again:
ACTION="/cgi-bin/guestbook.cgi/lemay/examples/guestbook.html">
The first part of the line is the call to the script (here, /cgi-bin/guestbook.cgi), which is just as you would call any CGI script from an ACTION attribute. You'll want to modify that part to point to the location of guestbook.cgi wherever you've installed it on your server. The rest of the line is the path to the HTML guest book file itself as it appears in the URL. This is very important. The path information appended to the script name is not the actual pathname to the file; it's basically the URL with the http: and the host name removed. So if the URL to your guest book is
http://myhost/mypages/stuff/guestbook.html
then the part you'd append to the name of the script will be the following:
/mypages/stuff/guestbook.html
If the URL is this:
http://myhost/~myname/stuff/guestbook.html
then the appended part will be this:
/~myname/stuff/guestbook.html
| Note |
Don't forget that leading slash if you've got a tilde (~) in your URL. It's important. |
There is one other thing you should note when you install this HTML file on your own system. Just as with the temporary files in the first examples, the user Nobody has to be able to write to the file so that the CGI script can add the postings. This usually means that you'll have to make the HTML file world-writable.
Now let's move on to the script. This one is much more complicated than the ones discussed previously in this section, so we'll go through it slowly, line by line.
First, start with the standard Perl stuff for decoding data, and output the first part of the HTML response:
#!/usr/local/bin/perl
require 'cgi-lib.pl';
&ReadParse(*in);
print "Content-type: text/html\n\n";
print "<HTML><HEAD>\n";
print "<TITLE>Post Results</TITLE>\n";
print "</HEAD><BODY>\n";
The guestbook script sticks a date in each posting, so the following two lines grab the current date and clip off the newline at the end. The $date variable now contains the date:
$date = 'date';
chop($date); # trim \n
In the next line of Perl code, the CGI script figures out where the HTML file is that it's supposed to be writing to. Remember, in the ACTION part of the form, you included the path to the file in the URL? That path gets stuck into the PATH_INFO CGI environment variable, and then the server translates that into an actual file system pathname and sticks that value in the PATH_TRANSLATED environment variable. You can use the value of PATH_TRANSLATED on the CGI script to figure out what file to write to, which is the purpose of this line:
$file = "$ENV{'PATH_TRANSLATED'}";
We'll also need a temporary file, to keep from trashing the original file in case things screw up. For the temporary file, we need a unique (but not too unique) file. Why? Because if two people are posting to the guest book at the same time, you want to be able to check that they are not erasing each other's posts. Simply appending the process ID to the end of the temporary file (as we did in the first script) won't work: that's too unique. Instead, let's create a temporary file (in /tmp) out of the path to the guest book itself by replacing all the slashes in the path with at signs (@). It's weird, but you'll end up with a single temporary file for each guest book file, which is what you want. Here's the code:
$tmp = "$ENV{'PATH_TRANSLATED'}.tmp";
$tmp =~ s/\//@/g; # make a unique tmp file name from the path
$tmp = "/tmp/$tmp";
Now let's test the input we got from our readers through the form. First, we'll check to make sure the reader put in values for all the fields and return an error if not. One thing to note about these next couple of lines is that the &err part is a call to a Perl subroutine that prints errors. You'll see the definition of this subroutine at the end of the script, but for now just be aware that it exists.
if ( !$in{'name'} || !$in{'address'} || !$in{'body'}) {
&err("You haven't filled in all the fields.
Back up and try again.");
}
The body of the post (the part that was in the text area in the form) needs some simple reformatting. In particular, if the reader included separate paragraphs in the text, you want to replace those (two newlines in a row) with a paragraph tag so that HTML won't run it all together. However, if we do that, we might end up with multiple <P> tags, so the last line will strip out any duplicates. The following code illustrates how to do all this:
$text = $in{'body'};
$text =~ s/\r/ /g;
$text =~ s/\n\n/<P>/g;
$text =~ s/\n/ /g;
$text =~ s/<P><P>/<P>/g;
We're now ready to start actually updating the guest book. First we'll try opening the temporary file for which we created a name earlier. Remember all that stuff I said about making sure the temporary file isn't too unique? Here's where it matters. Before opening the temporary file, the script checks to see whether one is already there. If it is there, someone else is already posting to the guest book, and we'll have to wait until they're done. In fact, we'll wait for a little while. If it takes too long, though, we'll assume something has gone wrong and exit. Got all that? Here's the code to do it:
for($count = 0; -f "$tmp"; $count++) {
sleep(1);
&err("Tmp file in use, giving up!") if ($count > 4); }
If the temporary file doesn't exist, let's open it and the original HTML guest book file so we can read from the original and write to the temporary file. In each case, if the file can't be opened, we'll fail with an error, as shown in the following code:
open(TMP,">$tmp") || &err("Can't open tmp file.");
open(FILE,"<$file") || &err("Can't open file $file: $!");
The files are open. Now it's time to copy things from the original to the temporary, line by line. As the lines go by, we'll check each one to see whether it contains one of the comments we're interested in. For example, if we find the LASTDATE comment, we'll print the comment followed by the current date (remember, we set it up at the beginning of the script):
while(<FILE>) {
if (/<!--LASTDATE-->/)
{ print TMP "<!--LASTDATE--> $date \n"; }
If we find the GUESTBOOK comment, this is indeed a guest book file. We'll check for that later, so set a variable called guestbook:
elsif (/<!--GUESTBOOK-->/) {
print TMP "<!--GUESTBOOK-->\n";
$guestbook++;
}
When we find the POINTER comment, this is where we insert the new posting. Here, we'll do several things to include the new stuff:
And here's that code:
elsif (/<!--POINTER-->/) {
print TMP "<HR>";
print TMP "<B>$in{'name'} \n";
print TMP " <A HREF=mailto:$in{'address'}>
$in{'address'}</A></B>$date\n";
print TMP "<P> $text\n<!--POINTER-->\n";
}
Finally, if the line doesn't contain a special comment, we'll just copy it from the original to the temporary file:
else { print TMP $_; } # copy lines
}
Now we'll check that guestbook variable we set up in the loop. If the file didn't have the GUESTBOOK comment, it wasn't a GUESTBOOK file, and we'll exit here without updating the original file:
if (! defined $guestbook)
{ &err("not a Guestbook file!"); }
Finally, replace the old HTML file with the new version and remove the temporary file:
open(TMP,"<$tmp") || &err("Can't open tmp file.");
open(FILE,">$file") || &err("Can't open file $file: $!");
while(<TMP>) {
print FILE $_;
}
close(FILE);
close(TMP);
unlink "$tmp";
We're almost to the end. Now print the rest of the HTML response to finish up. Note that it contains a link to the original pathname of the guest book (as contained in the environment variable PATH_INFO), so that people can go back and see the result:
print "<H1>Thank you!</H1>";
print "<P>Your comment has been added to the ";
print "<A HREF=$ENV{'PATH_INFO'}>guestbook</A>\n";
print "</BODY></HTML>\n";
1;
The last part of the script is the subroutine that prints errors, in case any happened. I'll include it here so you can see what it does:
sub err {
local($msg) = @_;
print "$msg\n";
close FILE;
close TMP;
unlink "$tmp";
print "</BODY></HTML>\n";
exit;
}
Basically, if there is an error during processing, the err subroutine does the following:
Why stop with a guest book? The framework that I've described for the guest book could be extended into a Web-based conference system or a discussion board such as those provided by Usenet news.
Actually, this guest book script was written as part of a larger HTML conference system called htmlbbs, which you'll see in action in Chapter 28. With the framework for adding individual posts in place, adding a larger framework for multiple topics isn't that difficult.
In the previous chapter, you learned the technical aspects of CGI and how to make your programs interact with the Web server and browser through the CGI interface. In this chapter, we worked through four examples of forms and CGI scripts:
After this chapter, you should have a good background in how to turn your own ideas for forms into real interactive Web presentations.
The main thing you should realize is that CGI isn't any different from most programming tasks. With an understanding of your goals and what the user expects from your script, adding the extra information to make your program work with the Web is the easy part.
All the examples you explored in this chapter are available on the CD-ROM and on the Web site for this book at http://www.lne.com/Web/.
| Q | I really like those pages that have access counts on them such as, "You are the 15,643th person to visit this page since April 14." Can you do that with a CGI script? |
| A | You learned some about access counters in Chapter 15, " Putting It All Online," and there were some pointers to public access counters that work without CGI scripting. The answer to the actual question-can you do an access counter with a CGI script-is yes, but the easiest way to do it is actually with something called server-side inlcudes. You'll learn more about server-side includes and creating access counters using them in Chapter 27, "Web Server Hints, Tricks, and Tips." |
| Q | I can't get any of these Perl examples to work. Either I get blank results, or no matches are ever found, or I get wierd errors. What's going on here? |
| A | What's most likely happening is that you don't have cgi-lib.pl in the right place. cgi-lib.pl is a Perl library and, as such, has to be installed with your Perl installation with all your other Perl libraries, usually in the directory /usr/lib/perl. Putting it in your cgi-bin directory will not work-Perl will not be able to find it. Talk to your Webmaster or system adminstrator about getting this library installed in the right location so that you can run these scripts. |
| Q | Can you create a CGI script that will allow the input from a form to access a big database such as Oracle or Sybase? |
| A | Yes, you can. But writing CGI that can talk SQL is too complex for this book, so I suggest you talk with your database company or search a Web index for more information. Chapter 30, "Managing Larger Presentations and Sites," also has more information about databases and CGI. |