Chapter 18
Real-Life Examples III: Adding
Navigation and Automation
CONTENTS
You're about to learn about one of the facts of life about developing
Web pages. As new features are added to the HTML standards, the
first thing you want to do is add those new features to your pages.
Some of the things you learned in this section of the book incorporate
some of the latest and greatest enhancements to the HTML standard.
So, you'll get a crash training course in modifying some existing
pages to apply the features as well as adding some automation
to your pages with those bots you've been hearing so much about.

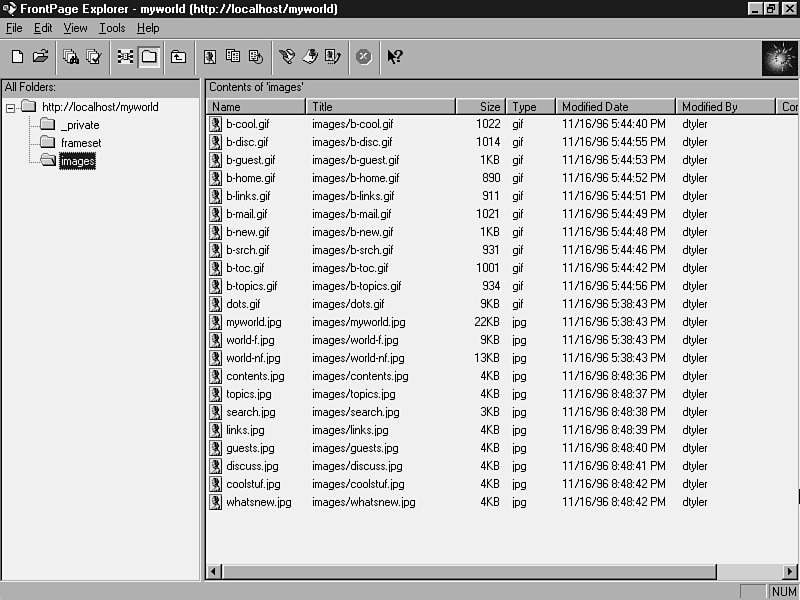
There are some header graphics furnished on the CD that accompanies
this book. You'll use these header graphics to replace the placeholder
image that appears on your main page and links page template.
To import the images to your web, follow these steps:
- From the FrontPage Explorer, choose View | Folder
View.
- From the All Folders view, select the images directory in
your Web.
- Choose File | Import. The Import File to FrontPage
Web dialog box appears.
- Click the Add File button. The Add File to Import List
dialog box appears.
- Locate the directory on the CD that contains the header graphics.
Highlight contents.jpg, coolstuf.jpg, discuss.jpg,
guests.jpg, links.jpg, search.jpg,
topics.jpg, and whatsnew.jpg.
- Click Open. The images appear in the Import File to
FrontPage Web dialog box.
- Click OK. The images are imported into the images folder in
your web, as shown in Figure 18.1.
Figure 18.1 : The header graphics are imported into your web's images directory.
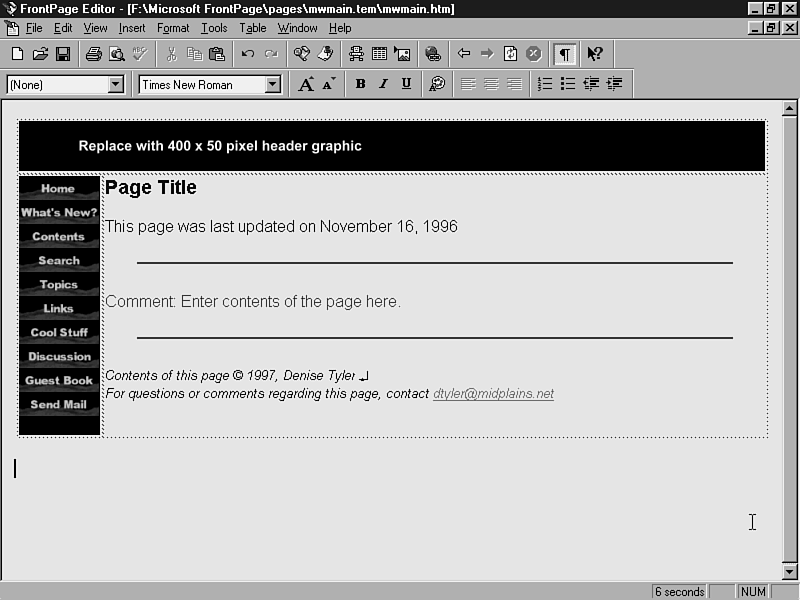
In Chapter 12, "Real-Life Examples II: Planning and Developing
a Site," you started a main page template that will be used
for the main pages in your web. You're going to add some items
to that template. Now that you know how to use Include and Timestamp
bots, they will be included in your template. You'll also add
a table in the template and place navigation buttons along the
left side of the table, as shown in Figure 18.2.
Figure 18.2 : The main page template now includes a table, navigation buttons, and a footer.
To complete your main page template, follow these steps:
- From the FrontPage Editor, choose File | Open
(Ctrl+O), or choose the Open button on the Standard toolbar. The
Open File dialog box appears.
- Click the Other Location tab. Choose the From File
radio button (default), and click the Browse button. The
Open File dialog box appears.
- Locate the template directory in which your main page template
appears. If you installed FrontPage to the default installation
directory, it will be located in the c:\Program Files\Microsoft
FrontPage\pages\mwmain.tem directory. Select mwmain.htm
and click Open. The page opens in the FrontPage Editor.
- Position the insertion point at the beginning of the page, before
the placeholder heading graphic.
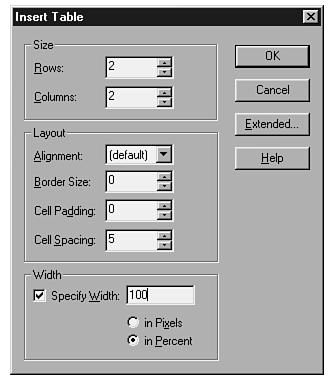
- Choose Table | Insert Table. The Insert Table
dialog box shown in Figure 18.3 appears.
Figure 18.3 : Add a table at the beginning of your main page template, and set its properties in the Insert Table dialog box.
| Rows: | 2 |
| Columns: | 2 |
| Alignment: | (default) |
| Border Size: | 0 |
| Cell Padding: | 0 |
| Cell Spacing: | 5 |
| Specify Width: | 100 in Percent
|
- Specify the following settings for the table:
- Click OK. The table appears on your page.
- Position your cursor at the left side of the table. Click
and drag to select both rows of cells.
- Press Alt+Enter. The Cell Properties dialog box shown in Figure
18.4 appears. Choose the following settings and click OK to return
to the FrontPage Editor.
Figure 18.4 : Select all the cells and assign properties in the Cell Properties dialog box.
| Horizontal Alignment: | Left
|
| Vertical Alignment: | Top |
| Specify Width: | Not checked
|
- Position the insertion point at the left of the first row
in the table, and click to select both cells.
- Choose Table | Merge Cells. The cells become
one large cell.
- Click the placeholder graphic for the heading to select it.
Choose Edit | Cut (Ctrl+X) to cut the graphic into
your clipboard.
- Choose Edit | Paste (Ctrl+V) to paste the graphic
into the first row of the table.
- Click and drag to select the remaining contents beneath the
table, and choose Edit | Cut (Ctrl+X) to cut the
contents into your clipboard.
- Choose Edit | Paste (Ctrl+V) to paste the contents
into the right cell in the second row.
- Position the insertion point at the end of the heading that
reads Page Title and press Enter. The insertion point
moves to the next line and is formatted as a Normal paragraph.
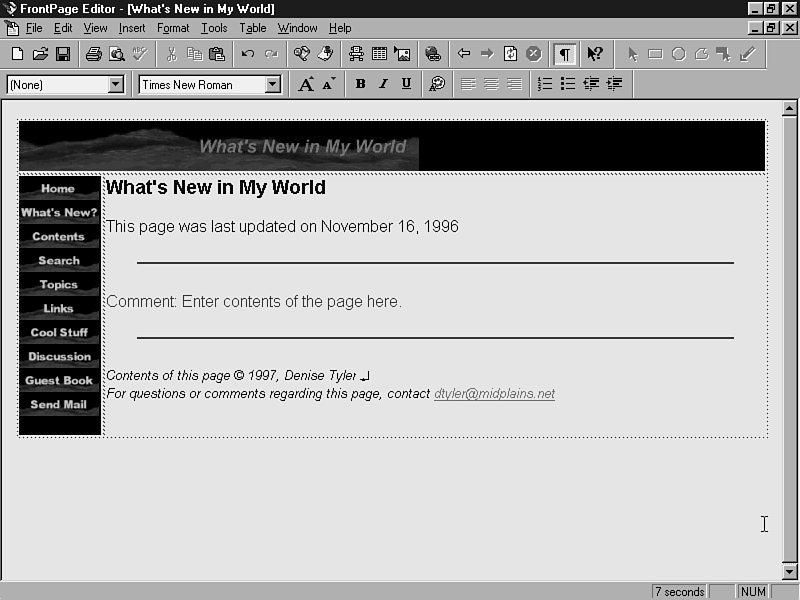
- Enter This page was last updated on followed by a
space. Then choose Insert | WebBot Component. The
Insert WebBot Component dialog box appears.
- From the Select a component list, double-click Timestamp.
The WebBot Timestamp Component Properties dialog box appears.
- In the Display field, the Date this page was last edited
radio button is selected by default. Leave this setting as it
is.
- Choose the Date Format and Time Format (if desired)
that you prefer for your timestamp from their respective drop-down
menus and click OK. The timestamp appears on your page as shown
in Figure 18.5.
Figure 18.5 : A timestamp will appear on each of the main pages in your web.
- Position the insertion point in the left cell in the second
row. Choose Insert | WebBot Component again. The
Insert WebBot Component dialog box appears.
- From the Select a component field, double-click Include.
The WebBot Include Component Properties dialog box appears.
- Click the Browse button. The Current Web dialog box
appears.
- Double-click the _private directory and then double-click
mainnav.htm. You return to the WebBot Include Component
Properties dialog box.
- Click OK. The navigation bar graphics appear in the table.
- Click inside the cell in which you just inserted the navigation
bar (there will be a blank space above the Include bot where you
can click). Right-click and choose Cell Properties from the pop-up
menu. Set the following properties, and click OK to return to
the FrontPage Editor.
| Background Color: | Black |
| Specify Width: | 80 pixels |
- Click inside the top cell. Right-click and choose Cell Properties
from the pop-up menu. From the Background Color drop-down
menu, choose Black, then click OK to return to the FrontPage Editor.
The top and left cells in the table now have a black background,
as shown in Figure 18.6.
Figure 18.6 : The top and left cells in the table now have a black background.
- You may find it difficult to place the insertion point anywhere
at the end of or after the second horizontal line in the right
cell of the table. This will occur if you don't have an extra
space after the horizontal line. If you are having this problem,
click on the horizontal line and use Ctrl+X to cut it into your
clipboard. Then complete the next two steps.
- Position the insertion point at the end of the comment that
reads Enter contents of the page here and press Enter.
You add a line to the contents in the cell.
- Position the insertion point immediately at the end of the
comment again, and paste the horizontal line into the first line
you added, using Ctrl+V. Now you should have an extra line after
the horizontal line.
- Click the line beneath the horizontal line. Choose Insert
| WebBot Component. The Insert WebBot Component dialog
box appears.
- Double-click Include. The WebBot Include Component Properties
dialog box appears.
- Click the Browse button. The Current Web dialog box
appears.
- Double-click the _private directory and double-click
it again to select footer.htm. From the WebBot Include
Components dialog box, click OK to return to the FrontPage Editor.
The footer appears on your page.
- Choose Edit | Select All (Ctrl+A). From the
Change Font drop-down menu, choose Arial.
- Choose File | Save to save the template back
into the template directory. Choose File | Close
to close the page.
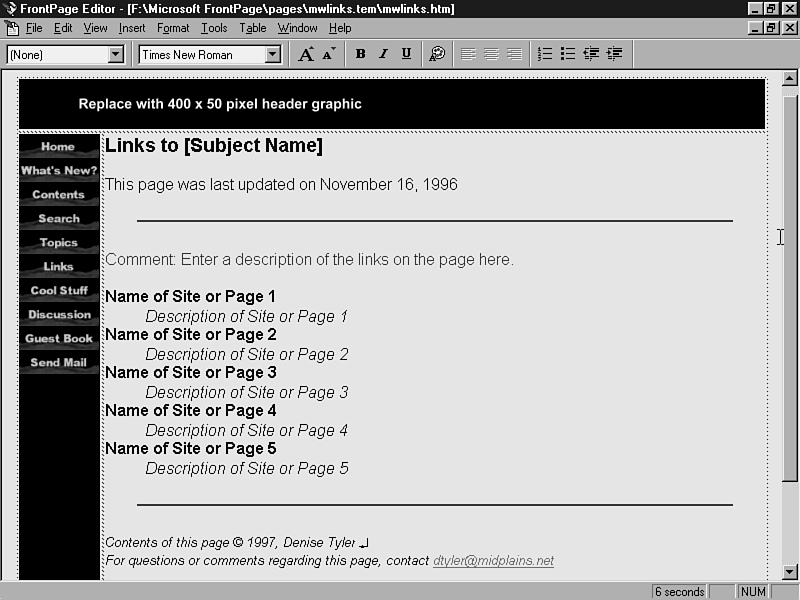
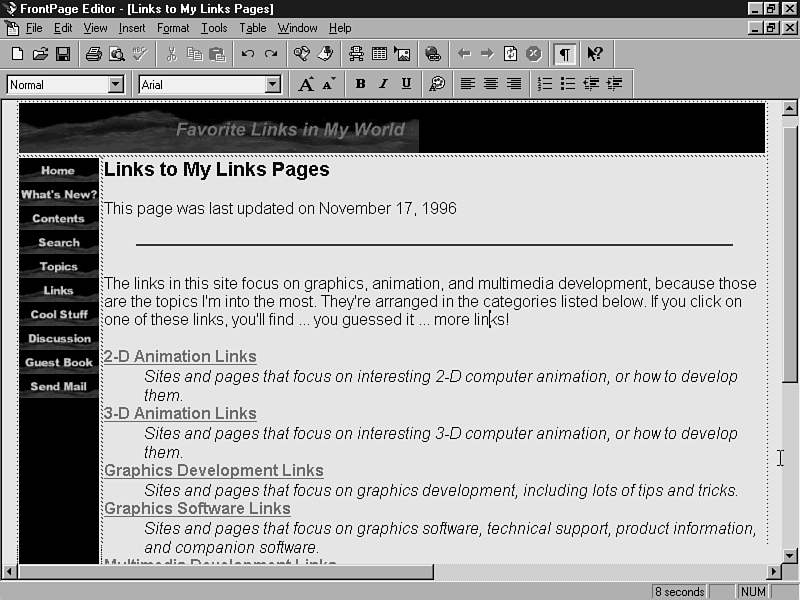
You'll complete the links page template using steps that are very
similar to those you just completed. There are some minor exceptions.
When you complete the links template, it should look as shown
in Figure 18.7.
Figure 18.7 : The links page template now contains a table, the same navigation buttons, and a footer.
- From the FrontPage Editor, choose File | Open
(Ctrl+O) or choose the Open button on the Standard toolbar. The
Open File dialog box appears.
- Click the Other Location tab. Choose the From File
radio button (default) and click the Browse button. The
Open File dialog box appears.
- Locate the template directory in which your links page template
appears. If you installed FrontPage to the default installation
directory, it will be located in the c:\Program Files\Microsoft
FrontPage\pages\mwlinks.tem directory. Select mwlinks.htm,
and click Open. The page opens in the FrontPage Editor.
- Position the insertion point at the beginning of the page, before
the placeholder heading graphic.
- Choose Table | Insert Table. The Insert Table
dialog box appears.
- Specify the following settings for the table:
| Rows: | 2 |
| Columns: | 2 |
| Alignment: | (default)
|
| Border Size: | 0 |
| Cell Padding: | 0 |
| Cell Spacing: | 5 |
| Specify Width: | 100 in Percent
|
- Click OK. The table appears on your page.
- Position your cursor at the left side of the table. Click
and drag to select both rows of cells.
- Press Alt+Enter. The Cell Properties dialog box appears. Choose
the following settings and click OK to return to the FrontPage
Editor.
| Horizontal Alignment: | Left
|
| Vertical Alignment: | Top
|
| Specify Width: | Not checked
|
- Position the insertion point at the left of the first row
in the table and click to select both cells.
- Choose Table | Merge Cells. The cells become
one large cell.
- Click the placeholder graphic for the heading to select it.
Choose Edit | Cut (Ctrl+X) to cut the graphic into
your clipboard.
- Choose Edit | Paste (Ctrl+V) to paste the graphic
into the first row of the table.
- Click and drag to select the remaining contents beneath the
table, and choose Edit | Cut (Ctrl+X) to cut the
contents into your clipboard.
- Choose Edit | Paste (Ctrl+V) to paste the contents
into the right cell in the second row.
- Position the insertion point at the end of the heading that
reads Page Title and press Enter. The insertion point
moves to the next line and is formatted as a Normal paragraph.
- Enter This page was last updated on followed by a
space. Then choose Insert | WebBot Component. The
Insert WebBot Component dialog box appears.
- From the Select a component list, double-click Timestamp.
The WebBot Timestamp Component Properties dialog box appears.
- In the Display field, the Date this page was last edited
radio button is selected by default. Leave this setting as it
is.
- Choose the Date Format and Time Format (if desired)
that you prefer for your timestamp from their respective drop-down
menus and click OK. The timestamp appears on your page.
- Position the insertion point in the left cell in the second
row. Choose Insert | WebBot Component again. The
Insert WebBot Component dialog box appears.
- From the Select a component field, double-click Include.
The WebBot Include Component Properties dialog box appears.
- Click the Browse button. The Current Web dialog box
appears.
- Double-click the _private directory and then double-click
mainnav.htm. You return to the WebBot Include Component
Properties dialog box.
- Click OK. The navigation bar graphics appear in the table.
- Click inside the cell in which you just inserted the navigation
bar. (There will be a blank space above the Include bot where
you can click.) Right-click and choose Cell Properties from the
pop-up menu. Set the following properties, and click OK to return
to the FrontPage Editor.
| Background Color: | Black
|
| Specify Width: | 80 pixels |
- Click inside the top cell. Right-click and choose Cell Properties
from the pop-up menu. From the Background Color drop-down
menu, choose Black, then click OK to return to the FrontPage Editor.
- You might find it difficult to place the insertion point anywhere
at the end of or after the second horizontal line in the right
cell of the table. This will occur if you don't have an extra
space after the horizontal line. If you are having this problem,
click the horizontal line and use Ctrl+X to cut it into your clipboard.
Then complete the next two steps.
- Position the insertion point at the end of the definition
list, and press Enter three times to break out of the definition
list. Press Enter again to add an extra line.
- Press the up arrow on your keyboard to move one line above
the last line in the table, and paste the horizontal line into
it using Ctrl+V. Now you should have an extra line after the horizontal
line.
- Click the line beneath the horizontal line. Choose Insert
| WebBot Component. The Insert WebBot Component dialog
box appears.
- Double-click Include. The WebBot Include Component Properties
dialog box appears.
- Click the Browse button. The Current Web dialog box
appears.
- Double-click the _private directory and double-click
again to select footer.htm. From the WebBot Include Components
dialog box, click OK to return to the FrontPage Editor. The footer
appears on your page.
- Choose Edit | Select All (Ctrl+A). From the
Change Font drop-down menu, choose Arial.
- Choose File | Save to save the template back
into the template directory. Choose File | Close
to close the page.
Now you'll use the main page template to create seven pages. While
you're creating the pages, you'll add the header graphics and
change the titles. This way, when you test the links in your frameset
later in the chapter, you'll be able to tell if they all work
properly. Figure 18.8 shows an example of one of the pages. You'll
add content to most of them in future tasks.
Figure 18.8 : Add the header graphics and revise the title for each of the main pages in your web.
To create the main pages in your web, follow steps 1-6 for each
of the pages listed below:
| TIP |
If you need to add additional header graphics of your own to this web, open the blankhdr.tga graphic from the CD in your favorite graphics editor. This is a truecolor version of the header graphic. Add the text to your header using Arial Bold
Italic, 18-point (antialiased if your graphics program allows). The color I used was Red 102, Green 102, and Blue 255 (the same color used for the link text in the Black Style Sheet). Save the header in jpg format with medium to high-quality compression.
|
- From the FrontPage Editor, choose File | New
(Ctrl+N). The New Page dialog box appears.
- From the Template or Wizard field, choose My World Main Page
Template and click OK. The page template appears in the FrontPage
Editor.
- Click the header placeholder graphic. It becomes surrounded
by a bounding box.
- Choose Insert | Image or click the Insert Image
button on the Standard toolbar. Double-click to select the images
folder and then double-click to select the appropriate header
graphic for the page that you are creating:
| What's New in My World: | whatsnew.jpg
|
| Contents in My World: | contents.jpg
|
| Search My World: | search.jpg
|
| Topics in My World: | topics.jpg
|
| Cool Stuff in My World: | coolstuf.jpg
|
| My World Discussion: | discuss.jpg
|
| Guests of My World: | guests.jpg
|
- Replace the Page Title heading with the appropriate page title
for your page, as follows:
What's New in My World
Contents in My World
Search My World
Topics in My World
Cool Stuff in My World
My World Discussion
Guests of My World
- Choose File | Save. In the Save As dialog box,
enter the text shown below in the left column in the Page Title
field and the URL shown in the right column in the Page URL field,
appropriate for the page you are creating:
| What's New in My World | whatsnew.htm
|
| Contents in My World | toc.htm
|
| Search My World | search.htm
|
| Topics in My World | topics.htm
|
| Cool Stuff in My World | coolstuf.htm
|
| My World Discussion | discwelc.htm
|
| Guests of My World | guests.htm
|
- Choose OK to save the page to your web.
The Links page template has several placeholders to create links
on it, if you recall from the previous Real-Life Examples chapter.
In this task, you'll create an initial links page that links to
all your categorized links pages. I'm sure the links you collect
will be different than mine, but you'll understand what you have
to do by comparing your example to the example shown in Figure
18.9.
Figure 18.9 : Create an initial links page that links to the categorized links pages in your web.
To create your links page:
- Choose File | New (Ctrl+N). The New Page dialog
box appears.
- From the Template or Wizard field, choose My World Links
Page Template and click OK. The page template appears in
the FrontPage Editor.
- Click the header placeholder graphic. It becomes surrounded
by a bounding box.
- Choose Insert | Image or click the Insert Image
button on the Standard toolbar. Double-click to select the images
folder and then double-click again to select links.jpg.
The image appears on your page.
- Revise the page title to read Links to My Links Pages.
- Scroll down to the comment on the page. To replace the comment,
just click on it and begin typing. Enter an introduction to the
contents of the page.
- Now, proceed to edit the definition list on the links page.
List the same topics you entered in your Links TOC Page in Chapter
12. Add a description of the topic, as shown in Figure 18.9.
- Create links to the new links pages, using the My World Links
Page template for the new pages as well.
- Choose Edit | Select All and select Arial font
from the Change Font drop-down menu, if your new text appears
in a different font in any area.
- Choose File | Save (Ctrl+S), or click the Save
button in the Standard toolbar. The Save As dialog box appears.
- In the Page Title field, enter Links to My Links Pages. In
the File path within your FrontPage Web field, enter links.htm.
- Choose OK. The page is saved to your web.
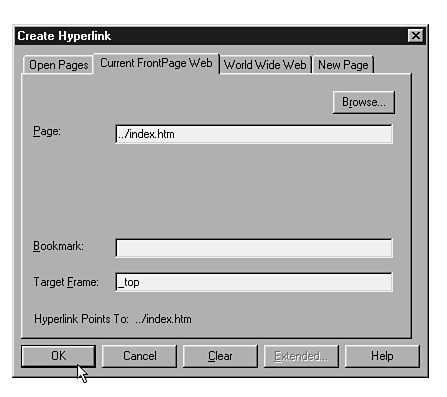
| NOTE |
Now for an important side note. No doubt, your links pages will take the user to other people's sites rather than your own. You also need to remember that your links pages can be displayed in frames when viewed in a frame-compatible browser. When you
create a link to any external site from a page that may be displayed in frames, you'll need to assign a Target Frame of _top, as shown in Figure 18.10.
|
Figure 18.10 : When you create links to pages that exist in other sites on the World Wide Web, assign a Target Frame of _top to the link.
You can complete the tasks for your Home Page (Not Framed), shown
in Figure 18.11, and Home Page (Framed), shown in Figure 18.12.
These still appear in your To Do List. We'll do the non-framed
version of the home page first, since it exists in the main directory
of your web. This automatically creates the new pages to which
it links in the main directory also. The steps to complete the
hotspots on both of these pages are almost identical.
Figure 18.12 : You'll add the same hotspots to the framed version of the home page. The only difference is that the hotspots are smaller.
Figure 18.11 : The home page (non-framed) contains links to the main pages in your web.
To add the hotspots, complete the following steps for Home Page
(Not Framed), located in the main folder in your web, and Home
Page (Framed), located in your web's frameset subfolder:
- From the FrontPage Editor, choose Tools | Show To Do
List. The To Do List opens.
- Highlight the task that reads Complete Home Page (Not
Framed) and then click the Do Task button. The second
time you go through the steps, highlight Complete Home Page
(Framed) and click Do Task. The page opens in the
FrontPage Editor.
- Click the image to enable the Image toolbar. Select the Rectangle
tool, and click and drag to draw a rectangular hotspot around
the text on the image that reads What's New? The Create
Hyperlink dialog box appears when you release the mouse.
- Select the Current Web tab if it is not already selected.
Click the Browse button. Double-click whatsnew.htm
and choose OK to return to the FrontPage Editor.
- Select the Rectangle tool again. Draw a rectangular hotspot
around the Contents text. Use the procedure outlined in step 4
to create a link to index.htm.
- Select the Rectangle tool again. Draw a rectangular hotspot
around the Search text. Use the procedure outlined in step 4 to
create a link to search.htm.
- Select the Rectangle tool again. Draw a rectangular hotspot
around the Topics text. Use the procedure outlined in step 4 to
create a link to topics.htm.
- Select the Rectangle tool again. Draw a rectangular hotspot
around the Links text. Use the procedure outlined in step 4 to
create a link to links.htm.
- Select the Rectangle tool again. Draw a rectangular hotspot
around the Cool Stuff text. Use the procedure outlined in step
4 to create a link to coolstuf.htm.
- Select the Rectangle tool again. Draw a rectangular hotspot
around the Discussion text. Use the procedure outlined in step
4 to create a link to discwelc.htm.
- Select the Rectangle tool again. Draw a rectangular hotspot
around the Guest Book text. Use the procedure outlined in step
4 to create a link to guests.htm.
- Select the Rectangle tool again. Draw a rectangular hotspot
around the Send Mail text. The Create Hyperlink dialog box appears.
- Select the World Wide Web tab. From the Hyperlink Type
drop-down menu, choose mailto:.
- In the URL field, append your e-mail address to the
mailto: protocol. It should look similar to the following:
mailto:yourname@yourmailserver.com
- Choose OK to return to the FrontPage Editor. Your page should
now look as shown in Figure 18.12 or 18.13.
- Choose File | Save (Ctrl+S) or click the Save
button on the Standard toolbar to save your page to the web. FrontPage
asks if you want to mark the task in the To Do List as completed.
Answer Yes.
Now that you have your main page template and links page template
done, you can add the links to your main navigation bar. This
is the group of 10 buttons that appears in the left cell of the
table in your page templates. I know what you're thinkingÉ"Oh
no! Do I have to add links to all those new pages I created from
the templates, too?" The answer is "No, you don't (phew!)."
You only need to make the changes to the mainnav.htm
page, located in your _private directory. The Include
bot in your template is passed on to the pages in your web when
you create the new pages. Each page that has the included navigation
bar placed on it is updated automatically.
To complete the main navigation bar page, follow these steps:
- From the FrontPage Editor, choose File | Open
(Ctrl+O), or choose the Open button from the Standard toolbar.
The Open File dialog box appears.
- Double-click the _private folder, and then double-click
mainnav.htm to open the page. The navigation bar appears
in the FrontPage Editor.
- Click the Home button and choose the Create or Edit Link button
on the Standard toolbar. The Create Hyperlink dialog box appears.
- Select the Current FrontPage Web tab if it is not already
selected. Then choose the Browse button to open the Current
Web dialog box.
- Double-click index.htm. You return to the Current
FrontPage Web tab. Don't worry if you see two dots and a forward
slash before index.htm in the Page field. This means
that the link has to go back one directory from the _private
directory to link to the home page.
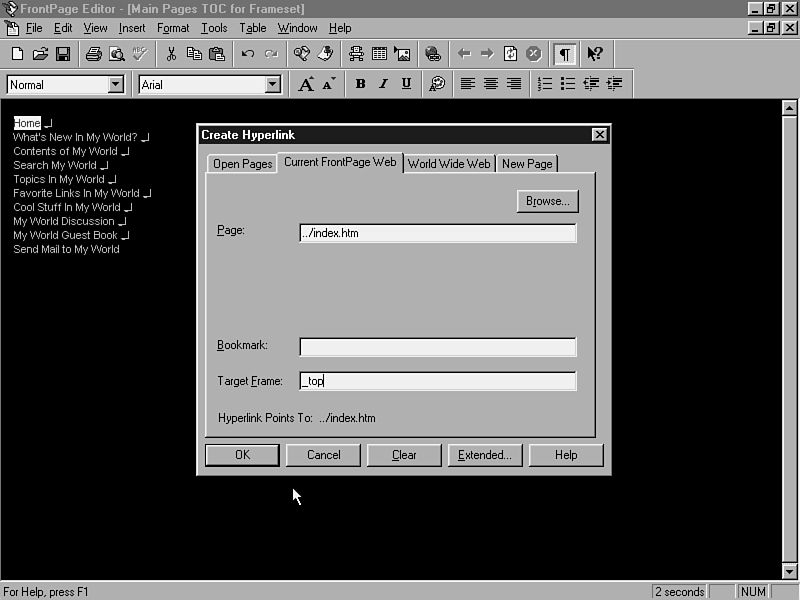
- Now, for the target frame for this link. If you recall, index.htm
is the Welcome Splash Screen that gives the user the opportunity
to choose frames or not. If the user goes into your site using
frames, he or she might decide later that it would be better to
go without them. Unless you specify a special target frame, called
_top, the Welcome Splash Screen will display in the frameset.
Enter _top in the Target Frame field in the Current
FrontPage Web tab, as shown in Figure 18.13. Then choose OK to
return to the FrontPage Editor.
Figure 18.13 : Assign a target frame of _top to the link that goes to the Welcome splash screen.
- Repeat steps 3 through 5 for the buttons shown below, creating
links to the pages in your current web. You won't need to add
a target frame for these pages. Choose OK to return to the FrontPage
Editor after you choose the page:
| What's New button | whatsnew.htm
|
| Contents button | index.htm
|
| Search button | search.htm
|
| Topics button | topics.htm
|
| Links button | links.htm
|
| Cool Stuff button | coolstuf.htm
|
| Discussion button | discwelc.htm
|
| Guest Book button | guests.htm
|
- Click the Send Mail button graphic and select the Create or
Edit Link button on the Standard toolbar.
- Select the World Wide Web tab. From the Hyperlink Type
drop-down menu, choose mailto:.
- In the URL field, append your e-mail address to the
mailto: protocol. It should look similar to the following:
mailto:yourname@yourmailserver.com
- Choose OK to return to the FrontPage Editor. Then, choose
File | Save (Ctrl+S) or click the Save button on
the Standard toolbar to save your page to the web. Close the page
using the File | Close command.
The Main Pages TOC for Frameset page, shown in Figure 18.14, is
the source URL page for the contents frame in your frameset.
You probably know the procedures to create the links by heart
at this point, but I'll run them one more time. Even though it's
probably set in stone, I'll add more cement.
Figure 18.14 : The Main Pages TOC for Frameset page links to the pages in the main section of your web.
To add the pages to your Main Pages TOC for Frameset page, follow
these steps:
- From the FrontPage Editor, choose File | Open
(Ctrl+O) or click the Open button on the Standard toolbar. The
Open File dialog box appears.
- Double-click to select the frameset folder and double-click
frmnpgtoc.htm to open the file.
- Select the line that reads Home. Click the Create
or Edit Hyperlink button on the Standard toolbar. The Create Hyperlink
dialog box appears.
- Select the Current FrontPage Web tab and create a link to
index.htm, assigning it a Target Frame of _top.
- Select the line that reads What's New in My World.
Click the Create or Edit Hyperlink button on the Standard toolbar.
The Create Hyperlink dialog box appears. Select the World Wide
Web tab and create a link to whatsnew.htm. In the Target
Frame field, enter main.
- In a similar manner, repeat steps 3 and 4 to create the remaining
links on the page. Assign each link a target frame of main.
| Contents of My World | index.htm
|
| Search My World | search.htm
|
| Topics in My World | topics.htm
|
| Favorite Links in My World | links.htm
|
| Cool Stuff in My World | coolstuf.htm
|
| My World Discussion | discwelc.htm
|
| My World Guest Book | guest.htm
|
- For the Send Mail button, use the World Wide Web tab to create
a hyperlink to your E-mail address. Choose a Hyperlink
Type of mailto: and append your e-mail address to the
mailto: prompt in the URL field. No target frame is necessary
here.
- Choose File | Save (Ctrl+S) or click the Save
button on the Standard toolbar to save your page to the web.
In the section titled "Creating Your Links Pages," earlier
in this chapter, you created a page that links to the categorized
links pages in your web. The page shown in Figure 18.9 is displayed
when users are not viewing your site with frame-compatible browsers.
The Main Links TOC for Frameset, shown in Figure 18.15, takes
the place of the other page when viewing your site in frames.
Links to the same pages appear on both versions.
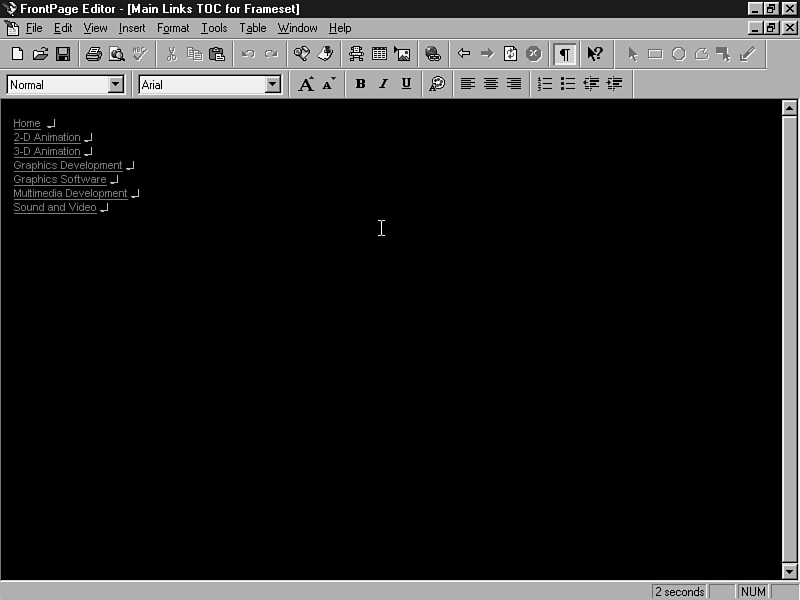
Figure 18.15 : The Main Links TOC for Frameset page links to the categorized links pages in your web.
Your Links Pages TOC will differ from mine, but you should be
able to determine what you need to add by following this example:
- From the FrontPage Editor, choose File | Open
(Ctrl+O) or click the Open button on the Standard toolbar. The
Open File dialog box appears.
- Double-click the frameset folder and then double-click
frlinktoc.htm. The page opens in the FrontPage Editor.
- Select the line that reads Home. Click the Create
or Edit Hyperlink button on the Standard toolbar. The Create Hyperlink
dialog box appears.
- Choose the Current FrontPage Web tab. Double-click index.htm.
You return to the Create Hyperlink dialog box.
- In the Target Frame field, enter _top.
- For the link category pages, highlight the text for the page
to which you want to link. Click the Create or Edit Link button.
The Create Hyperlink dialog box appears.
- Click the Browse button. The Current Web dialog box
appears. Double-click the page in your web to which you want to
link. You return to the Create Hyperlink dialog box.
- In the Target Frame field for each of the Links category pages,
enter main. This loads your links pages into the main
frame of the frameset.
- Choose OK. You create a link to a page in your web.
- After all your links are complete, choose File | Save
(Ctrl+S) or click the Save button on the Standard toolbar. The
page is saved to your web.
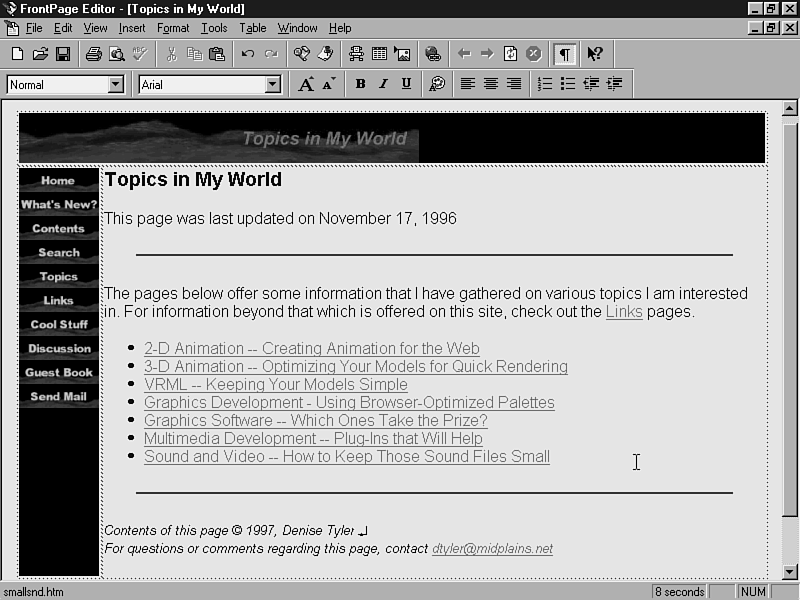
The Topics page is similar to the Links page in that it is the
gateway to all the topics you want to discuss on your web. Whereas
the Links pages link to other sites that talk about given topics,
the Topics page links to pages where you can show your expertise
on one or more subjects. An example of a Topics page is shown
in Figure 18.16. You can create yours in a similar manner and
link to other pages in your web where you discuss the topics in
more detail. The header graphics for the topics pages is topics.jpg,
which you have already imported into your web.
Figure 18.16 : The Topics Page links to pages in your web that show your expertise in various topics of interest.
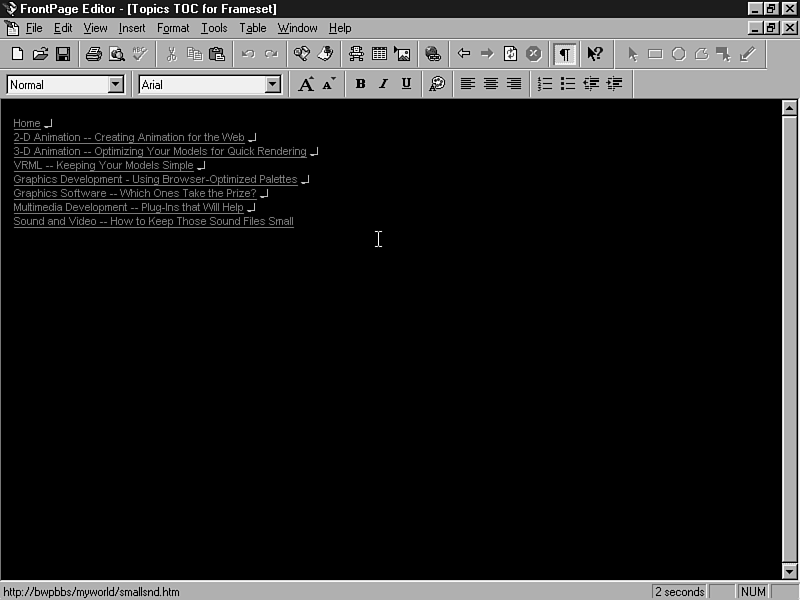
You'll also need to create a Topics TOC for your frameset, similar
to that shown in Figure 18.17. Actually, it will be an easy task.
You'll notice that the Topics page shown in the preceding figure
listed the topics pages in a bulleted list. You can use what you
already have on the Topics page to create the Topics TOC for Frameset
page.
Figure 18.17 : The Topics TOC Page links to the same pages listed on the Topics page.
Briefly, the steps to create your Topics TOC page are as follows:
- Highlight all the items in the bulleted list.
- Copy the selection into your clipboard.
- Create a new page and paste the contents of the clipboard
into it.
- Use the Format | Bullets and Numbering command
to remove the bulleted list formatting. (Select the style in the
Bullets tab that shows no bullets.)
- Add line breaks and delete extra spaces between the items.
- Reduce the text size by clicking the Decrease Font Size button
on the Format toolbar twice.
- Assign _private/frstyle.htm for the background and
colors for the page, using the File | Page Properties
command.
- Position the insertion point inside the text of each of the
links, and select the Create or Edit Hyperlink button. For each
of the links on the page, assign a Target Frame of main
in the Edit Hyperlink dialog box.
- Position the insertion point at the beginning of the first
line and press Enter. The list moves down one space.
- Click to position the insertion point at the top of the page
(where the first line used to be) and enter Home. Then
press Shift+Enter to insert a normal line break. Press the Delete
key to delete the extra space between the items.
- Highlight the Home text and click the Create or Edit
Hyperlink button on the Standard toolbar. From the Create Hyperlink
dialog box, select the Current FrontPage Web tab.
- Click the Browse button and then double-click to select
index.htm. You return to the Create Link dialog box.
- In the Target Frame field, enter _top. Then
choose OK to return to the FrontPage Editor.
- Choose File | Save (Ctrl+S) or click the Save
button to save the page with a title of Topics TOC for Frameset,
and a URL of topictoc.htm. Move the page into your frameset
directory.
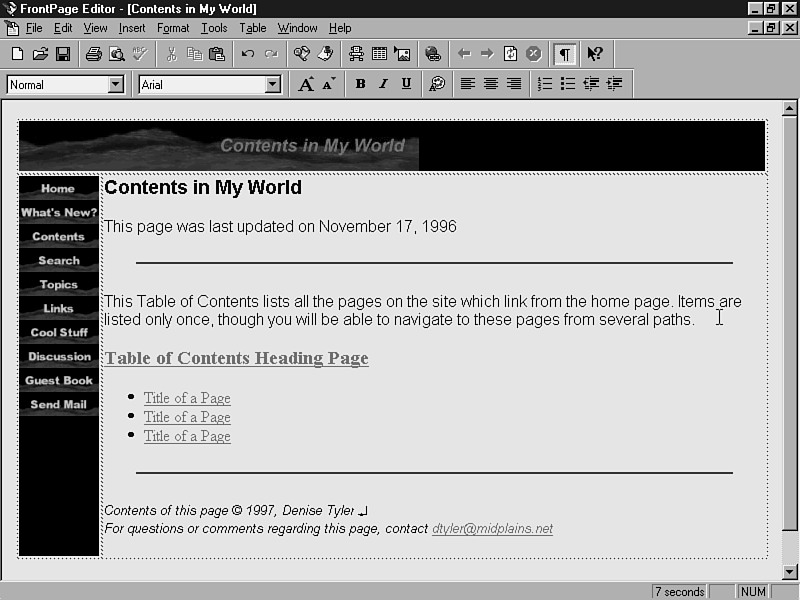
You have your Table of Contents page partly done. Now you'll add
the Table of Contents bot to it, as shown in Figure 18.18. You
have several pages created already that you'll be able to see
in the Table of Contents when you open it up in a browser.
Figure 18.18 : The Contents page now includes a Table of Contents bot which lists all the pages that are hierarchically linked to your Welcome Splash Screen page.
To complete the Table of Contents page, follow these steps:
- From the FrontPage Editor, choose File | Open
(Ctrl+O) or click the Open button on the Standard toolbar. The
Open File dialog box appears.
- Double-click index.htm to open it. It appears
in the FrontPage Editor.
- Click the comment that reads "Enter contents of the page
here" to highlight it. Enter text to replace the comment.
Enter a brief description of the con-tents of your site, or a
general message about what the Table of Contents represents.
- Choose Insert | WebBot Component. The Insert
WebBot Component dialog box appears.
- Choose Table of Contents and click OK. The WebBot Table of
Contents Component Properties dialog box appears.
- In the Page URL for Starting Point of Table, leave
the setting at its default of index.htm.
- In the Heading Size field, choose 3.
- Select Show each page only once. Deselect the other
two options.
- Choose OK. The Table of Content bot appears on your page.
You will not see a listing of pages in the FrontPage Editor, but
if you choose File | Preview in Browser, you'll
see all pages linked from the Welcome Splash Screen.
- Double-click the Timestamp bot at the top of the page. The
WebBot Timestamp Component Properties dialog box appears. Select
the Date this page was last automatically updated radio
button and choose OK to return to the FrontPage Editor.
- Choose Edit | Select All and select Arial from
the Change Font drop-down menu on the Format toolbar.
- Choose File | Save (Ctrl+S) or click the Save
button on the Standard toolbar. The Table of Contents page is
saved to your web.
Now you're going to complete the frameset that pulls all of these
contents together. This frameset will place the main pages in
your web within a large frame at the left side of the frameset.
The contents pages will be located in a narrow frame at the right
side of the page, and the links to the main sections in your web
will appear at the bottom of the page.
To create your frameset, follow these steps:
- From the FrontPage Editor, choose File | New
(Ctrl+N). The New Page dialog box appears.
- From the Template or Wizard field, select Frames Wizard and
choose OK. The Frames Wizard Choose Technique panel appears.
- Select Make a custom grid and choose Next. The
Frames Wizard Edit Frameset Grid panel appears.
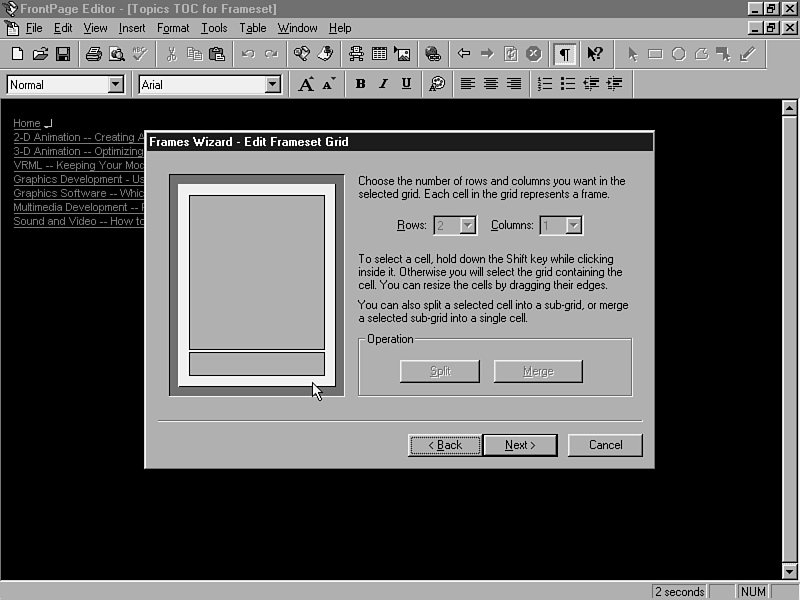
- Specify 2 Rows and 1 Column for your frameset.
- Adjust the divider between the two rows so that the narrower
row is located at the bottom. To do this, position your mouse
over the division line until you see an up and down arrow cursor.
Then click and drag to bring the division line nearer to the bottom
of the preview. Your frame preview should now look as shown in
Figure 18.19.
Figure 18.19 : Move the divider toward the bottom of the frameset in the preview window.
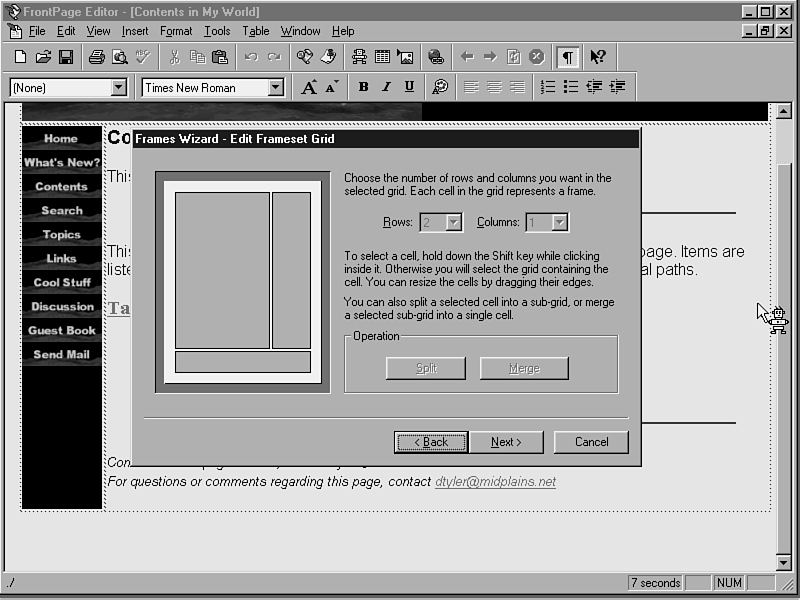
- Shift-click to select the larger upper frame in the preview.
Click the Split button. The frame splits into 2 rows and
2 columns.
- Change the Rows setting to 1.
- Drag the column divider in the larger cell closer to the right
side of the frameset preview. Your frameset grid should now look
as shown in Figure 18.20.
Figure 18.20 : The upper frame is split, and the dividers are adjusted.
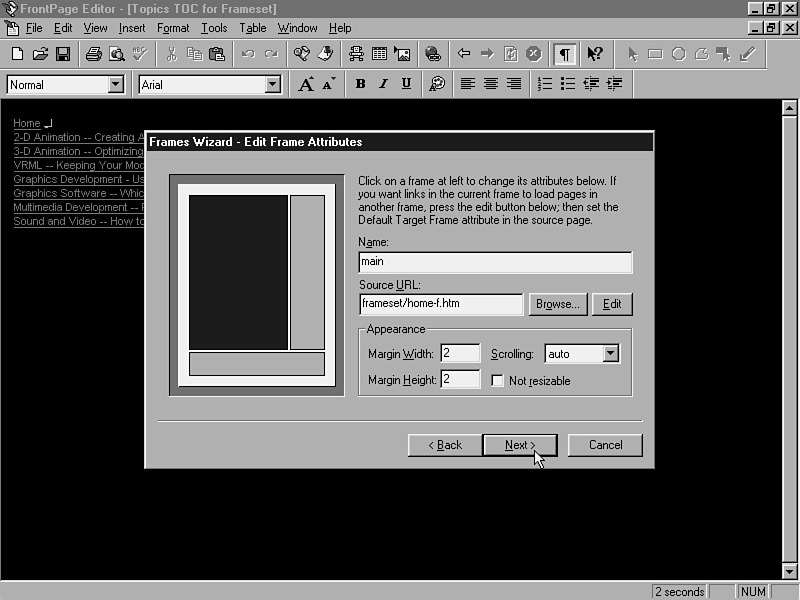
- Click Next. The Frames Wizard Edit Frame Attributes
Panel appears.
- Click the large frame in the top row. Enter the following
values, as shown in Figure 18.21:
Figure 18.21 : Assign the frame name, source URL, and margin settings for each frame in the Edit Frame Attributes panel.
| Name: | main
|
| Source URL: | Click Browse button and choose Home Page (Framed) from the HTML Page tab in the Choose Source URL dialog box. Click OK to return to the Frames Wizard.
|
| Margin Width: | 2 |
| Margin Height: | 2 |
| Scrolling: | auto |
| Not resizable: | Leave unchecked.
|
- Click the narrower frame in the top row. Enter the following
values:
| Name: | contents
|
| Source URL: | Click Browse button and choose Main Pages TOC for Frameset from the HTML Page tab in the Choose Source URL dialog box. Click OK to return to the Frames Wizard.
|
| Margin Width: | 2 |
| Margin Height: | 2 |
| Scrolling: | auto |
| Not resizable: | Leave unchecked.
|
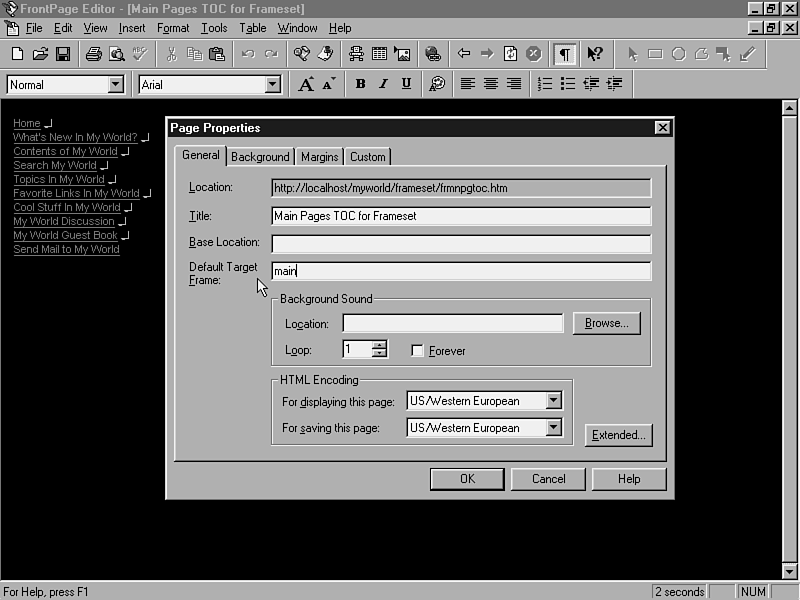
- Click the Edit button. The Main Pages TOC for Frameset
opens in the FrontPage Editor.
- Choose File | Page Properties. The Page Properties
dialog box appears.
- In the Default Target Frame field, enter main,
as shown in Figure 18.22. When the user clicks the links that
appear on this page, changes occur in the frameset's main
frame. Choose OK to return to the FrontPage Editor. Then choose
File | Save to save the page to your web.
Figure 18.22 : Assign the Main Pages TOC for Frameset page a default target frame of main.
- Click the Frames Wizard button in your taskbar to return to
the Frames Wizard Edit Frame Attributes panel.
- Click the bottom frame in the preview. Assign the following
values:
| Name: | sections
|
| Source URL: | Click Browse button and choose Main Section TOC for Frameset from the HTML Page tab in the Choose Source URL dialog box. Click OK to return to the Frames Wizard.
|
| Margin Width: | 2 |
| Margin Height: | 2 |
| Scrolling: | auto |
| Not resizable: | Leave unchecked.
|
- Click the Edit button. The Main Section TOC for Frameset
opens in the FrontPage Editor.
- Choose File | Page Properties. The Page Properties
dialog box appears.
- In the Default Target Frame field, enter contents,
as shown in Figure 18.23. When the user clicks the links that
appear on this page, changes occur in the frameset's contents
frame. Choose OK to return to the FrontPage Editor. We'll add
the links to this page in the next task.
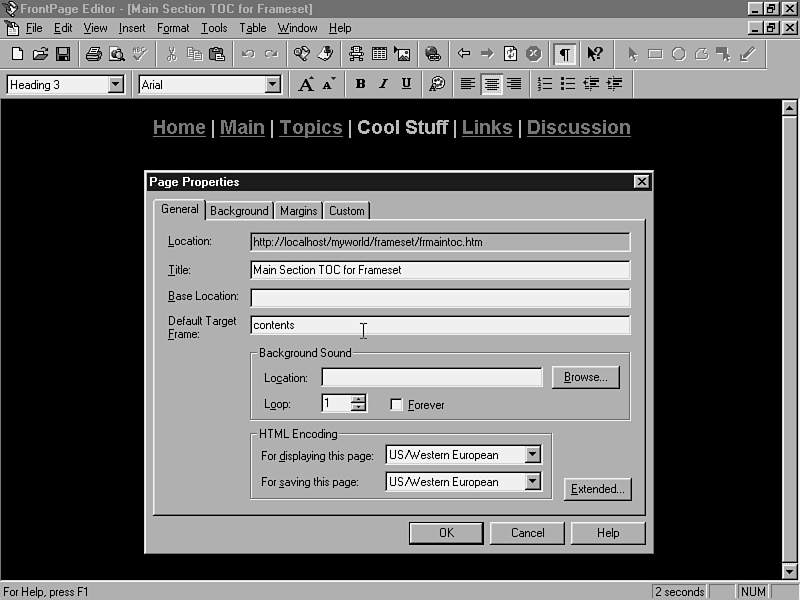
Figure 18.23 : Assign the Main Section TOC for Frameset page a default target frame of contents.
- Click the Frames Wizard button in your taskbar to return to
the Frames Wizard Edit Frame Attributes panel.
- From the Frames Wizard Edit Frame Attributes panel, click
Next. The Frames Wizard Choose Alternate Content panel
appears.
- In the Alternate Page URL field, click the Browse
button. Select Home Page (Not Framed), and choose OK.
You return to the Frames Wizard.
- Click Next to continue. The Frames Wizard Save Page
panel appears. In the Title field, enter Frameset for
My World. In the URL field, enter frameset.htm.
- Click Finish. The frameset is saved to your web.
- Now that the frameset is complete, you can edit the link on
the Welcome Splash Screen to point to it. From the FrontPage Editor,
choose File | Open (Ctrl+O) or click the Open button
on the Standard toolbar. The Open File dialog box appears.
- Select index.htm (Welcome to My World) and choose
OK. The Welcome Splash Screen appears on your page.
- Click the image to enable the hotspots and click again to
select the "I like frames" hotspot, as shown in Figure
18.24. Click the Create or Edit Hyperlink button on the Standard
toolbar. The Edit Hyperlink dialog box appears, opened to the
Current FrontPage Web tab.
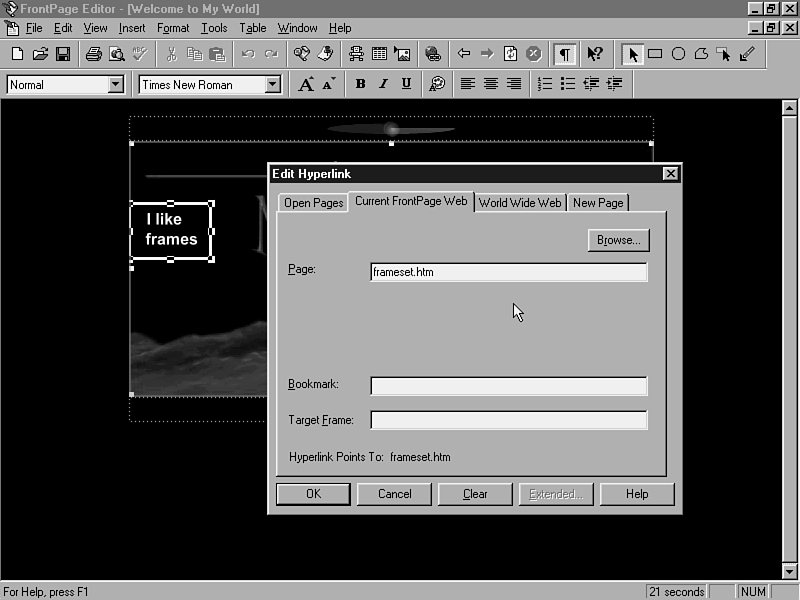
Figure 18.24 : Edit the I like frames hotspot on the Welcome Splash Screen to link to the new frameset.
- Click the Browse button. Select frameset.htm
and choose OK. You return to the Edit Hyperlink dialog box. Choose
OK again to return to the FrontPage Editor.
- In a similar manner, repeat steps 27 and 28 to change the
"I like frames" text link beneath the table to point
to the frameset.htm page in your current web.
- Choose File | Save (Ctrl+S) or click the Save
button on the Standard toolbar. The page is saved to your web.
You can add some, but not all, of the links to the Main Section
TOC for Frameset, shown in Figure 18.25. This page appears at
the bottom frame in the frameset, and links to the TOC sections
of the frameset.
Figure 18.25 : The Main Section TOC page links to the pages that appear in the contents frame of your frameset. In addition, a Home link takes the user back to the Welcome Splash Screen, and a Discussion link takes the user
to the discussion welcome page.
To complete the links, follow these steps:
- If you still have the Main Section TOC for Frameset opened
in the FrontPage Editor, switch to it now by selecting the page
from the Window menu in the FrontPage Editor. If the page
is no longer open, choose File | Open to open the
page.
- Highlight the text that reads Home and click the Create or
Edit Hyperlink button. The Create Hyperlink dialog box appears.
- Select the Current FrontPage Web tab. Use the Browse
button to select index.htm. In the Target Frame
field, enter a target frame of _top. Click OK to return
to the FrontPage Editor.
- Highlight the text that reads Main. Click the Create or Edit
Hyperlink button on the Standard toolbar. The Create Hyperlink
dialog box opens. Select the Current FrontPage Web tab. Double-click
the frameset folder and then double-click frmnpgtoc.htm
(Main Pages TOC for Frameset). You return to the Create Hyperlink
dialog box.
- In the Target Frame field, enter contents.
Choose OK to return to the FrontPage Editor.
- If you have your Topics TOC for Frameset page done, repeat
steps 4 and 5 to create a link to it, using the Topics text in
the navigation bar. Assign it a Target Frame of contents.
- Repeat steps 4 and 5 when you complete your Cool Stuff TOC
for frameset (more on this in Chapter 25, "Real-Life Examples
IV: Adding Interactivity"). Assign it a Target Frame
of contents.
- Repeat steps 4 and 5 for the Link text, creating a link to
frlinktoc.htm in the frameset folder. Assign it a Target
Frame of contents.
- Select the text that reads Discussion. Click the Create or
Edit Hyperlink button on the Standard toolbar. The Create Hyperlink
dialog box appears.
- Choose the Current FrontPage Web tab. Click the Browse
button, and double-click to select discwelc.htm (My World
Discussion). You return to the Create Hyperlink dialog box.
- In the Target Frame field, enter main. This
places the Discussion Welcome page in the main frame of the frameset.
Choose OK to return to the FrontPage Editor.
- Choose File | Save (Ctrl+S) or select the Save
button on the Standard toolbar to save the page to your web.
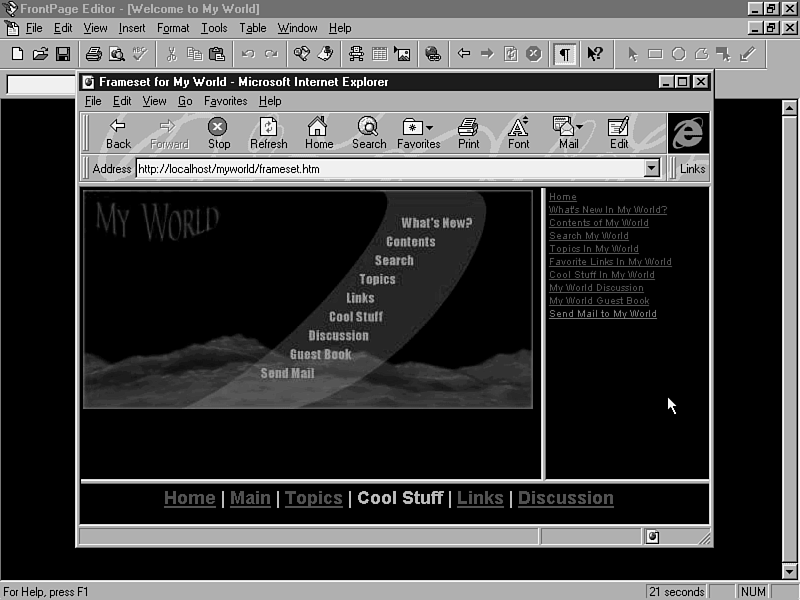
To test your frameset, open index.htm (Welcome to My
World) in the FrontPage Editor. Then choose the File |
Preview in Browser command. Select a browser that supports
frames from the Browser list. Choose the Window Size you
want to preview the pages in and click Preview. The Splash
screen opens in the browser, as shown in Figure 18.26.
Figure 18.26 : Preview your frameset in different browsers to test the links.
- To test the frameset, choose the "I like frames"
link. Your frameset should appear.
- To test the links without using the frameset, choose the "I
hate frames" link, or preview the pages in a browser that
does not support framesets. The Home Page (Not Framed) appears
in the browser.
I'm going to give you some creativity homework in this chapter.
You have your What's New page started already, but I'll let you
decide what you want it to look like, and what pages you want
to include on it now. Add some animation, or a What's New icon,
to point out the new items on your site. As you add new pages
to your site, add them to your What's New page.
Many of the features you added on the pages in this chapter are
fairly new to the Web. You designed two page templates and created
new pages from them. You learned how to use tables and frames
to enhance your page layout. You configured Timestamp, Include,
and Table of Contents bots that streamline revisions to your web.
You designed the navigation system that will be used throughout
your web. Finally, you designed a frameset of your own and configured
the links to place pages in different frames in the frameset.
I'd say you've come a long way!
In the following section, you'll learn a lot about forms and the
many ways you can configure them. You'll also learn about some
of the hottest technologies on the Web and how you can use FrontPage
to implement them.
- See Chapter 19, "Can We Talk?," to learn how to
add a discussion group to your web.
- See Chapter 20, "Quick and Easy Forms," to learn
how to generate forms using FrontPage's Form Wizard. What a great
way to create a form!
- See Chapter 21, "Fields-The Building Blocks of Forms,"
to learn how to edit and validate the form fields on your pages.
- See Chapter 22, "Runtime Bots-The Heartbeat of FrontPage
Forms," to learn how to assign form handlers to the forms
so that they will work properly when they are out on the Web.
- See Chapter 23, "Java and Plug-Ins," to learn how
to add these hot technologies using FrontPage.
- See Chapter 24, "ActiveX and VBScript," to learn
how to configure ActiveX controls and write scripts for them.
| Q: | Can I create any kind of template I want for my Webs?
|
| A: | Sure you can! You might not want to do this for page styles you think you'll use only once in a while, but for pages you use repeatedly (section pages, links pages, and so on), templates help
maintain a degree of consistency in the look of your web, while saving you time in the process.
|
| Q: | You created two versions of the home page. Can you create one version, and then resize the graphic according to which view the user opens the home page in?
|
| A: | You can use the same home page whether you're viewing the site in frames or without, if you like. To do so, edit the link on the Welcome Splash Screen to open the smaller framed version of the
home page instead. Though you can configure a graphic to resize automatically, the hotspots on the page won't be resized with it and won't work right.
|


