


|
Image maps are a special kind of clickable image. Usually, when you embed an image inside a link, clicking anywhere on that image goes to one single location. Using image maps, you can go to different locations based on where inside the image you clicked. In this chapter you'll learn all about image maps and how to create them, including:
In Chapter 7, "Using Images, Color, and Backgrounds," you learned how to create an image that doubles as a link, simply by including the <IMG> tag inside a link (<A>) tag. In this way, the entire image becomes a link. You could click the image, the background, or the border, and you'd get the same effect.
In image maps, different parts of the image activate different links. By using image maps, you can create a visual hyperlinked map that links you to pages describing the regions you click. Or you can create visual metaphors for the information you're presenting: a set of books on a shelf or a photograph in which each person in the picture is individually described.
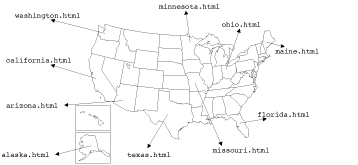
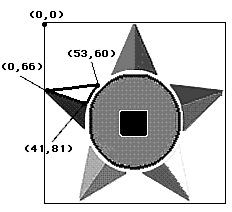
Figure 17.1 : Image maps: different places, different links.
| New Term |
Image maps are special images which have different areas that point to different link locations. Where you go on the site is determined by the place on the image where you click the mouse. |
Traditionally, image maps are created by using a special program that runs on the server. Such image maps are referred to as server-side image maps.
| New Term |
Server-side image maps are implemented using an image displayed by the client and a program that runs on the server. |
When a browser activates a link on an image map, it calls a special image map program stored on a Web server. In addition to calling the image map program, the browser also sends the program the x and y coordinates of the position, on the image, where the mouse was clicked. The image map program then looks up a special map file that matches regions in the image to URLs, does some calculations to figure out which page to load, and then loads that page.
Server-side image maps were one of the earliest Web features and are supported by most, if not all, graphical browsers.
Although server-side image maps have been in common use for some time, the problems associated with them have led to the development of a new type of image map called a client-side image map. These are the main problems associated with server-side image maps:
Client-side image maps, on the other hand, remove all these difficulties by removing the need for a special image map program on the server. Instead, they manage all the image-map processing locally on the Web browser itself.
| New Term |
Client-side image maps work in the same ways as server-side image maps, except there is no program that runs on the server. All the processing of coordinates and pointers to different locations occurs in the browser. |
| Note |
Client-side image maps are currently supported by only a few of the very latest Web browsers, including Netscape 2.0. The proposal for client-side image maps, however, is a standard in discussion by the W3 Consortium, so client-side image maps are likely to be more widely supported as time goes by. |
Because of the inherently graphical nature of image maps, they can work only in graphical browsers. In fact, if you try to view a document with an image map in a text-only browser such as Lynx, you don't even get an indication that the image exists. (Unless, of course, the image contains an ALT attribute.) But even with the ALT attribute, you won't be able to navigate the presentation without a graphical browser.
If you decide to create a Web page with an image map on it, it's doubly important that you also create a text-only equivalent so that readers with text-only browsers can use your page. The use of image maps can effectively lock out readers using text-only browsers; have sympathy and allow them at least some method for viewing your content.
In addition to the various disadvantages of using server-side image maps, there's one more that puts a wrinkle into how I explain them: Almost every Web server has a different way of creating them. The methods even vary among servers on the same platform. For example, the W3C (CERN) httpd server and NCSA HTTPd server have incompatible methods of implementing image files. All servers, however, use the same basic ingredients for image maps:
This section explains how to construct clickable images in general, but its examples focus on the NCSA HTTP-style servers such as NCSA itself and Apache. If you need more information for your server, see the documentation that comes with that server, or get help from your Web administrator.
To create an image map, you'll need an image (of course). The image that serves as the map is most useful if it has several discrete visual areas that can be individually selected; for example, images with several symbolic elements, or images that can be easily broken down into polygons. Photographs make difficult image maps because their various "elements" tend to blend together or are of unusual shapes. Figures 17.2 and 17.3 show examples of good and poor images for image maps.
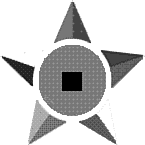
Figure 17.2 : A good image map.
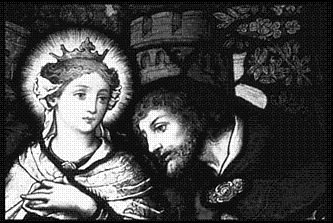
Figure 17.3 : A not-so-good image map.
The heart of the server-side image map is a map file. Creating a map file involves sketching out the regions in your image that are clickable, determining the coordinates that define those regions, and deciding on the HTML pages where they should point.
| Note |
The format of the map file depends on the image-mapping program you're using on your server. In this section, I'll talk about image maps on the NCSA HTTP server, and the map files it uses by default. If you're using a different server, you might have several image-mapping programs to choose from with several map formats. Check with your Web administrator or read your server documentation carefully if you're in this situation. |
You can create a map file either by sketching regions and noting the coordinates by hand or by using an image map-making program. The latter method is easier because the program will automatically generate a map file based on the regions you draw with the mouse.
The Mapedit and MapThis programs for Windows and WebMap for the Macintosh (all available on the CD accompanying this book) can all help you create map files in NCSA format. In addition, MapThis also includes support for the creation of client-side image map definitions. (Refer to the documentation included on the CD-ROM for more information about how these programs are used.)
If you use a UNIX-based system, there is a version of Mapedit available via FTP. (See Appendix A, "Sources for Further Information," for a full list of related FTP sites.)
If you need your map file in a different format, you can always use these programs to create a basic map and then convert the coordinates you get into the map file format your server needs.
If you must create your map files by hand, here's how to do it. First, make a sketch of the regions you want to make active on your image (for example, as in Figure 17.4).
Figure 17.4 : Sketching mapable regions.
You next need to determine the coordinates for the endpoints of those regions (see Figure 17.5). Most image-editing programs have an option that displays the coordinates of the current mouse position. Use this feature to note the appropriate coordinates. (All the mapping programs mentioned previously will create a map file for you, but for now, following the steps manually will help you better understand the processes involved.)
Figure 17.5 : Getting the coordinates.
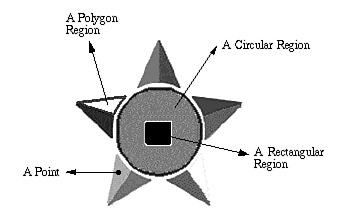
For circle regions, note the coordinates of the center point and the radius, in pixels. For rectangle regions, note the upper-left and lower-right corners. For polygon regions, note the coordinates of each corner. For points, note the coordinates of the point.
| Note |
The 0,0 origin is in the upper-left corner of the image, and positive y is down. |
You're more than halfway there. The next step is to come up with a set of URLs to link for each region or point that is selected. You can have multiple regions pointing to the same URL, but each region must have only one link.
With all your regions, coordinates, and URLs noted, you can now write a map file for your server. NCSA HTTP map files look like this:
default URL
circle URL x,y radius
rect URL x,y x,y
poly URL x1,y1 x2,y2 ... xN,yN
point URL x,y
The map files for your particular image-map program for your server might look different from this, but the essential parts are there. Substitute the values for the coordinates you noted in previously in each of the x or y positions (or x1, y1, and so on). Note that the radius (in the circle line) is the radius for the circle region.
The URLs you specify for either format must be either full URLs (starting with http, ftp, or some other protocol) or the full pathnames to the files you are linking-that is, everything you could include after the hostname in a URL. You cannot specify relative pathnames in the image-map file.
Here's a sample of an NCSA HTTPd map file:
circle /www/mapping.html 10,15 20
circle /www/mapping.html 346,23 59
poly /www/test/orange.html 192,3 192,170 115,217
rect /www/pencil.html 57,57 100,210
point /www/pencil.html 100,100
point /www/orange.html 200,200
Points enable you to specify that a given mouse click, if it doesn't land directly on a region, will activate the nearest point. Points are useful for photographs or other images with nondiscrete elements, or for a finer granularity than just "everything not in a region."
The order of regions in the map file is relevant; the further up a region is in the file, the higher precedence it has for mouse clicks. If part of the region that occurs on overlapping regions is selected, the first region listed in the map file is the one that is activated.
Finally, the map file includes a "default" region with no coordinates, just a URL. The default is used when a mouse click that is not inside a region is selected; it provides a catch-all for the parts of the image that do not point to a specific link. (Note that if you use an NCSA HTTPd map file and you include default, you shouldn't include any points. The existence of point elements precludes that of default.) Here's an example of using default:
default /www.none.html
Creating the map file is the hardest part of making an image map. Once you've got a map file written for your image, you'll have to install both the map file and the image map program on your server, and then hook everything up in your HTML files to use the image map.
Save your map file with a descriptive name (say, myimage.map). Where you install the map file on your server isn't important, but I like to put my map files in a central directory called maps at the top level of my Web files.
You'll also need your image-map program installed on your server, usually in a special directory called cgi-bin, which has been specially set up to store programs and scripts for your server (you'll learn more about the cgi-bin directory in Chapter 19, "Beginning CGI Scripting"). Most servers have an image program set up by default, and if you're using someone else's server, that program will most likely be available to you as well. The program to look for is often called htimage or imagemap.
| Warning |
Be careful with the NCSA server and the imagemap program. Older versions of imagemap were more difficult to work with and required an extra configuration file; the program that comes with the 1.5 version of the server works much better. If you aren't running the most recent version of the NCSA server, you can get the new imagemap program from http://hoohoo.ncsa.uiuc.edu/docs/tutorials/imagemap.txt. |
So now you have an image, a map file, and an image map program. Now let's hook it all up. In your HTML page that contains the image map, you'll use the <A> and <IMG> tags together to create the effect of the clickable image. Here's an example using NCSA's image map program:
<A HREF="/cgi-bin/imagemap/maps/myimage.map">
<IMG SRC="image.gif" ISMAP></A>
Notice several things about this link. First, the link to the image-map script (imagemap) is indicated the way you would expect, but then the path to the map file is appended to the end of it. The path to the map file should be a full pathname from the root of your Web directory (everything after the hostname in your URL), in this case /maps/myimage.map. (This weird-looking form of URL will be described in more detail when you learn more about CGI scripting in Chapter 19.)
The second part of the HTML code that creates a server-side map is the ISMAP attribute to the <IMG> tag. This is a simple attribute with no value that tells the browser to send individual mouse-click coordinates to the image map program on the server side for processing.
And now, with all three parts of the server-side image map in place (the map file, the image map program, and the special HTML code), the image map should work. You should be able to load your HTML file into your browser and use the image map to go to different pages on your server by selecting different parts of the map.
| Note |
If you're running the NCSA HTTPd server and you don't have the newest version of imagemap, you'll get the error Cannot Open Configuration file when you try to select portions of your image. If you get these errors, check with your Web administrator. |
Image maps can get pretty hairy. The map files are prone to error if you don't have your areas clearly outlined and everything installed in the right place. In this exercise, you'll take a simple image and create a simple map file for it using the NCSA server map file format. This way you can get a feel for what the map files look like and how to create them.
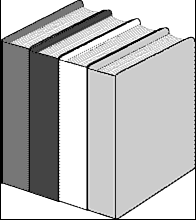
The image you'll use here (which you can find on the CD accompanying this book) is a simple color rendering of some books (see Figure 17.6). You can't see the colors here, but from left to right, they are red, blue, yellow, and green.
Figure 17.6 : The bookshelf image.
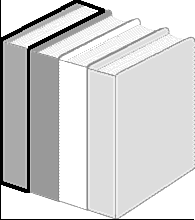
First, you'll define the regions that will be clickable on this image. Because of the angular nature of the books, it's most appropriate to create polygon-shaped regions. Figure 17.7 shows an example of the sort of region it makes sense to create on the image. This one is for the leftmost (red) book. You can define similar regions for each book in the stack. (Draw on the figure here in this book, if you want to. I won't mind.)
Figure 17.7 : The bookshelf with an area defined.
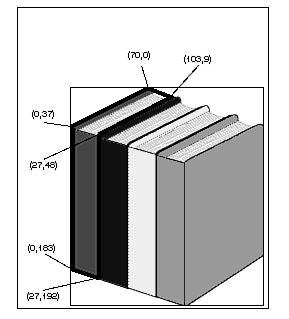
Now that you have an idea of where the various regions are on your image, you'll need to find out the exact coordinates of the corners as the appear in your image. To find out those coordinates, you can use a mapping program such as Mapedit or WebMap (highly recommended), or you can do it by hand. If you do try it by hand, most image-editing programs should have a way of displaying the x and y coordinates of the image when you move the mouse over it. I used Adobe Photoshop's Info window to come up with the coordinates shown in Figure 17.8.
Figure 17.8 : The bookshelf with coordinates.
| Tip |
Don't have an image-editing program? Here's a trick if you use Netscape as your browser: create an HTML file with the image inside a link pointing to a fake file, and include the ISMAP attribute inside the <IMG> tag. You don't actually need a real link; anything will do. The HTML code might look something like this: |
With regions and a list of coordinates, you just need the Web pages to jump to when the appropriate book is selected. These can be any documents, or they can be scripts; you can use anything you can call from a browser as a jump destination. For this example, I've created a document called redbook.html and stored it inside the www directory on my Web server. (You can also find this file on the CD accompanying this book.) This is the page we'll define as the end-point of the jump when the red book is selected.
Now create the entry in the map file for this area, with the coordinates and the file to link to if that area is clicked on. In an NCSA map file, the information looks like this:
poly /www/redbook.html 70,0 0,37 0,183 27,192 27,48 103,9
Note that the URLs in the map file must be absolute pathnames from the top of the Web root (not from the top of the file system). They cannot be relative URLs from the map file; image maps don't work like that. In this case, my www directory is at the Web root, and the redbook.html file is in that directory, and so the URL for the purposes of the map file is /www/redbook.html.
You can now create identical entries for the other books in the image (blue, yellow, and green). Don't forget to include a default line in the map file to map mouse clicks that don't hit any books (here, a file called notabook.html):
default /www/notabook.html
You also can use points to refer to default pages; in this case, it was easier to use default.
Save your map file to your map directory on the server (or wherever you keep your maps). Finally, create a Web page that includes the books image, the ISMAP attribute in the <IMG> tag, and the link to the image mapping program. Here's an example that uses the imagemap program on my server:
<A HREF="http://www.lne.com/cgi-bin/imagemap/maps/books.map">
<IMG SRC="image.gif" ISMAP></A>
And that's it. With everything connected, clicking the image on each book should load the page for that part of the image.
When you creating a client-side image map, many of the steps for finding out the coordinates of each area on the map are exactly the same as they are for creating server-side image maps. Unlike a server-side image map, however, which uses a separate file to store the coordinates and references for each hyperlink, client-side image maps store all the mapping information as part of an HTML document.
To include client-side image map inside an HTML document, you use the new <MAP> tag, which looks like this:
<MAP NAME="mapname"> coordinates and links </MAP>
The value assigned to the NAME attribute is the name of this map definition. This is the name that will be used later to associate the clickable image with its corresponding coordinates and hyperlink references-so, if you have multiple image maps on the same page, you can have multiple <MAP> tags with different names.
Between the <MAP> and the </MAP> tags, you enter the coordinates for each area in the image map and the destinations of those regions using the same values and links that you determined in the section on server-side image maps. This time, however, the coordinates are defined inside yet another new tag-the <AREA> tag. For example, to define the polygon area from Excercise 17.1, you would write this:
<AREA SHAPE="POLY" COORDS="70,0, 0,37, 0,183, 27,192, 27,48, 103,9"
HREF="/www/redbook.html">
The type of shape to be used for the region is declared by the SHAPE attribute, which can have the values RECT, POLY, and CIRCLE. The coordinates for each shape are noted using the COORDS attribute. So, for example, the COORDS attribute for the POLY shape is the following, where each x,y combination represents a point on the polygon:
<AREA SHAPE="POLY" COORDS="x1,y1,x2,y2,x3,y3,…,xN,yN" HREF="URL">
For RECT shapes, x1,y1 is the upper-left corner of the rectangle, and x2,y2 is the lower-right corner:
<AREA SHAPE="RECT" COORDS="x1,y1,x2,y2" HREF="URL">
And for CIRCLE shapes, x,y represents the center of a circular region of size radius:
<AREA SHAPE="CIRCLE" COORDS="x,y,radius" HREF="URL">
The last attribute you need to define for each <AREA> tag is the HREF attribute. HREF can be assigned any URL you would usually associate with an <A> link, including relative pathnames. In addition, you can assign HREF a value of "NOHREF" to define regions of the image that don't contain links to a new page.
| Note |
When using client-side image maps with frames, you can also include the TARGET attribute inside an <AREA> tag to open new page in a specific window, as in this example: |
After your client-side image map has been defined using the <MAP> tag, the last step is to put the image on your Web page. To do this, you use a special form of the <IMG> tag that includes a new attribute called USEMAP (this is different from the ISMAP for server-side image maps). USEMAP looks like this, where mapname is the name of a map defined by the <MAP NAME="mapname"> tag:
<IMG SRC="image.gif" USEMAP="#mapname">
| Note |
Unlike with server-side image maps, you do not need to enclose the <IMG> tag inside an <A> tag. Instead, the USEMAP attribute tells the Web browser that the <IMG> contains a clickable image map. |
| Note |
The value assigned to USEMAP is a standard URL. This is why mapname has a pound (#) symbol in front of it. As with links to anchors inside a Web page, the pound symbol tells the browser to look for mapname in the current Web page. However, if you have a very complex image map, it can be stored in a separate HTML file and referenced using a standard URL. |
To conclude this discussion of image maps, take a look at how the image map example discussed in Exercise 17.1 would be written using client-side image maps. Because we already have the coordinates and the destination, all you really need is to convert the server-side map file into client-side HTML.
So, for the book image, the <MAP> tag and its associated <AREA> tag looks like this:
<MAP NAME="books">
<AREA SHAPE="POLY" COORDS="70,0, 0,37, 0,183, 27,192, 27,48, 103,9"
HREF="/www/redbook.html">
</MAP>
The <IMG> tag to refer to the map coordinates is also different. It uses USEMAP instead of ISMAP, and doesn't have a link around it:
<IMG SRC="image.gif" USEMAP="#books">
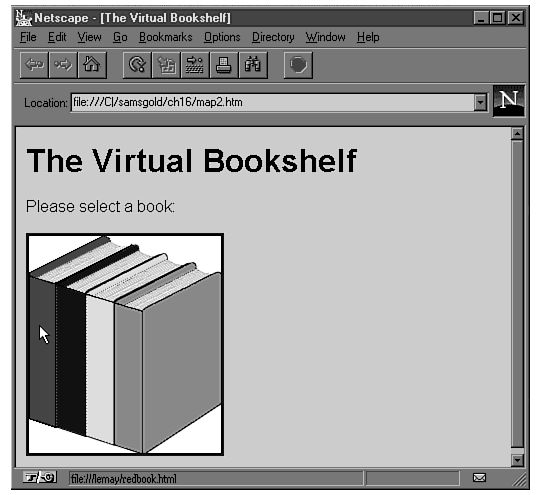
Finally, put the whole lot together and test it. Here's a sample HTML file that contains both the <MAP> tag and the image that uses it. The result is shown in Figure 17.9.
Figure 17.9 : The bookshelf with coordinates.
<HTML><HEAD>
<TITLE>The Virtual Bookshelf</TITLE>
</HEAD><BODY>
<H1>The Virtual Bookshelf</H1>
<P>Please select a book:</P>
<IMG SRC="books.gif" USEMAP="#books">
<MAP NAME="books">
<AREA SHAPE="POLY" COORDS="70,0, 0,37, 0,183, 27,192, 27,48, 103,9"
HREF="/www/redbook.html" >
</MAP>
</BODY>
</HTML>
The main problem with using client-side image maps in your Web pages is that although client-side image maps are faster and easier to implement than server-side image maps, they're not supported by very many browsers at all. Because of this, if you do use client-side image maps, its a good idea to also create a server-side equivalent, and then modify your HTML files so that they support both forms of image map. This way your pages will work equally well with both newer and older image map formats while taking advantage of the newer client-side capabilities in browsers that support them.
To create an image map that uses client-side support, if available, but falls back to server-side support when needed, take the following standard server-side definition:
<A HREF="/cgi-bin/imagemap/maps/myimage.map">
<IMG SRC="image.gif" ISMAP>
</A>
And add the client-side image map details as part of the <IMG SRC="image.gif" ISMAP> text, like this:
<A HREF="/cgi-bin/imagemap/maps/myimage.map">
<IMG SRC="image.gif" USEMAP="#books" ISMAP>
</A>
You will, of course, need to have installed the myimage.map file on your server, and to have included the "books" <MAP> tag definition somewhere in your HTML document.
In this chapter you learned how to add image maps to your Web pages. You should now know the difference between server-side and client-side image maps and which ones are available in which browsers. You also learned how to find regions and the coordinates that defined them, and to create map files for client-side image maps. You now should know how to connect clickable images, map files, and image map programs on the appropriate servers.
It's been a very full chapter, so to help refresh your memory,
Table 17.1 presents a summary of the tags and attributes you learned
about in this chapter.
| Tag | Attribute | Use |
| ISMAP | An attribute of the <IMG> tag that that indicates this image is a server-side image map. | |
| <MAP> | Define a map for a client-side image map. | |
| NAME | An attribute of the <MAP> tag used to define the map's name. | |
| USEMAP | An attribute of the <IMG> tag used to associate an image with a client-side image map specified by <MAP NAME="mapname">. | |
| <AREA> | The individual regions within a <MAP> element. | |
| TYPE | An attribute of the <AREA> tag indicating the type of region. Possible values are RECT, POLY, and CIRCLE. | |
| COORDS | An attribute of the <AREA> tag indicating the point bounding the region. | |
| HREF | An attribute of the <AREA> tag indicating the URL of the region. |
| Q | Do I need a server to create image maps? I want to create and test all of this offline, the same way I did for my regular HTML files. |
| A | If you're using client-side image maps, you can create and test them all on your local system (assuming, of course, that your map destinations all point to files in your local presentation as well). If you're using server-side image maps, however, because you need the image map program on the server, you'll have to be connected to the server for all of this to work. |
| Q | My server-side image maps aren't working. What's wrong? |
| A | Here are a couple things you can look for: |
| |
| Q | My client-side image maps aren't working. What's wrong? |
| A | Here are a couple suggestions: |
|