


|
Tables are an advanced HTML construct that allows you to arrange text, images, and other HTML content into rows and columns with or without borders. Tables were the first part of HTML 3.2 to hit the Web, and they've had an enormous influence on how pages are designed and constructed. In this chapter, you'll learn all about tables, including:
Tables were one of the first extensions to HTML that were proposed as part of HTML 3.2. In early 1995, Netscape and Mosaic almost simultaneously implemented a simple version of HTML 3.2 tables in their browsers (with Netscape adding a few extra features). Tables almost immediately revolutionized Web page design because tables can be used not just for presenting data in a tabular form, but also for page layout and control over placement of various HTML elements on a page. Tables have become so popular that most major browsers have now added table support.
At the time tables were originally implemented in Netscape and Mosaic, the actual definition for tables in HTML was still under considerable discussion, as was most of the HTML 3.2 specification. Although the definition of the basic table, as I'll describe in this chapter, is pretty much settled, and most browsers that support tables do support this definition, tables are still being discussed and refined by the WWW Consortium and by other interested parties. The new table specification contains lots of new features that have yet to be implemented in any browsers. You can read the current table specification at http://www.w3.org/pub/WWW/TR/WD-tables if you're interested.
Keep the fact that tables are still changing in mind as you design your own tables; although it's unlikely that anything you design now will break in the future, there probably will be changes still to come.
With that one small warning in mind, let's jump right in. To create tables in HTML, you define the parts of your table and which bits of HTML go where, and then you add HTML table code around those parts. Then you refine the table's appearance with alignments, borders, and colored cells. In this section, you'll learn how to create a basic table with headings, data, and a caption.
One more note, however. Creating tables by hand in HTML is no fun. The code for tables was designed to be easy to generate by programs, not to be written by hand, and as such it's rather confusing. You'll do a lot of experimenting, testing, and going back and forth between your browser and your code to get a table to work out right. HTML editors can help a great deal with this, as can working initially in a word processor's table editor or a spreadsheet to get an idea of what goes where. But I suggest doing at least your first bunch of tables the hard way so you can get an idea how HTML tables work.
Before we get into the actual HTML code to create a table, let me define some terms so we both know what we're talking about:
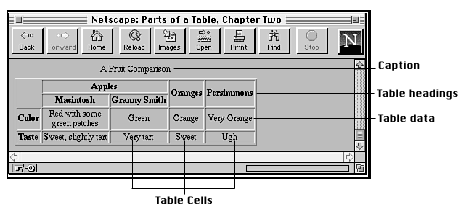
Figure 13.1 shows a typical table and its parts.
Figure 13.1 : The parts of a table.
To create a table in HTML, you use the <TABLE>...</TABLE> tags, which contain the code for a caption and then the contents of the table itself:
<TABLE>
...table contents...
</TABLE>
The most common attribute to the <TABLE> tag is the BORDER attribute. BORDER causes the table to be drawn with a border around it, which can be a fancy border in a graphical browser or just a series of dashes and pipes (|) in a text-based browser.
Borderless tables are useful when you want to use the table structure for layout purposes, but you don't necessarily want the outline of an actual table on the page.
Inside the <TABLE>...</TABLE> tags, you define the actual contents of the table. Tables are specified in HTML row by row, and each row definition contains definitions for each of the cells in that row. So, to define a table, you start by defining a top row and each cell in turn, and then you define a second row and its cells, and so on. The columns are automatically calculated based on how many cells there are in each row.
Each table row is indicated by the <TR> tag and
ends with the appropriate closing </TR>. Each table
row, in turn, has a number of table cells, which are indicated
using the <TH>...</TH> (for heading cells)
and <TD>...</TD> tags (for data cells). You
can have as many rows as you want to and as many cells in each
row as you need for your columns, but you should make sure each
row has the same number of cells so that the columns line up.
| NOTE |
In early definitions of tables, the closing tags </TR>, </TH>, and </TD> were required for each row and cell. Since then, the table definition has been refined such that each of these closing tags is optional. However, many browsers that support tables still expect the closing tags to be there, and the tables may even break if you don't include the closing tags. Until tables become more consistently implemented across browsers, it's probably a good idea to continue using the closing tags even though they are optional. |
Here's a simple example: a table with only one row, four cells, and one heading on the left side:
<TABLE>
<TR>
    <TH>Heading</TH>
    <TD>Data</TD>
    <TD>Data</TD>
    <TD>Data</TD>
</TR>
</TABLE>
The <TH> tag indicates a cell that is also a table heading, and the <TD> tag is a regular cell within the table (TD stands for Table Data). Headings are generally displayed in a different way than table cells, such as in a boldface font. Both <TH> and <TD> should be closed with their respective closing tags </TH> and </TD>.
If it's a heading along the top edge of the table, the <TH> tags for that heading go inside the first row. The HTML for a table with a row of headings along the top and one row of data looks like this:
<P>A Table with Headings Across the Top</P>
<TABLE BORDER>
<TR>
    <TH>Drive Plate</TH>
    <TH>Front Cover</TH>
</TR>
<TR>
    <TD>39-49</TD>
    <TD>19-23</TD>
</TR>
</TABLE>
If the headings are along the left edge of the table, put each <TH> in the first cell in each row, like this:
<P>A Table with Headings Along the Side</P>
<TABLE BORDER>
<TR>
    <TH>Drive Plate</TH>
    <TD>39-49</TD>
</TR>
<TR>
    <TH>Front Cover</TH>
    <TD>19-23</TD>
</TR>
</TABLE>
Figure 13.2 shows the results of both these tables.
Figure 13.2 : Small tables and headings.
Both table headings and data can contain any text or HTML code or both, including links, lists, forms, and other tables.
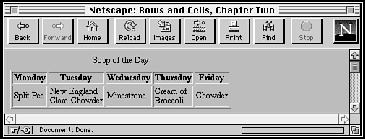
The following input and output example shows a simple table. Figure 13.3 shows its result in Netscape.
<HTML>
<HEAD>
<TITLE>Rows and Cells</TITLE>
</HEAD>
<BODY>
<TABLE BORDER>
<CAPTION>Soup of the Day</CAPTION>
<TR>
    <TH>Monday</TH>
    <TH>Tuesday</TH>
    <TH>Wednesday</TH>
    <TH>Thursday</TH>
    <TH>Friday</TH>
</TR>
<TR>
    <TD>Split Pea</TD>
    <TD>New England<BR>Clam Chowder</TD>
    <TD>Minestrone</TD>
    <TD>Cream of<BR>Broccoli</TD>
    <TD>Chowder</TD>
</TR>
</TABLE>
</BODY>
</HTML>
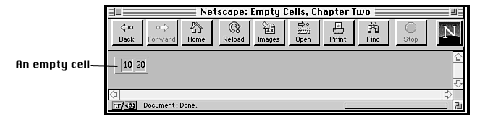
What if you want a cell with nothing in it? That's easy. Just define a cell with a <TH> or <TD> tag with nothing inside it:
<TR>
    <TD></TD>
    <TD>10</TD>
    <TD>20</TD>
</TR>
Sometimes, an empty cell of this sort is displayed as if the cell doesn't exist (as shown in Figure 13.4).
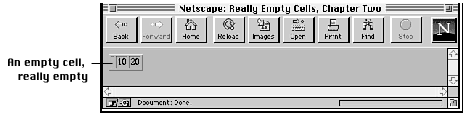
If you want to force a truly empty cell, you can add a line break in that cell by itself with no other text (see Figure 13.5).
Figure 13.5 : Really empty cells.
<TR>
    <TD><BR></TD>
    <TD>10</TD>
    <TD>20</TD>
</TR>
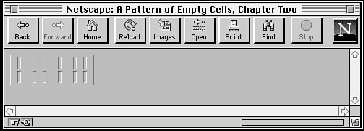
The following input and output example creates a pattern of empty cells (see Figure 13.6).
Figure 13.6 : A pattern of empty cells.
<HTML>
<HEAD>
<TITLE>Empty</TITLE>
</HEAD>
<BODY>
<TABLE BORDER>
<TR>
    <TH></TH><TH><BR></TH><TH></TH><TH></TH>
    <TH><BR></TH><TH></TH><TH><BR></TH><TH></TH>
    <TH></TH><TH><BR></TH><TH></TH><TH></TH>
    <TH><BR></TH><TH></TH><TH><BR></TH><TH></TH>
</TR>
<TR>
    <TH></TH><TH><BR></TH><TH></TH><TH></TH>
    <TH><BR></TH><TH></TH><TH><BR></TH><TH></TH>
    <TH></TH><TH><BR></TH><TH></TH><TH></TH>
    <TH><BR></TH><TH></TH><TH><BR></TH><TH></TH>
</TR>
</TABLE>
</BODY>
</HTML>
Table captions tell your reader what the table is for. Although you could just use a regular paragraph or a heading as a label for your table, there is a <CAPTION> tag for just this purpose. Because the <CAPTION> tag labels captions as captions, tools to process HTML files could extract them into a separate file, or automatically number them, or treat them in special ways simply because they are captions.
But what if you don't want a caption? You don't have to include one. Captions are optional. If you just want a table and don't care about a label, leave the caption off.
The <CAPTION> tag goes inside the <TABLE> tag just before the table rows, and it contains the title of the table. It closes with the </CAPTION> tag.
<TABLE>
<CAPTION>Decapitated Tulips in Virginia, 1960-1980</CAPTION>
<TR>
The optional ALIGN attribute to the caption determines the alignment of the caption. However, depending on which browser you're using, you have different choices for what ALIGN means.
In most browsers, ALIGN can have one of two values: TOP and BOTTOM. By default, the caption is placed at the top of the table (ALIGN=TOP). You can use the ALIGN=BOTTOM attribute to the caption if you want to put the caption at the bottom of the table, like this:
<TABLE>
<CAPTION ALIGN=BOTTOM>Torque Limits for Various Fruits</CAPTION>
In Internet Explorer, however, captions are different. Using Internet Explorer, you use the VALIGN attribute to put the caption at the top or the bottom, and ALIGN has three different values: LEFT, RIGHT, and CENTER, which align the caption horizontally.
In general, unless you have a very short table, you should leave the caption in its default position-centered, at the top of the table-so that your readers will see the caption first and know what they are about to read, instead of seeing it after they're already done reading the table (at which point they've usually figured out what it's about anyway).
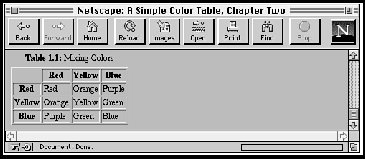
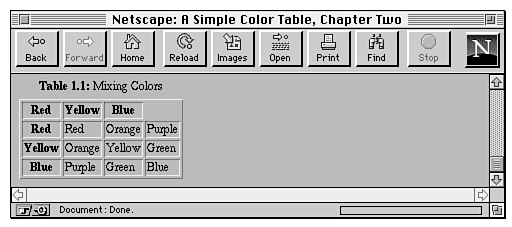
Now that you know the basics of how to create a table, let's try a simple example. For this example, we'll create a table that indicates the colors you get when you mix the three primary colors together.
Figure 13.7 shows the table we're going to re-create in this example.
Figure 13.7 : The simple color table.
Here's a quick hint for laying out tables: because HTML defines tables on a row-by-row basis, it can sometimes be difficult to keep track of the columns, particularly with very complex tables. Before you start actually writing HTML code, it's useful to make a sketch of your table so you know what the heads are and the values of each cell. You might find that it's easiest to use a word processor with a table editor (such as Microsoft Word) or a spreadsheet to lay out your tables. Then when you have the layout and the cell values, you can write the HTML code for that table. Of course, eventually there will be filters so that you can simply save the file and automatically get HTML code out of the other end, but for now this is a good way of keeping track of everything.
Let's start with a simple HTML framework for the page that contains a table. Like all HTML files, you can create this file in any text editor:
<HTML><HEAD>
<TITLE>Colors</TITLE>
</HEAD>
<BODY>
<TABLE BORDER>
...add table rows and cells here...
</TABLE>
</BODY></HTML>
Note that the <TABLE> tag has the BORDER attribute. This draws the highlighted borders around the table.
Now start adding table rows inside the opening and closing <TABLE> tags (where the line "add table rows and cells here" was in the framework). The first row is the three headings along the top of the table. The table row is indicated by </TR>, and each cell by a <TH> tag:
<TR>
    <TH>Red</TH>
    <TH>Yellow</TH>
    <TH>Blue</TH>
</TR>
| NOTE |
You can format the HTML code any way you want to; like with all HTML, the browser ignores most extra spaces and returns. I like to format it like this, with the contents of the individual rows indented and the cell tags on separate lines, so I can pick out the rows and columns more easily. |
Now add the second row. The first cell in the second row is the Red heading on the left side of the table, so it will be the first cell in this row, followed by the cells for the table data:
<TR>
    <TH>Red</TH>
    <TD>Red</TD>
    <TD>Orange</TD>
    <TD>Purple</TD>
</TR>
Continue by adding the remaining two rows in the table, with the Yellow and Blue headings. Here's what you have so far for the entire table:
<TABLE BORDER>
<TR>
    <TH>Red</TH>
    <TH>Yellow</TH>
    <TH>Blue</TH>
</TR>
<TR>
    <TH>Red</TH>
    <TD>Red</TD>
    <TD>Orange</TD>
    <TD>Purple</TD>
</TR>
<TR>
    <TH>Yellow</TH>
    <TD>Orange</TD>
    <TD>Yellow</TD>
    <TD>Green</TD>
</TR>
<TR>
    <TH>Blue</TH>
    <TD>Purple</TD>
    <TD>Green</TD>
    <TD>Blue</TD>
</TR>
</TABLE>
Finally, let's add a simple caption. The <CAPTION> tag goes just after the <TABLE BORDER> tag and just before the first <TR> tag:
<TABLE BORDER>
<CAPTION><B>Table 1.1:</B> Mixing Colors</CAPTION>
<TR>
Now, with a first draft of the code in place, test the HTML file in your favorite browser that supports tables. Figure 13.8 shows how it looks in Netscape.
Figure 13.8 : The color table.
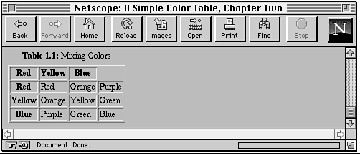
Oops! What happened with that top row? The headings are all messed up. The answer, of course, is that you need an empty cell at the beginning of that first row to space the headings out over the proper columns. HTML isn't smart enough to match it all up for you (this is exactly the sort of error you're going to find the first time you test your tables).
Let's add an empty table heading cell to that first row (here, the line <TH><BR></TH>):
<TR>
    <TH><BR></TH>
    <TH>Red</TH>
    <TH>Yellow</TH>
    <TH>Blue</TH>
</TR>
| NOTE |
I used <TH> here, but it could just as easily be <TD>. Because there's nothing in the cell, its formatting doesn't matter. |
If you try it again, you should get the right result with all the headings over the right columns.
Once you've got your basic table layout with rows, headings, and data, you can start refining how that table looks. The first way to do this is to align the table on the page and to align the contents of the cells inside that table.
By default, tables are displayed on a line by themselves along the left side of the page, with any text above or below the table.
Using the ALIGN attribute, however, you can align tables along the left or right margins and wrap text alongside them the same way you can with images. ALIGN=LEFT aligns the table along the left margin, and all text following that table is wrapped in the space between that table and the right side of the page. ALIGN=RIGHT does the same thing, with the table aligned to the right side of the page. Figure 13.9 shows an example of a table with text wrapped alongside of it.
Figure 13.9 : A Table with text alongside it.
As with images, to stop wrapping text alongside an image, you can use the line break tag with the CLEAR attribute.
Centering tables is slightly more difficult. Currently, no browsers support ALIGN=CENTER on tables. However, you can use the <CENTER> or <DIV ALIGN=CENTER> tags (both of which you learned about in Chapter 5 "More Text Formatting with HTML") to center tables on the page.
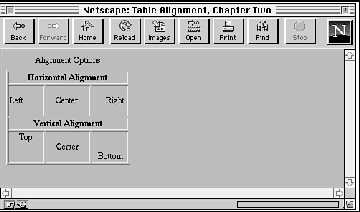
When you have your rows and cells in place inside your table and the table properly aligned on the page, you can align the data within each cell for the best effect based on what your table contains. HTML tables give you several options for aligning the data within your cells both horizontally and vertically. Figure 13.10 shows a table (a real HTML one!) of the various alignment options.
Horizontal alignment (the ALIGN attribute) defines whether the data within a cell is aligned with the left cell margin (LEFT), the right cell margin (RIGHT), or centered within the two (CENTER).
Vertical alignment (the VALIGN attribute) defines the vertical alignment of the data within the cell, meaning whether the data is flush with the top of the cell (TOP), flush with the bottom of the cell (BOTTOM), or vertically centered within the cell (MIDDLE). Netscape also implements VALIGN=BASELINE, which is similar to VALIGN=TOP, except that it aligns the baseline of the first line of text in each cell (depending on the contents of the cell, this might or might not produce a different result than ALIGN=TOP).
By default, heading cells are centered both horizontally and vertically, and data cells are centered vertically but aligned flush left.
You can override the defaults for an entire row by adding the ALIGN or VALIGN attributes to the <TR> tag, as in this example:
<TR ALIGN=CENTER VALIGN=TOP>
You can override the row alignment for individual cells by adding ALIGN to the <TD> or <TH> tags:
<TR ALIGN=CENTER VALIGN=TOP>
    <TD>14</TD>
    <TD>16</TD>
    <TD ALIGN=LEFT>No Data</TD>
    <TD>15</TD>
</TR>
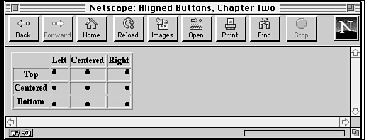
The following input and output example shows the various cell alignments and how they look in Netscape (Figure 13.11).
Figure 13.11: Alignment options.
<HTML>
<HEAD>
<TITLE>Cell Alignments</TITLE>
</HEAD>
<BODY>
<TABLE BORDER>
<TR>
    <TH></TH>
    <TH>Left</TH>
    <TH>Centered</TH>
    <TH>Right</TH>
</TR>
<TR>
    <TH>Top</TH>
    <TD ALIGN=LEFT VALIGN=TOP><IMG SRC="button.gif"></TD>
    <TD ALIGN=CENTER VALIGN=TOP><IMG SRC="button.gif"></TD>
    <TD ALIGN=RIGHT VALIGN=TOP><IMG SRC="button.gif"></TD>
</TR>
<TR>
    <TH>Centered</TH>
    <TD ALIGN=LEFT VALIGN=MIDDLE><IMG SRC="button.gif"></TD>
    <TD ALIGN=CENTER VALIGN=MIDDLE><IMG SRC="button.gif"></TD>
    <TD ALIGN=RIGHT VALIGN=MIDDLE><IMG SRC="button.gif"></TD>
</TR>
<TR>
    <TH>Bottom</TH>
    <TD ALIGN=LEFT VALIGN=BOTTOM><IMG SRC="button.gif"></TD>
    <TD ALIGN=CENTER VALIGN=BOTTOM><IMG SRC="button.gif"></TD>
    <TD ALIGN=RIGHT VALIGN=BOTTOM><IMG SRC="button.gif"></TD>
</TR>
</TABLE>
</BODY>
</HTML>
Tables are great when you have a lot of information-particularly technical or numeric information-that you want to present in a way that enables your readers to find what they need quickly and easily. Perhaps they're only interested in one bit of that information or a range of it. Presented in a paragraph or in a list, it might be more difficult for your readers to glean what they need.
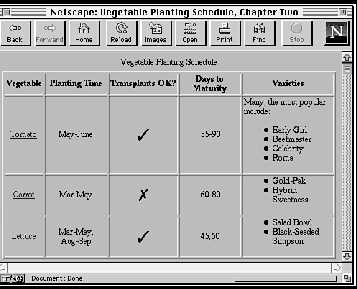
For example, say you want to summarize information about planting vegetables, which includes the time in the year each vegetable should be planted, how long it takes before you can harvest that vegetable, whether you can transplant an already growing plant, and some common varieties that are known to grow especially well. You can present this information as a list, one paragraph per vegetable; but, because the data falls into neat categories, the data will look better and be more accessible as a table.
Figure 13.12 shows the vegetable-planting chart, the table you'll be building in this exercise. Like the last example, it's a rather simple table, but it does use links, images, and lists inside the table cells. In addition, it takes advantage of some of the alignment options that I described in the previous section. In this example, we'll start with a basic HTML framework, lay out the rows and the cells, and then adjust and fine-tune the alignment of the data within those cells. You'll find, as you work with more tables, that this plan is the easiest way to develop a table. If you worry about the alignment at the same time that you're constructing the table, it's easy to get confused.
Figure 13.12: The vegetable planting schedule.
Here's the basic framework for the table, including the caption:
<HTML>
<HEAD>
<TITLE>Vegetable Planting Schedule</TITLE>
</HEAD>
<BODY>
<TABLE BORDER>
<CAPTION>Vegetable Planting Schedule</CAPTION>

</TABLE>
</BODY>
</HTML>
The first row we'll add is the heading for the top table. It's a row with five heading cells, and we'll add it to the table just beneath the <CAPTION> tag:
<TR>
    <TH>Vegetable</TH>
    <TH>Planting Time</TH>
    <TH>Transplants OK?</TH>
    <TH>Days to Maturity</TH>
    <TH>Varieties</TH>
</TR>
The remaining rows are for the data for the table. Note that within a table cell (a <TH> or <TD> tag), you can put any HTML markup, including links, images, forms, or other tables. In this example, we've used links for each vegetable name (pointing to further information), a checkmark or X image for whether you can plant transplants of that vegetable, and an unordered list for the varieties. Here's the code so far for the headings and the three rows of the table:
<TABLE BORDER>
<CAPTION>Vegetable Planting Schedule</CAPTION>
<TR>
    <TH>Vegetable</TH>
    <TH>Planting Time</TH>
    <TH>Transplants OK?</TH>
    <TH>Days to Maturity</TH>
    <TH>Varieties</TH>
</TR>
<TR>
    <TD ><A HREF="tomato.html">Tomato</A></TD>
    <TD>May-June</TD>
    <TD><IMG SRC="check.gif"></TD>
    <TD>55-90</TD>
    <TD>Many; the most popular include:
        <UL>
        <LI>Early Girl
        <LI>Beefmaster
        <LI>Celebrity
        <LI>Roma
        </UL>
    </TD>
</TR>
<TR>
    <TD><A HREF="carrot.html">Carrot</A></TD>
    <TD>Mar-May</TD>
    <TD><IMG SRC="ex.gif"></TD>
    <TD>60-80</TD>
    <TD>
        <UL>
        <LI>Gold-Pak
        <LI>Hybrid Sweetness
        </UL>
    </TD>
</TR>
<TR>
    <TD><A HREF="lettuce.html">Lettuce</A></TD>
    <TD>Mar-May, Aug-Sep</TD>
    <TD><IMG SRC="check.gif"></TD>
    <TD>45,60</TD>
    <TD>
        <UL>
        <LI>Salad Bowl
        <LI>Black-Seeded Simpson
        </UL>
    </TD>
</TR>
</TABLE>
In Netscape, there's one exception to the rule that whitespace in your original HTML code doesn't matter in the final output. For images in cells, say you've formatted your code with the <IMG> tag on a separate line, like this:
<TD>
    <IMG SRC="check.gif">
</TD>
With this code, the return between the <TD> and the <IMG> tag is significant; your image will not be properly placed within the cell (this particularly shows up in centered cells). To correct the problem, just put the <TD> and the <IMG> on the same line:
<TD><IMG SRC="check.gif"></TD>
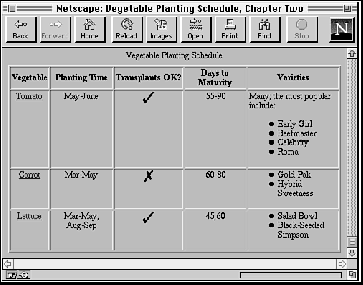
Figure 13.13 shows what the table looks like so far.
Figure 13.13: The Vegetable Table, try one.
| NOTE |
Depending on how big your screen and your browser window are, your table may not look exactly like this one. Browsers reformat tables to the width of the window as they do with other HTML elements. You'll learn more about controlling the width of tables in "Defining Table and Column Widths," later in this chapter. |
So far, so good, but the columns would look better centered. We can do this globally for each row by adding the ALIGN=CENTER attribute to each <TR> tag. (Note that you need to do it only for the data rows; the headings are already centered.)
<TR ALIGN=CENTER>
    <TD ><A HREF="tomato.html">Tomato</A></TD>
    <TD>May-June</TD>
    ...
Figure 13.14 shows the new table with the contents of the cells now centered:
Figure 13.14: The Vegetable Table, try two.
Now the table looks much better, except for the bullets in the Varieties column. They got centered, too, so now they're all out of whack. But that doesn't matter; we can fix that by adding the ALIGN=LEFT attribute to the <TD> tag for that cell in every row with the following code. The result is shown in Figure 13.15.
Figure 13.15: The Vegetable Table, try three.
<TD ALIGN=LEFT>Many; the most popular include:
    <UL>
    <LI>Early Girl
    ...
| NOTE |
You could have just kept the default alignment for each row and then added an ALIGN=CENTER attribute to every cell that needed to be centered. But that would have been a lot more work. It's usually easier to change the default row alignment to the alignment of the majority of the cells and then change the cell alignment for the individual cells that are left. |
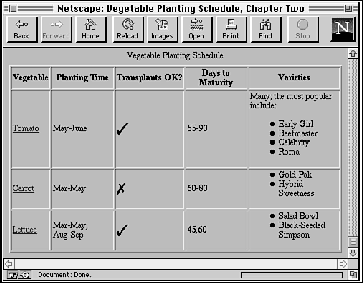
We're getting close, but let's try one more thing. Right now, all the cells are vertically centered. Let's add a VALIGN=TOP to each data row (next to the ALIGN=CENTER) so that they'll hug the top of the cells.
<TR ALIGN=CENTER VALIGN=TOP>
    <TD ><A HREF="tomato.html">Tomato</A></TD>
    <TD>May-June</TD>
You're done! Here's the final HTML text for the example:
<HTML>
<HEAD>
<TITLE>Vegetable Planting Schedule</TITLE>
</HEAD>
<BODY>
<TABLE BORDER>
<CAPTION>Vegetable Planting Schedule</CAPTION>
<TR>
    <TH>Vegetable</TH>
    <TH>Planting Time</TH>
    <TH>Transplants OK?</TH>
    <TH>Days to Maturity</TH>
    <TH>Varieties</TH>
</TR>
<TR ALIGN=CENTER VALIGN=TOP>
    <TD ><A HREF="tomato.html">Tomato</A></TD>
    <TD>May-June</TD>
    <TD><IMG SRC="check.gif"></TD>
    <TD>55-90</TD>
    <TD ALIGN=LEFT>Many; the most popular include:
        <UL>
        <LI>Early Girl
        <LI>Beefmaster
        <LI>Celebrity
        <LI>Roma
        </UL>
    </TD>
</TR>
<TR ALIGN=CENTER VALIGN=TOP>
    <TD><A HREF="carrot.html">Carrot</A></TD>
    <TD>Mar-May</TD>
    <TD><IMG SRC="ex.gif"></TD>
    <TD>60-80</TD>
    <TD ALIGN=LEFT>
        <UL>
        <LI>Gold-Pak
        <LI>Hybrid Sweetness
        </UL>
    </TD>
</TR>
<TR ALIGN=CENTER VALIGN=TOP>
    <TD><A HREF="lettuce.html">Lettuce</A></TD>
    <TD>Mar-May, Aug-Sep</TD>
    <TD><IMG SRC="check.gif"></TD>
    <TD>45,60</TD>
    <TD ALIGN=LEFT>
        <UL>
        <LI>Salad Bowl
        <LI>Black-Seeded Simpson
        </UL>
    </TD>
</TR>
</TABLE>
</BODY>
</HTML>
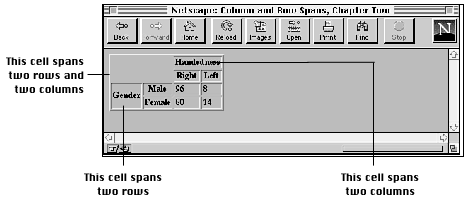
The tables we've created up to this point all had one value per cell or had the occasional empty cell. You can also create cells that span multiple rows or columns within the table. Those spanned cells can then hold headings that have subheadings in the next row or column, or you can create other special effects within the table layout. Figure 13.16 shows a table with spanned columns and rows.
Figure 13.16: Tables with spans.
To create a cell that spans multiple rows or columns, you add the ROWSPAN or COLSPAN attribute to the <TH> or <TD> tags, along with the number of rows or columns you want the cell to span. The data within that cell then fills the entire width or length of the combined cells, as in the following example:
<TR>
    <TH COLSPAN=2>Gender
</TR>
<TR>
    <TH>Male</TH>
    <TH>Female</TH>
</TR>
<TR>
    <TD>15</TD>
    <TD>23</TD>
</TR>
Figure 13.17 shows how this table might appear when displayed.
Note that if a cell spans multiple rows, you don't have to redefine that cell as empty in the next row or rows. Just ignore it and move to the next cell in the row; the span will fill in the spot for you.
Cells always span downward and to the right. So to create a cell that spans several columns, you add the COLSPAN attribute to the leftmost cell in the span, and for cells that span rows, you add ROWSPAN to the topmost cell.
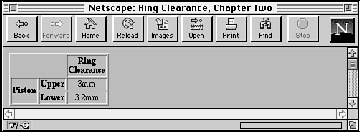
The following input and output example shows a cell that spans multiple rows (the cell with the word "Piston" in it). Figure 13.18 shows the result in Netscape.
Figure 13.18: Cells that span multiple rows and columns.
<HTML>
<HEAD>
<TITLE>Ring Clearance</TITLE>
</HEAD>
<BODY>
<TABLE BORDER>
<TR>
    <TH COLSPAN=2></TH>
    <TH>Ring<BR>Clearance</TH>
</TR>
<TR ALIGN=CENTER>
    <TH ROWSPAN=2>Piston</TH>
    <TH>Upper</TH>
    <TD>3mm</TD>
</TR>
<TR ALIGN=CENTER>
    <TH>Lower</TH>
    <TD>3.2mm</TD>
</TR>
</TABLE>
</BODY>
</HTML>
Had enough of tables yet? Let's do one more example that takes advantage of everything you've learned here: tables with headings and normal cells, alignments, and column and row spans. This is a very complex table, so we'll go step by step, row by row to build it.
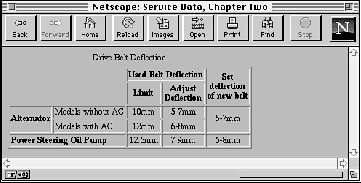
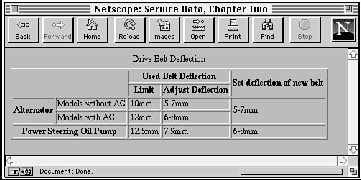
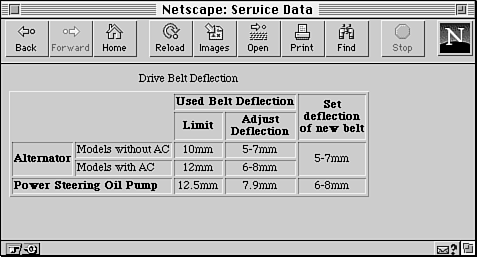
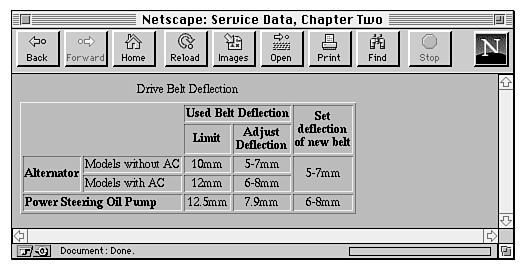
Figure 13.19 shows the table, which indicates service and adjustment specifications from the service manual for a car.
Figure 13.19: The really complex service specification table.
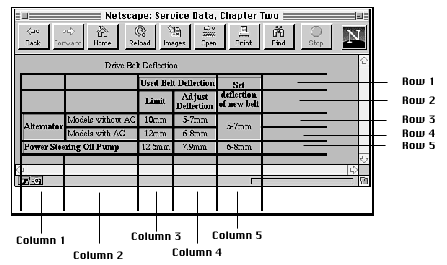
There are actually five rows and columns in this table. Do you see them? Some of them span columns and rows. Figure 13.20 shows the same table with a grid drawn over it so you can see where the rows and columns are.
Figure 13.20: Five columns, five rows.
With tables such as this one that use many spans, it's helpful to draw this sort of grid to figure out where the spans are and in which row they belong. Remember, spans start at the topmost row and the leftmost column.
Ready? Start with the framework, just as you have for the other tables in this chapter:
<HTML>
<HEAD>
<TITLE>Service Data</TITLE>
</HEAD>
<BODY>
<TABLE BORDER>
<CAPTION>Drive Belt Deflection</CAPTION>

</TABLE>
</BODY>
</HTML>
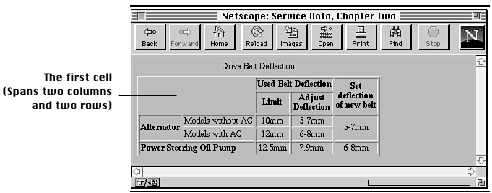
Now create the first row. With the grid on your picture, you can see that the first cell is empty and spans two rows and two columns (see Figure 13.21). Therefore, the HTML for that cell would be as follows:
<TR>
<TH ROWSPAN=2 COLSPAN=2></TH>
The second cell in the row is the Used Belt Deflection heading cell, which spans two columns (for the two cells beneath it). So the code for that cell is
<TH COLSPAN=2>Used Belt Deflection</TH>
Now that you have two cells that span two columns each, there's only the one left in this row. But this one, like the first one, spans the row beneath it:
<TH ROWSPAN=2>Set deflection of new belt</TH>
</TR>
Now go on to the second row. This isn't the one that starts with the Alternator heading. Remember that the first cell in the previous row has a ROWSPAN and a COLSPAN of two, meaning that it bleeds down to this row and takes up two cells. You don't need to redefine it for this row; you just move on to the next cell in the grid. The first cell in this row is the Limit heading cell, and the second cell is the "Adjust Deflection" heading cell:
<TR>
    <TH>Limit</TH>
    <TH>Adjust Deflection</TH>
</TR>
What about the last cell? Just like the first cell, the cell in the row above this one had a ROWSPAN of two, which takes up the space in this row. So the only values you need for this row are the ones you already defined.
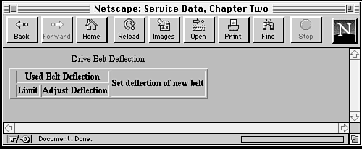
Are you with me so far? Now is a great time to try this out in your browser to make sure that everything is lining up. It will look kind of funny because we haven't really put anything on the left side of the table yet, but it's worth a try. Figure 13.22 shows what we've got so far.
Figure 13.22: The table so far.
Next row! Check your grid if you need to. Here, the first cell is the heading for Alternator, and it spans this row and the one below it. Are you getting the hang of this yet?
<TR>
    <TH ROWSPAN=2>Alternator</TD>
The next three cells are pretty easy because they don't span anything. Here are their definitions:
<TD>Models without AC</TD>
<TD>10mm</TD>
<TD>5-7mm</TD>
The last cell in this row is just like the first one:
<TD ROWSPAN=2>5-7mm</TD>
</TR>
We're up to row number four. In this one, because of the ROWSPANs from the previous row, there are only three cells to define: the cell for Models with AC, and the two cells for the numbers:
<TR>
    <TD>Models with AC</TD>
    <TD>12mm</TD>
    <TD>6-8mm</TD>
</TR>
| NOTE |
In this table, I've made the Alternator cell a heading cell and the AC cells plain data. This is mostly an aesthetic decision on my part; I could just as easily have made all three into headings. |
Now for the final row-this one should be easy. The first cell (Power Steering Oil Pump) spans two columns (the one with Alternator in it, and the With/Without AC column). The remaining three are just one cell each:
<TR>
    <TH COLSPAN=2>Power Steering Oil Pump</TD>
    <TD>12.5mm</TD>
    <TD>7.9mm</TD>
    <TD>6-8mm</TD>
</TR>
That's it. You're done laying out the rows and columns. That was the hard part; the rest is just fine-tuning. Let's try looking at it again to make sure there are no strange errors (see Figure 13.23).
Figure 13.23: The table: the next step.
Now that you have all the rows and cells laid out, adjust the alignments within the cells. The numbers, at least, should be centered. Because they make up the majority of the table, let's center the default alignment for each row:
<TR ALIGN=CENTER>
But the labels along the left side of the table (Alternator, Models With/Without AC, and Power Steering Oil Pump) look funny if they're centered, so let's align them left:
<TH ROWSPAN=2 ALIGN=LEFT>Alternator</TD>
<TD ALIGN=LEFT>Models without AC</TD>

<TD ALIGN=LEFT>Models with AC</TD>

<TH COLSPAN=2 ALIGN=LEFT>Power Steering Oil Pump</TD>
Finally, the last bit of fine-tuning I've done is to put some line breaks in the longer headings so that the columns are a little narrower. Because the text in the headings is pretty short to start with, I don't have to worry too much about the table looking funny if it gets too narrow. Here are the lines I modified:
<TH ROWSPAN=2>Set<BR>deflection<BR>of new belt</TH>
<TH>Adjust<BR>Deflection</TH>
Voilˆ-the final table, with everything properly laid out and aligned! Figure 13.24 shows the final result.
Figure 13.24: The Final Drive Belt Deflection Table.
| NOTE |
If you got lost at any time, the best thing you can do is pull out your handy text editor and try it yourself, following along tag by tag. After you've done it a couple of times, it becomes easier. |
Here's the full text for the table example:
<HTML>
<HEAD>
<TITLE>Service Data</TITLE>
</HEAD>
<BODY>
<TABLE BORDER>
<CAPTION>Drive Belt Deflection</CAPTION>
<TR>
    <TH ROWSPAN=2 COLSPAN=2></TH>
    <TH COLSPAN=2>Used Belt Deflection</TH>
    <TH ROWSPAN=2>Set<BR>deflection<BR>of new belt</TH>
</TR>
<TR>
    <TH>Limit</TH>
    <TH>Adjust<BR>Deflection</TH>
</TR>
<TR ALIGN=CENTER>
    <TH ROWSPAN=2 ALIGN=LEFT>Alternator</TD>
    <TD ALIGN=LEFT>Models without AC</TD>
    <TD>10mm</TD>
    <TD>5-7mm</TD>
    <TD ROWSPAN=2>5-7mm</TD>
</TR>
<TR ALIGN=CENTER>
    <TD ALIGN=LEFT>Models with AC</TD>
    <TD>12mm</TD>
    <TD>6-8mm</TD>
</TR>
<TR ALIGN=CENTER>
    <TH COLSPAN=2 ALIGN=LEFT>Power Steering Oil Pump</TD>
    <TD>12.5mm</TD>
    <TD>7.9mm</TD>
    <TD>6-8mm</TD>
</TR>
</TABLE>
</BODY>
</HTML>
All the tables we've created up to this point relied on the browser itself to decide how wide the table and column widths were going to be. In many cases, this is the best way to make sure your tables are viewable on different browsers with different screen sizes and widths; simply let the browser decide. In other cases, however, you may want to have more control over how wide your tables and columns are, particularly if the defaults the browser comes up with are really strange. In this section you'll learn a couple ways to do just this.
Often the easiest way to make small changes to how a table is laid out is by using line breaks (<BR> tags), using the NOWRAP attribute, or using both <BR> and NOWRAP together.
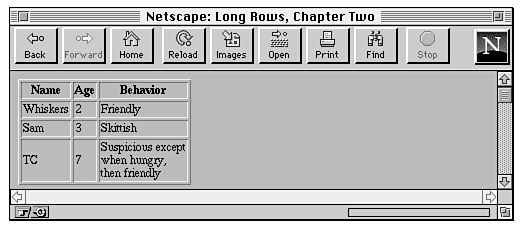
Line breaks are particularly useful if you have a table in which most of the cells are small and only one or two cells have longer data. As long as the screen width can handle it, the browser generally just creates really long rows, which looks rather funny in some tables (see Figure 13.25).
Figure 13.25: A table with one long row.
By putting in line breaks, you can wrap that row in a shorter column so that it looks more like the table shown in Figure 13.26.
Figure 13.26: The long row fixed with <BR>.
On the other hand, you might have a table in which a cell is being wrapped for which you want all the data on one line. (This can be particularly important for things such as form elements within table cells where you want the label and the input field to stay together.) In this instance, you can add the NOWRAP attribute to the <TH> or <TD> tags, and the browser keeps all the data in that cell on the one line. Note that you can always add <BR> tags by hand to that same cell and get line breaks exactly where you want them.
Be careful when you hard-code table cells with line breaks and NOWRAP attributes. Remember, your table might be viewed in many different screen widths. Try resizing the window in which your table is being viewed and see whether your table can still hold up under different widths with all your careful formatting in place. For the most part, you should try to let the browser itself format your table and to make minor adjustments only when necessary.
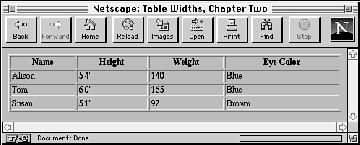
The WIDTH attribute to the <TABLE> tag defines how wide the table will be on the page. WIDTH can have a value that is either the exact width of the table (in pixels) or a percentage (such as 50 percent or 75 percent) of the current screen width, which can therefore change if the window is resized. If WIDTH is specified, the width of the columns within the table can be compressed or expanded to fit the required width. For example, Figure 13.27 shows a table that would have been quite narrow if it had been left alone. But this table has stretched to fit a 100 percent screen width using the WIDTH attribute, which causes Netscape to spread out all the columns to fit the screen.
Figure 13.27: Table widths in Netscape.
| NOTE |
Trying to make the table too narrow for the data it contains might be impossible, in which case Netscape tries to get as close as it can to your desired width. |
It's always a better idea to specify your table widths as percentages rather than as specific pixel widths. Because you don't know how wide the browser window will be, using percentages allows your table to be reformatted to whatever width it is. Using specific pixel widths may cause your table to run off the page.
The WIDTH attribute can also be used on individual cells (<TH> or <TD>) to indicate the width of individual columns. As with table width, the WIDTH tag in calls can be an exact pixel width or a percentage (which is taken as a percentage of the full table width). As with table widths, using percentages rather than specific pixel widths is a better idea because it allows your table to be displayed regardless of the window size.
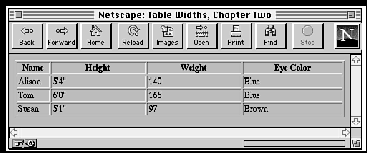
Column widths are useful when you want to have multiple columns of identical widths, regardless of their contents (for example, for some forms of page layout). Figure 13.28 shows the same table from the previous example that spans the width of the screen, although this time the first column is 10 percent of the table width and the remaining three columns are 30 percent. Netscape adjusts the column widths to fit both the width of the screen and the given percentages.
Sick of tables yet? There are only a couple table features left: border widths, cell spacing, cell padding, and adding color.
You can also change the width of the
border drawn around the table. If BORDER has a numeric
value, the border around the outside of the table is drawn with
that pixel width. The default is BORDER=1; BORDER=0
suppresses the border (just as if you had omitted the BORDER
attribute altogether).
| NOTE |
The border value applies only to the shaded border along the outside edge of the table, not to the borders around the cells. See the next section for that value. |
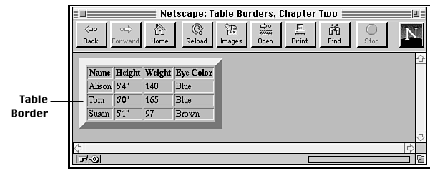
Figure 13.29 shows an example of a table with a border of 10 pixels.
Figure 13.29: Table border widths.
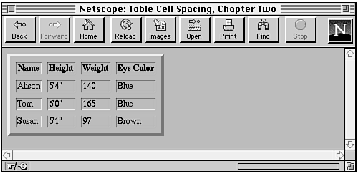
Cell spacing is similar to cell padding except that it affects the amount of space between cells-that is, the width of the shaded lines that separate the cells. The CELLSPACING attribute in the <TABLE> tag affects the spacing for the table. Cell spacing is 2 by default.
Cell spacing also includes the outline around the table, which is just inside the table's border (as set by the BORDER attribute). Experiment with it, and you can see the difference. For example, Figure 13.30 shows an example of a table with cell spacing of 8 and a border of 4.
Figure 13.30: Cell spacing (and borders).
Cell padding is the amount ofspace between the edges of the cells and the cell's contents. By default, Netscape draws its tables with a cell padding of 1 pixel. You can add more space by adding the CELLPADDING attribute to the <TABLE> tag, with a value in pixels for the amount of cell padding you want. Figure 13.31 shows an example of a table with cell padding of 10 pixels.
The CELLPADDING attribute with a value of 0 causes the edges of the cells to touch the edges of the cell's contents (which doesn't look very good).
Just when tables were becoming consistent amongst browsers, someone had to come along and add a whole bunch of new features. That someone was Microsoft, with their Internet Explorer browser, which supports several attributes that allow you to change the color of various parts of the table. Netscape has since included support for background colors in the newest version of its browser, but for the most part these attributes are very new and not commonly supported by most browsers on the Web, and so keep this in mind if you choose to use these tags.
To change the background color of a table, a row, or a cell inside a row, use the BGCOLOR attribute to the <TABLE>, <TR>, <TH> or <TD> tags. Just like in <BODY>, the value of BGCOLOR is a color specified as a hexadecimal triplet or, in Explorer only, one of the seven color names: Black, White, Green, Maroon, Olive, Navy, Purple, Gray, Red, Yellow, Blue, Teal, Lime, Aqua, Fuchsia, or Silver.
Each background color overrides the background color of its enclosing element. So, for example, a table background overrides the page background, a row background overrides the tables, and any cell colors override all other colors. If you nest tables inside cells, that nested table has the background color of the cell that encloses it.
Also, if you change the color of a cell, don't forget to change the color of the text inside it using <FONT COLOR...> so you can still read it.
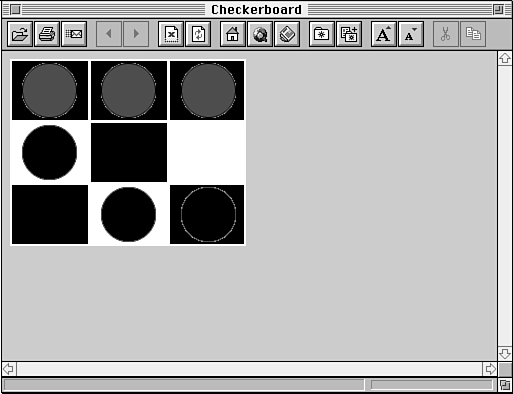
Here's an example of changing the background and cell colors in a table. Here I've created a checkerboard using an HTML table. The table itself is white, with alternating cells in black. The checkers (here, red and black circles) are images. The result in Explorer is shown in Figure 13.32.
Figure 13.32: Table cell colors.
| NOTE |
In order for table cells to show up with background colors, they have to have some sort of contents. Simply putting a <BR> tag in empty cells works fine. |
<HTML>
<HEAD>
<TITLE>Checkerboard</TITLE>
</HEAD>
<BODY>
<TABLE BGCOLOR="#FFFFFF" WIDTH=50%>
<TR ALIGN=CENTER>
   <TD BGCOLOR="#000000" WIDTH=33%><IMG SRC="redcircle.gif"></TD>
   <TD BGCOLOR="#000000" WIDTH=33%><IMG SRC="redcircle.gif"></TD>
   <TD BGCOLOR="#000000" WIDTH=33%><IMG SRC="redcircle.gif"></TD>
</TR>
<TR ALIGN=CENTER>
   <TD> <IMG SRC="blackcircle.gif"></TD>
   <TD BGCOLOR="#000000"><BR></TD>
   <TD><BR></TD>
</TR>
<TR ALIGN=CENTER>
   <TD BGCOLOR="#000000"><BR></TD>
   <TD><IMG SRC="blackcircle.gif"><BR></TD>
   <TD BGCOLOR="#000000"><IMG SRC="blackcircle.gif"> </TD>
</TR>
</TABLE>
</BODY>
</HTML>
Internet Explorer also allows you to change the colors of the elements of the table's border using the BORDERCOLOR, BORDERCOLORLIGHT, and BORDERCOLORDARK attributes. Each of these attributes takes either a color number or name and can be used in <TABLE>, <TD>, <TH>, or <TD>. Like background colors, the border colors each override the colors of the enclosing element. All three require the enclosing <TABLE> tag to have the BORDER attribute set.
These extensions are only (currently) supported in Internet Explorer.
Tables are great for summarizing large amounts of information in a way that can be quickly and easily scanned. In terms of information design, tables are right up there with link menus (as described earlier in this book) for structuring data so that your reader can get in and out of your pages.
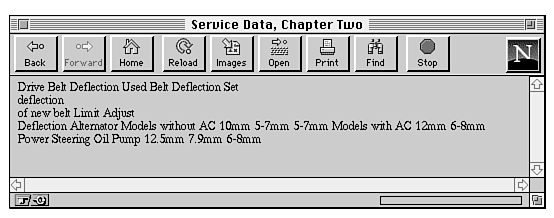
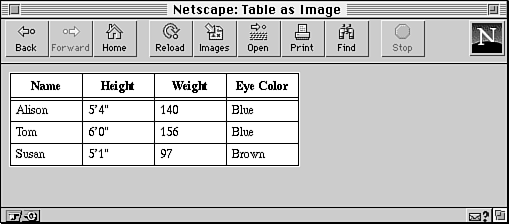
The difficulty with tables is that although most newer browsers do support them, they come out particularly messed up in browsers that don't. You won't lose all the data in the table, but you will lose the formatting, which can make your data just as unreadable as if it hadn't been included at all. For example, Figure 13.33 shows a table that looks pretty nice in Netscape.
Figure 13.33: A table in Netscape 1.1.
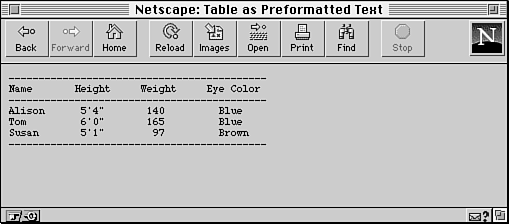
Figure 13.34 shows the same table as viewed by an earlier version of Netscape that didn't support tables.
Figure 13.34: The same table in Netscape 1.0.
Pretty gross, huh? It's also really confusing for your readers if they're not using a browser that supports tables and you haven't warned them about it.
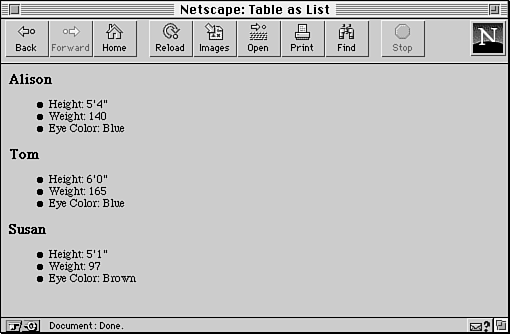
To work around tables for browsers that don't support them, you have several choices. Figure 13.35 shows a simple HTML table, and each of the following choices shows methods of working around that table:
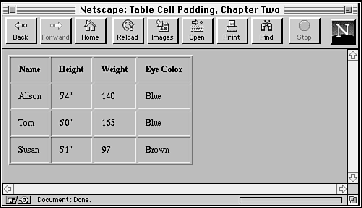
<P><A HREF="heights.html">A table</A> of the various
heights, weights and eye colors of people in my group.
Your browser must support tables to be able to view this</P>
The most complicated way to create tables that work even in non-table-enabled browsers is to design your tables so that the layout works equally well in both. For example, if you use text elements such as headings and block quotes inside table cells, those elements will end up on their own lines if tables aren't supported. Using trial and error and testing your pages in both kinds of browsers, you can often come up with a layout that works equally well inside and outside tables.
One commonly used trick along those lines is to include <P> or <BR> tags at the end of selected cells. By including them at the end of the cell, they're ignored in browsers that support tables but provide line breaks at the appropriate spots in browsers that don't support tables. So, for example, with the color table you created in Exercise 13.1, let's add line breaks to the last cell in each row:
<TABLE BORDER>
<TR>
    <TH><BR></TH>
    <TH>Red</TH>
    <TH>Yellow</TH>
    <TH>Blue<BR></TH>
</TR>
<TR>
    <TH>Red</TH>
    <TD>Red</TD>
    <TD>Orange</TD>
    <TD>Purple<BR></TD>
</TR>
<TR>
    <TH>Yellow</TH>
    <TD>Orange</TD>
    <TD>Yellow</TD>
    <TD>Green<BR></TD>
</TR>
<TR>
    <TH>Blue</TH>
    <TD>Purple</TD>
    <TD>Green</TD>
    <TD>Blue<BR></TD>
</TR>
</TABLE>
The <BR> tags won't make any difference to the layout of the table in browsers that understand tables (because they're at the end of the cell), but they are significant to browsers that don't. The paragraph tags make actual paragraph breaks so that each row is on its own line. It's not a replacement for a table, but it does make it a little less confusing to read.
In this chapter, you've learned all about tables. Tables allow you to arrange your information in rows and columns so that your readers can scan the table quickly and get to the information they need.
While working with tables in this chapter, you've learned about headings and data, captions, defining rows and cells, aligning information within cells, and creating cells that span multiple rows or columns. With these features you can create tables for most purposes.
As you're constructing tables, it's helpful to keep the following steps in mind:
Table 13.1 presents a quick summary of the HTML table-creating
tags that you've learned about in this chapter.
| Tag | Attribute | Use |
| <TABLE>...</TABLE> | Indicates a table. | |
| BORDER | An attribute of the <TABLE> tag, indicating whether the table will be drawn with a border. The default is no border. If BORDER has a value, that value is the width of the shaded border around the table. | |
| CELLSPACING | Defines the amount of space between the cells in the table. | |
| CELLPADDING | Defines the amount of space between the edges of the cell and its contents. | |
| <CAPTION>... </CAPTION> | Creates an optional caption for the table. | |
| <TR>...</TR> | Defines a table row, which can contain heading and data cells. | |
| <TH>..<TH> | Defines a table cell containing a heading. Heading cells are usually indicated by boldface and centered both horizontally and vertically within the cell. | |
| <TD>...<TD> | Defines a table cell containing data. Table cells are in a regular font, and are left-justified and vertically centered within the cell. | |
| ALIGN | When used with <TABLE>, possible values are LEFT and RIGHT. Determines the alignment of the table and indicates that text following the table will be wrapped alongside it.
When used with <CAPTION>, the possible values for most browsers are TOP and BOTTOM. ALIGN indicates whether the caption will be placed at the top of the table (the default) or the bottom. In Internet Explorer, the possible values are LEFT, RIGHT, and CENTER, and indicate the horizontal alignment of the caption. When used with <TR>, the possible values are LEFT, CENTER, and RIGHT, which indicate the horizontal alignment of the cells within that row (overriding the default alignment of heading and table cells). When used with <TH> or <TD>, the possible values are also LEFT, CENTER, and RIGHT, which override both the row's alignment and any default cell alignment. | |
| VALIGN | When used with captions in Internet Explorer, possible values are TOP and BOTTOM and indicate the positioning of the caption relative to the table (same as ALIGN in most other browsers).
When used with <TR>, possible values are TOP, MIDDLE, and BOTTOM. VALIGN indicates the vertical alignment of the cells within that row (overriding the defaults). When used with <TH> or <TD>, the same possible values are used, and VALIGN overrides both the row's vertical alignment and the default cell alignment. In Netscape, VALIGN can also have the value BASELINE. | |
| ROWSPAN | Used within a <TH> or <TD> tag, ROWSPAN indicates the number of cells below this one that this cell will span. | |
| COLSPAN | Used within a <TH> or <TD> tag, COLSPAN indicates the number of cells to the right of this one that this cell will span. | |
| BGCOLOR | (Internet Explorer and Netscape 3.0 extension) Can be used with any of the table tags to change the background color of that table element. Cell colors override row colors, which override table colors. The value can be a hexadecimal color number or a color name. | |
| BORDERCOLOR | (Internet Explorer extension) Can be used with any of the table tags to change the color of the border around that element. The value can be a hexadecimal color number or a color name. | |
| BORDERCOLORLIGHT | (Internet Explorer extension) Same as BORDERCOLOR, except it affects only the light component of a 3D-look border. | |
| BORDERCOLORDARK | (Internet Explorer extension) Same as BORDERCOLOR, except it affects only the dark component of a 3D-look border. | |
| NOWRAP | Used within a <TH> or <TD> tag, NOWRAP prevents the browser from wrapping the contents of the cell. | |
| WIDTH | When used with <TABLE>, indicates the width of the table, in exact pixel values or as a percentage of page width (for example, 50 percent).
When used with <TH> or <TD>, WIDTH indicates width of the cell, in exact pixel values or as a percentage of table width (for example, 50 percent). |
| Q | Tables are a real hassle to lay out, especially when you get into row and column spans. That last example was awful. |
| A | You're right. Tables are a tremendous pain to lay out by hand like this. However, if you're writing filters and tools to generate HTML code, having the table defined like this makes more sense because you can programmatically just write out each row in turn. Sooner or later, we'll all be working in HTML filters anyhow (let's hope), so you won't have to do this by hand for long. |
| Q | My tables work fine in Netscape, but they're all garbled in many other browsers. What did I do wrong? |
| A | Did you remember to close all your <TR>, <TH>, and <TD> tags? Make sure you've put in the matching </TR>, </TH>, and </TD> tags, respectively. The closing tags may be legally optional, but often other browsers need those tags in order to understand table layout. |
| Q | Can you nest tables, putting a table inside a single table cell? |
| A | Sure! As I mentioned in this chapter, you can put any HTML code you want to inside a table cell, and that can include other tables. |
| Q | Why does most of the world use ALIGN for positioning a caption at the top or bottom of a page, but Internet Explorer does something totally different? |
| A | I don't know. And, worse, Internet Explorer claims they got that definition from HTML 3.2, but no version of HTML 3.2 or the newer tables specification has it defined in that way. Hopefully, future versions of Internet Explorer will conform to the definition most of the world is following so that there isn't this confusion. |