This chapter continues with the knowledge you've gained in previous chapters and shows you how to use existing template databases for generating your own Web database applications. You will be using the Microsoft Access Database Wizard to generate a template database with sample data in Microsoft Access. You then will use the Access Upsizing Wizard to convert your Access database into a SQL Server database that will be used as the back-end database engine for the sample Visual Basic order-entry template application.
To help you better understand exactly how you will be implementing the sample order-entry application template, here is a list of the steps covered in this chapter:
If you have Microsoft Access at your site, you have a wealth of database templates already built into your Access installation. In this chapter, you will be building a Web database application from scratch and using Microsoft SQL Server to service that Web database. To accomplish this, you will use the order-entry database template available with Microsoft Access. After you build the database, you will port it to a SQL Server environment and use it as the data repository for the sample Web database application.
If you've never used the Access Database Wizard, you'll find that it is a very easy way to generate a standard database. This does not mean that you are limited to using the exact database structure of the template. Instead, you have the opportunity to add and remove tables and columns from your newly created database. In this example, you will use the template database exactly as it exists.
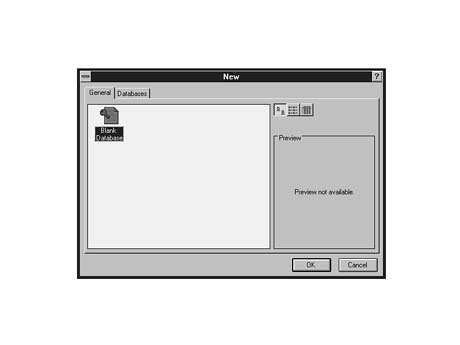
After you start the Access application, choose File | New Database. The New dialog
box appears, as shown in Figure 26.1.
FIGURE
26.1.The General tab of the New dialog box.
Notice that the New dialog box includes two selection tabs: General and Databases.
By default, the General tab is selected and includes the default Blank database.
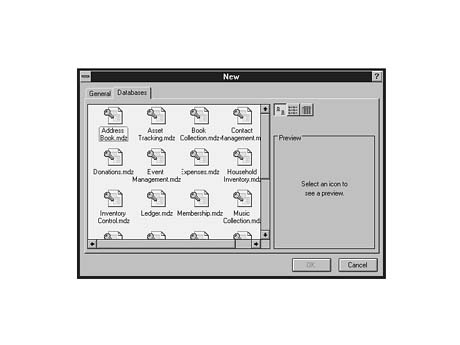
You want to get access to the database templates, so click the Databases tab. Figure
26.2 shows the available database templates in databases view.
FIGURE 26.2. Viewing the database templates on the Databases tab.
As you can see, the number of databases is too large to fit in the window. You
can control the presentation of the databases by clicking one of the three buttons
(text under icon, text to the right of icon, and column formatted) to the right of
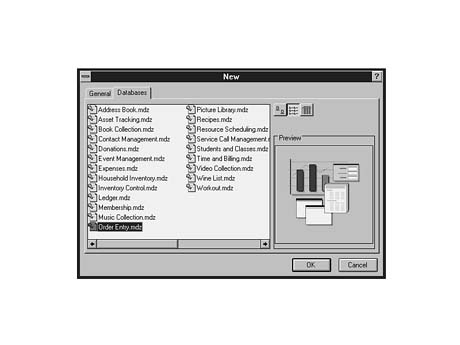
the Databases window. Click the middle button and then select the Order Entry.mdz
file by clicking it. Figure 26.3 shows the full template database view.
FIGURE
26.3. .The full template database view
Click OK, and Access begins to create your new database from the selected template.
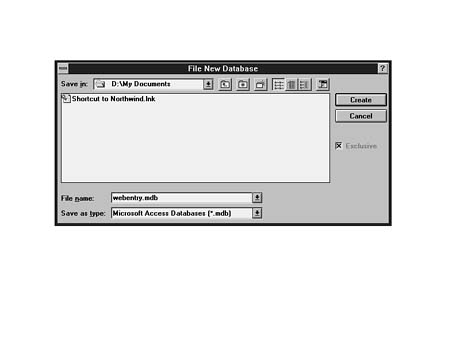
The next window prompts you for a database name for your new database. You can
select where to store your database in addition to selecting an appropriate name.
I chose webentry.mdb as my database name and used the default directory
as the location for storing the database. Figure 26.4 shows the File New Database
dialog box. In the File name combo box, enter your database name.
FIGURE 26.4. The File New Database dialog box.
Now that you've selected the database name and have chosen where the database
will be saved, you are ready to begin the process of using the wizards to actually
generate the database objects you want for your new database. Click Create, and the
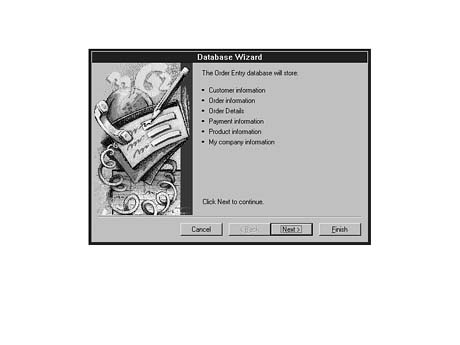
program begins to load all the wizards it needs to build your new database. After
the wizards are loaded, you are presented with an information window showing the
details of the template database. Figure 26.5 shows the order-entry database template
information window.
FIGURE
26.5. The order-entry template information
window.
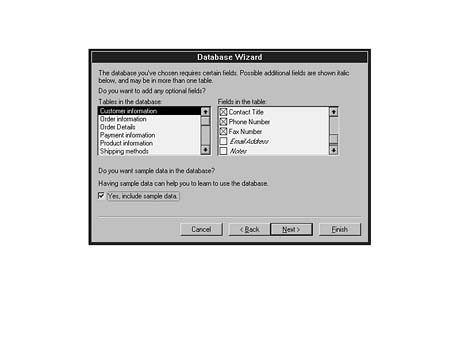
Click Next to go to the table- and column-selection window shown in Figure 26.6.
You now are ready to begin selecting specific tables and columns to be included in
the new database. If you scroll to the bottom of the list in the Fields in the table
listbox, you'll see two columns that are italicized. As the comments at the top of
the dialog box state, these are fields that are not included by default. You can
include them, though, simply by enabling the checkbox beside the column entry. Also,
this dialog box provides a checkbox for determining whether you want the newly created
database to include sample data. For this example, you do want sample data, so enable
the Yes, include sample data checkbox.
FIGURE
26.6. The table- and column-selection
window.
Now that you've identified the tables and columns you want included in the new
database, you are almost finished. Click Next, and you are presented with a screen-style
selection dialog box, as shown in Figure 26.7. The screen style is used only for
applications developed in Access. If you are planning on using an Access database
as your data repository for Web access, you can use this window to define how your
database screens will appear in your Access program. For this example, you will be
upsizing (porting) this database to a SQL Server environment, so you simply can choose
the default Standard style.
FIGURE
26.7. The screen-style selection dialog
box.
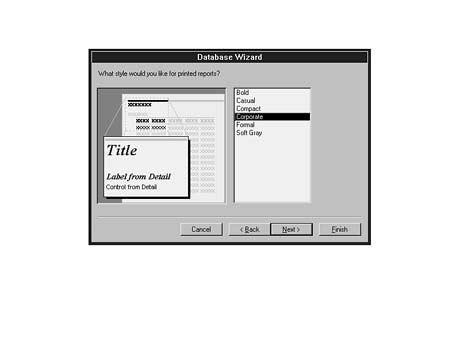
Click Next again, and the wizard presents you with the report-style selection
dialog box shown in Figure 26.8. Again, depending on the database platform you choose
for your Web database application, you may want to play with the selection options
in this dialog box to define how your database reports are presented when executed.
Six options are available for the style of report to be generated: Bold, Casual,
Compact, Corporate, Formal, and Soft Gray. In this dialog box, again choose the default
entry. In this dialog box, again choose the default entry.
FIGURE
26.8. The report-style selection dialog
box.
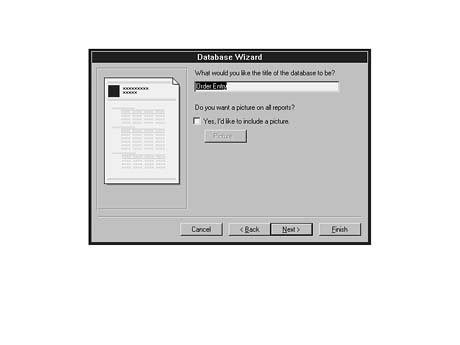
You've almost completed the database-creation process. Click Next, and you are
presented with the report title and name-selection dialog box shown in Figure 26.9.
FIGURE
26.9. The report title and name-selection
dialog box.
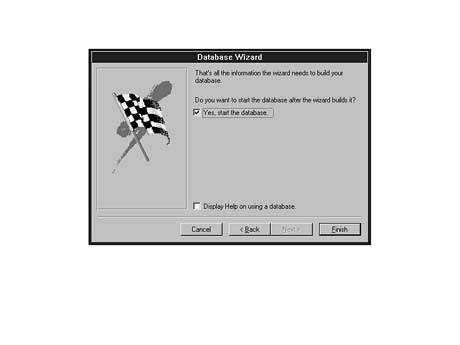
Finally, click Next, and the wizard will have all the information it needs to
build your new database. The final dialog box simply prompts the user to determine
whether the database should be started after it is generated (see Figure 26.10).
Additional help is available by enabling the Display Help on using a database checkbox.
FIGURE
26.10. The final Database Wizard dialog
box.
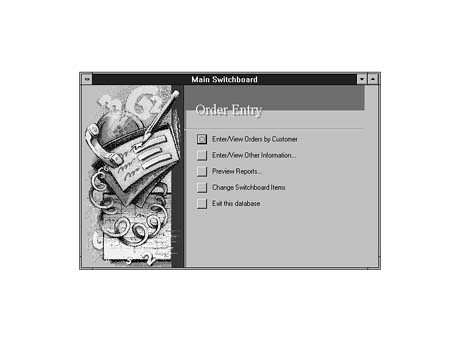
Click Finish, and Access creates your new database. Because this final phase actually generates your database, creates sample data, generates reports, and so on, the process can take a long time. On my system (a Pentium 100 running Windows NT 4.0), the process was complete in about 10 minutes.
After the entire process is complete, you are presented with the Main Switchboard
window, which enables you to view the database structure, enter data, view report
information, and exit the database (see Figure 26.11).
FIGURE
26.11. The Main Switchboard window.
Developers who plan on using a Microsoft Access database as their data repository
will find that the Database Wizard generates all the needed reports, query forms,
and so on. Take a quick look at a screen view of a specific customer's ordering information.
Select the Enter/View Orders by Customer option on the Main Switchboard window. The
Orders by Customer query form appears, as shown in Figure 26.12. Here, the database
information is available by clicking the selection arrows near the bottom of the
form.
FIGURE
26.12. The Orders by Customer form.
As you can see, the Access Database Wizard virtually builds your database application for you. The Main Switchboard window is a fully functional front-end to your Access database. Assuming that your Access database is your data repository for Web access, internal corporate users could use the Main Switchboard for the processing and handling of orders placed by Internet users.
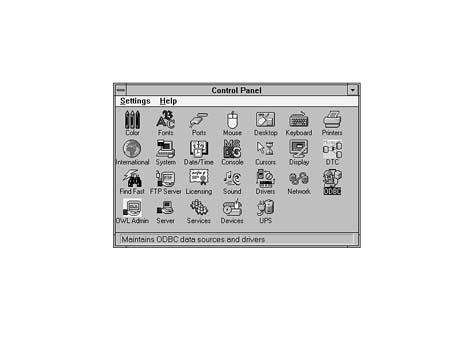
Upsizing an Access database to SQL Server requires that you have set up an Open Database Connectivity (ODBC) source for the new database. If you plan on creating a new database during the upsizing process, you need to set up an ODBC data source for the SQL Server Master database. For this chapter's sample application, you will be creating a new database in SQL Server that mirrors your Access database. You'll start by creating your ODBC source for the Master database.
From the Control Panel on your desktop, locate your ODBC icon, as shown in Figure
26.13.
FIGURE
26.13. Locating the ODBC icon in the Control
Panel.
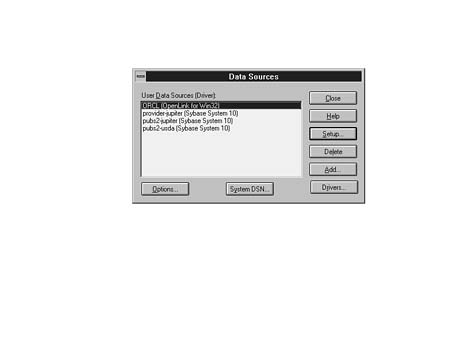
Double-click the ODBC icon. The ODBC Data Sources dialog box appears, showing
the currently configured ODBC resources (see Figure 26.14).
FIGURE
26.14. The ODBC Data Sources dialog box.
As you can see, you need to set up a data source for your SQL Server Master
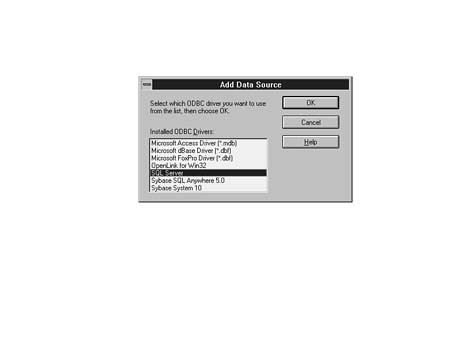
database. Click Add to access the Add Data Source dialog box. Add a new data source
by selecting the SQL Server driver, as shown in Figure 26.15.
FIGURE
26.15. The ODBC Add Data Source dialog
box.
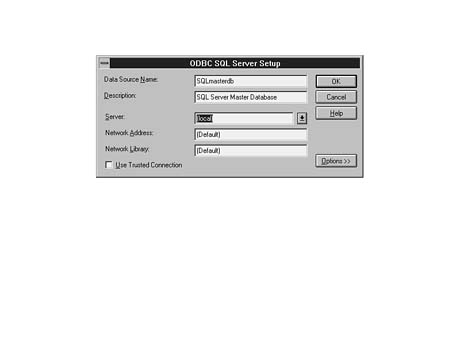
Click OK, and the ODBC SQL Server Setup dialog box appears. Here, you configure
your ODBC data source for the SQL Server Master database. Figure 26.16 shows
the ODBC SQL Server Setup dialog box with the values I selected for the Master
database.
FIGURE
26.16. The ODBC SQL Server Setup dialog
box.
Select a data source name and description and enter those values in the appropriate text-entry boxes. For my example, I chose SQLmasterdb as the data source name and SQL Server Master Database as the data source description. The data source name is used later when upsizing the database to SQL Server. Finally, select your server name. Because my SQL Server engine was running on the same machine from which I was upsizing my Access database, I simply chose local for the server name.
Click OK, and a new entry for your SQLmasterdb data source is added to the Data Sources dialog box.
You now can click Close to close the Data Sources dialog box, because you've completed the process needed to set up your ODBC source. Now you can begin the process of upsizing the database to SQL Server.
The Microsoft Access Upsizing tool is available for free from Microsoft and is used to automatically convert Access databases into their SQL Server equivalent. The Upsizing tool migrates your Access database to SQL Server while maintaining your data, indexes, defaults, counters, table relationships, and referential integrity.
For the sample order-entry processing application, you'll need to build the Web interface to the database. You will be using the new SQL Wizard included in the latest release of SQL Server. Before you can do that, however, you need to upsize the Access order-entry database to the SQL Server equivalent.
http://www.microsoft.com/Accessdev/AccInfo/AccInfo.htm
If you do not currently have the Access Upsizing tool, download and install it before continuing with the order-entry database application.
Before you begin your upsizing process, you must review a few items to reduce the possibility of upsizing errors. Every installation depends on so many factors that I cannot cover all of them in this book. If you follow these few recommendations, though, you can reduce many of the potential error conditions that arise during the execution of the Upsizing tool:
http://www.microsoft.com/accessdev/
If your Access webentry database is closed, open it now so that you can begin to use the Upsizing tool for migrating it to a SQL Server environment. After your database is open and you load the Upsizing tool, you are ready to migrate the order-entry database to SQL Server.
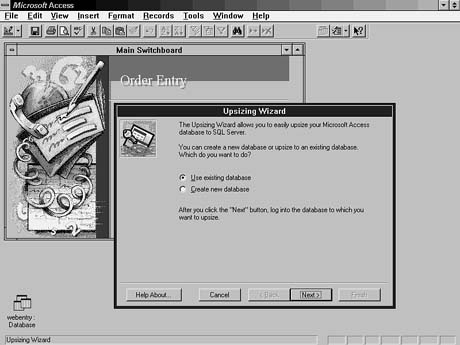
From the menu bar, choose Tools | Add-Ins | Upsize to SQL-Server. Figure 26.17
shows the first window for the Access Upsizing tool.
FIGURE
26.17. The Access Upsizing Wizard.
Because you will be creating a new SQL Server database that is a mirror of the Access database, you will choose the Create new database option.
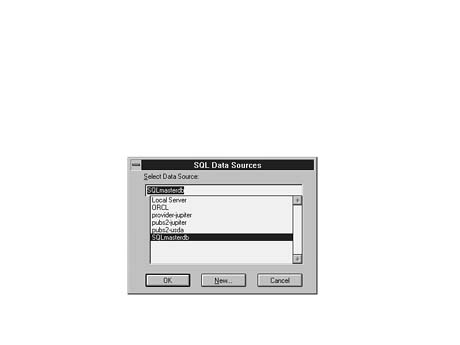
Select the "Create new database" option and click Next to begin the
upsizing process. The SQL Data Sources dialog box appears, which includes the SQLmasterdb
data source, as shown in Fig-ure 26.18.
FIGURE
26.18. The SQL Data Sources dialog box.
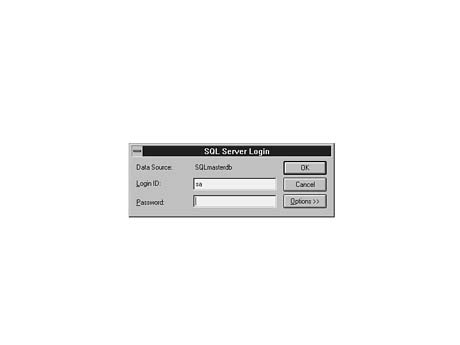
Highlight the SQLmasterdb data source and click OK. The SQL Server Login
dialog box appears, prompting the user for a SQL Server logon with the proper privileges
for creating a new database (see Figure 26.19).
FIGURE
26.19. The SQL Server Login dialog box.
Enter an appropriate SQL Server logon and password and click OK. The next window
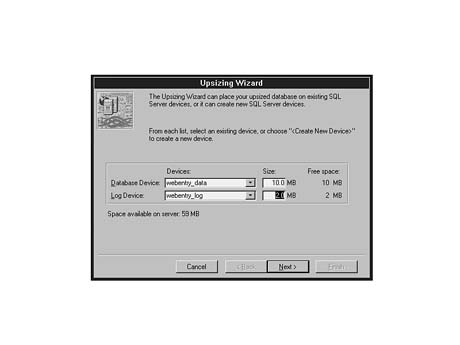
enables you to set up SQL Server devices for the newly upsized database. Select the
database device and log device you want to use for the new database. For the example,
you will be creating new devices for the webentry database. After you select
the Create New Device list entry, a New Device dialog box appears that enables you
to set the name of the SQL Server device for the data or log device (see Figure 26.20).
FIGURE
26.20. The SQL Server New Device dialog
box.
Notice in Figure 26.20 that I chose a name of webentry_log for my log device. For my data device, I chose webentry_data. Click OK to return to the device-selection window with the newly set options for creating new data and log devices (see Figure 26.21).
FIGURE 26.21. The Upsizing Wizard device-selection window.
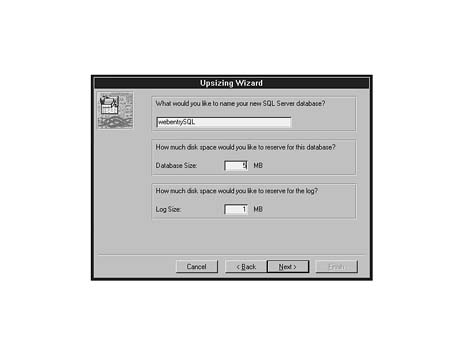
Click Next, and a new window appears in which you can define the new SQL Server database name, database size, and log size for the upsized database (see Figure 26.22). I chose the default database name, which is a concatenation of the Access database with a SQL extension (webentrySQL).
FIGURE 26.22. The Upsizing Wizard database name and data/log sizes dialog box.
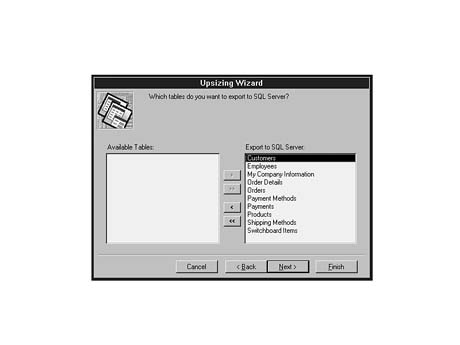
Click Next, and a listing of all of the available tables from the Access webentry
database appears, as shown in Figure 26.23. You will want to export all the tables
into the webentrySQL SQL Server database, so simply click the >> button
to select all the tables for export. The tables that will be exported are listing
in the Export to SQL Server box.
FIGURE
26.23. Tables to be exported to SQL Server.
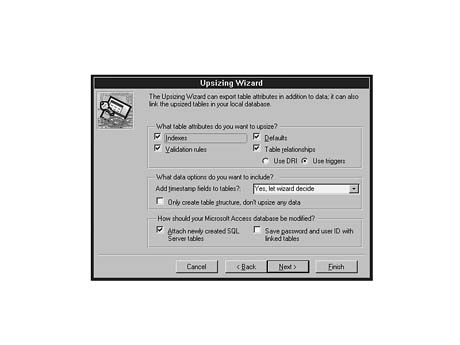
You now can click Next to select attributes for your new database (see Figure
26.24). Because you want to completely mirror the Access database, you will choose
all the default options.
FIGURE
26.24. The database attribute-selection
window.
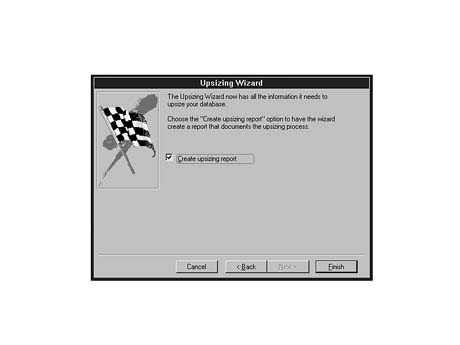
Note that, by default, Access will link the tables from the newly created SQL
Server database to the old Access database. Click Next, and the Upsizing Wizard displays
a dialog box asking whether you want the Upsizing Wizard to create a report of the
upsizing process (see Figure 26.25). Enable the Create upsizing report checkbox so
that you'll have a report to review in the event of an error.
FIGURE
26.25. The upsizing report dialog box.
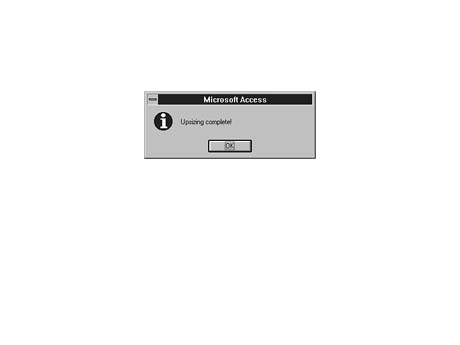
Now you simply can click Finish to begin the upsizing process. While the Upsizing Wizard is performing its magic, a status window tracks its progress. The whole process took only about five minutes on my machine. Depending on your machine configuration and the size of the database you are upsizing, your times may vary.
Voilà! After the process finally finishes, you see the Upsizing complete!
message box in Figure
26.26.
FIGURE
26.26. The Upsizing complete! message
box.
Assuming that your upsizing process was a success, you now have your webentry database migrated to a SQL Server database. The next step for the sample application is to build Web pages based on the information in the newly created database.
The SQL Server Web Assistant is a tool that is still in its infancy stage of development. The current version of the Web Assistant can provide some basic HTML generation based on simple database queries, however. The Web Assistant is capable of generating dynamic documents at specified intervals. You can build a page with the Web Assistant and have SQL Server rebuild the page whenever the contents of a specified table change, for example. Another scenario might be that you would want to rebuild a page on a daily basis--maybe something like a page displaying a "Fact of the Day" or "Hot, Special Deals."
This section looks at how you can use the Web Assistant to automatically build simple HTML documents. Later in this chapter, you'll learn how to generate HTML documents that go beyond simple HTML tables by incorporating use of the Internet Database Connector (IDC) discussed in Chapter 20, "The IIS Internet Database Connector (IDC)."
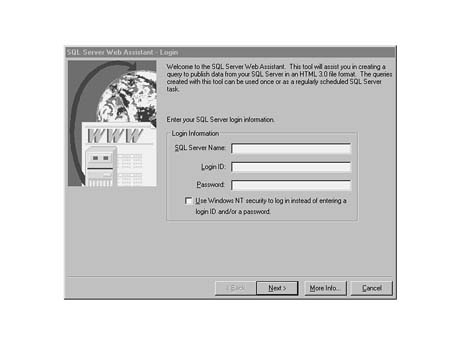
When you first start the SQL Server Web Assistant, you are presented with a logon
window that identifies the SQL Server and user logon you want to use for accessing
your SQL Server database (see Figure 26.27).
FIGURE
26.27. The Login dialog box.
Enter the name of the SQL Server you want to access. You might be able to leave this entry blank if the SQL Server exists on the current machine. Next, enter a proper logon and password and click Next.
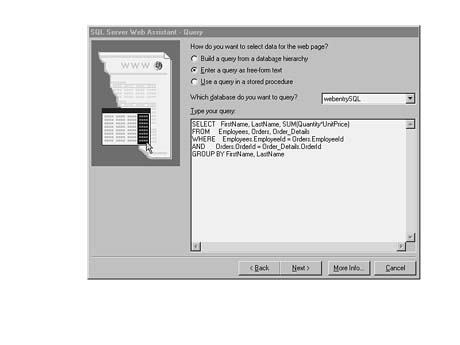
The Web Assistant next connects to the SQL Server Engine and generates a Query form (see Figure 26.28). In this form, you have the option of specifying how you want your data selected for the newly created Web page. By default, the Build a query from a database hierarchy option is selected. For this example, you will be specifying a freeform text query, so select the Enter a query as free-form text option. Next, select the webentrySQL database from the Which database do you want to query? drop-down listbox.
Finally, you need to specify the freeform text for the query. Because you want a total sales figure for each salesperson, you simply can specify the query as the following:
SELECT   FirstName, LastName, SUM(Quantity*UnitPrice)
FROM     Employees, Orders, Order_Details
WHERE    Employees.EmployeeId = Orders.EmployeeId
AND      Orders.OrderId = Order_Details.OrderId
GROUP BY FirstName, LastName
Figure 26.28 shows the Query form with the proper query information specified.
FIGURE
26.28. The Query dialog box.
Click Next, and the Web Assistant displays the Scheduling dialog box, which prompts you for information on when to generate the Web page (see Figure 26.29).
Assume that this company pays its sales staff a commission on sales whenever an order has been shipped. To automatically generate the Web page based on the shipping date, you can specify the ShipDate column as the specific column that, when updated, will rebuild the Web page.
Click the down-arrow in the When do you want to create your web page? drop-down
listbox. You'll notice several options that determine when the page will be generated
or updated. For pages that will require rebuilding based on changed input, you can
select the When Data Changes entry. When you select this entry, you'll notice that
a new Table(s) selection list appears. In this selection list, you can specify the
tables and columns that, when changed, will generate the Web page to be rebuilt.
When you select the When Data Changes entry, the Web Assistant creates or updates
an existing trigger based on the table or column selections specified in the Table(s)
listbox. This trigger will fire and execute the sp_makewebpage stored procedure,
which is responsible for generating the updated Web page.
FIGURE
26.29. The Scheduling dialog box.
The sample in Figure 26.29 is based on a trigger firing when the ShipDate column of the Orders table is updated.
For this example, you want to generate a document now so that you can look at the contents as generated by the Web Assistant. Select the Now entry in the When do you want to create your Web page? listbox.
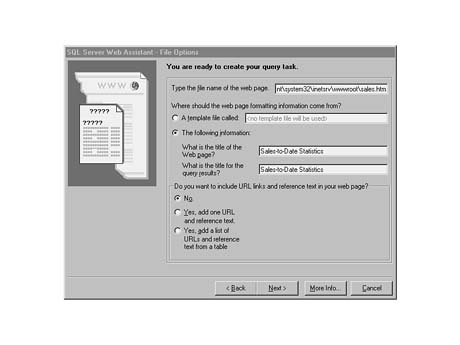
Click Next to specify the file options (see Figure 26.30). Here, you specify the
URL location for the HTML file to be generated. You should specify a path that is
in your Web server document root path. Specify the title for the page and the title
for the query results in the appropriate textboxes.
FIGURE
26.30. The File Options dialog box.
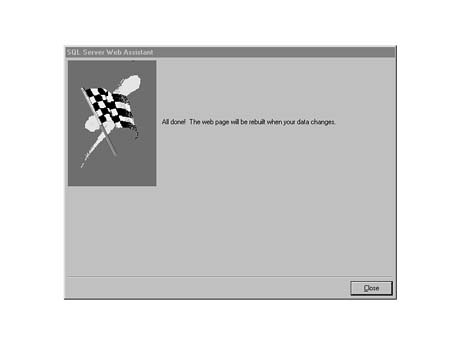
Click Next, and the Formatting dialog box appears. Here, you can specify minimal
formatting for the database output. For the example, you can use the default selections
and click Finish, and the Web Assistant generates the database trigger based on the
specified table to re-create the Web page whenever the data changes. If the Web Assistant
has accepted your information and registered the page to be built, the window shown
in Figure 26.31 appears.
FIGURE
26.31. The SQL Server Web Assistant completion
window.
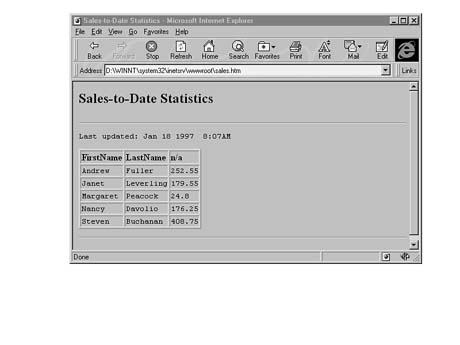
Now look at the HTML page that you just created. Listing 26.1 shows the source code for the page.
Listing 26.1. The HTML Page You Created.
<HTML>
<HEAD>
<TITLE>Sales-to-Date Statistics</TITLE>
</HEAD>

<BODY>
<H2>Sales-to-Date Statistics</H2>
<HR>

<PRE><TT>Last updated: Jan 18 1997  8:07AM</TT></PRE>

<P>
<P><TABLE BORDER=1>
<TR>
<TH ALIGN=LEFT>FirstName</TH>
<TH ALIGN=LEFT>LastName</TH>
<TH ALIGN=LEFT>n/a</TH>
</TR>

<TR>
<TD NOWRAP><TT>Andrew</TT></TD>
<TD NOWRAP><TT>Fuller</TT></TD>
<TD NOWRAP><TT>252.55</TT></TD>
</TR>

<TR>
<TD NOWRAP><TT>Janet</TT></TD>
<TD NOWRAP><TT>Leverling</TT></TD>
<TD NOWRAP><TT>179.55</TT></TD>
</TR>

<TR>
<TD NOWRAP><TT>Margaret</TT></TD>
<TD NOWRAP><TT>Peacock</TT></TD>
<TD NOWRAP><TT>24.8</TT></TD>
</TR>

<TR>
<TD NOWRAP><TT>Nancy</TT></TD>
<TD NOWRAP><TT>Davolio</TT></TD>
<TD NOWRAP><TT>176.25</TT></TD>
</TR>

<TR>
<TD NOWRAP><TT>Steven</TT></TD>
<TD NOWRAP><TT>Buchanan</TT></TD>
<TD NOWRAP><TT>408.75</TT></TD>
</TR>

</TABLE>
<HR>
</BODY>
</HTML>
Figure 26.32 shows how the HTML page will look when rendered on a Web browser.
FIGURE
26.32. The document generated by the Web
Assistant.
As you can see, the Web Assistant easily can generate "canned" HTML documents. For Web pages that require user input as query criteria, however, you need a more advanced mechanism. The next section discusses how to incorporate the IDC to generate dynamic hypermedia documents.
As discussed in Chapter 20, the IDC is an Internet Server API (ISAPI) DLL used to retrieve information from ODBC databases. This section focuses on how to set up the proper IDC files and HTML extension files required to automate the webentrySQL database into a WWW application.
Using the knowledge gained in Chapter 20 on how to build .idc and .htx files, you now can begin to put together the sample template order-entry application. As mentioned earlier, this application is based on an intranet example that enables internal users to process order entries that could have been generated by a Web-interface application such as an online store.
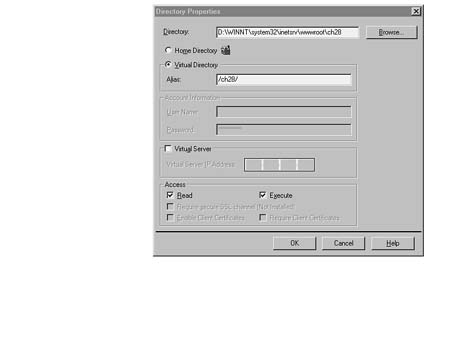
Figure 26.33 shows the Directory Properties dialog box for adding a new directory
to the IIS WWW Service.
FIGURE
26.33. The IIS WWW Service Directory Properties dialog box.
This example shows a few forms that easily can be modified to implement a simple solution for building your own order-entry processing application. The forms in this example are not all complete, and there certainly are numerous ways to expand on these examples. I present them here simply as templates for you to build on.
As noted in earlier chapters, security can be implemented in many ways. For an application such as an order-entry processing system, you would want to at least verify and log transactions at the user level. In most cases, you easily can track an employee's identification number. In this example, an employee logs onto the system with a user ID. This user ID then can be used to maintain information such as commissions data, to monitor work content (such as when an employee is paid based on quantity), and so on.
Another form of security that should be enforced when implementing intranet applications is security at the server level. On the authors' machines, we set up an entire directory structure for the application and defined only our machines (IP addresses) as having access to that directory structure.
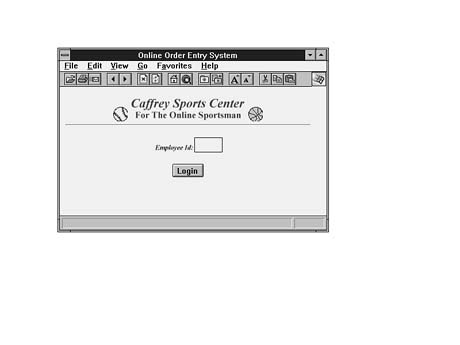
The application starts with the logon window shown in Figure 26.34. I could have
added a PASSWORD input field, but my database wasn't set up to handle passwords.
When designing your intranet application and database, however, be sure to include
a mechanism for authenticating user access.
FIGURE
26.34. The order-entry application logon
window.
Listing 26.2 shows the code that generated this first logon window.
Listing 26.2. Generating the first logon window.
<HTML>
<HEAD><TITLE>Online Order Entry System</TITLE></HEAD>
<BODY BGCOLOR="#FFFFFF">

<CENTER>
<IMG SRC="/ch26/bsball.jpg" ALIGN="CENTER">
<IMG SRC="/ch26/caffrey.jpg" ALIGN="CENTER">
<IMG SRC="/ch26/bkball.jpg" ALIGN="CENTER">
<HR>
<FORM METHOD="POST" ACTION="/ch26/main.idc">
<P>

<IMG SRC="/ch26/employee.jpg"><INPUT NAME="EmployeeID" SIZE="5">

<P>
<INPUT TYPE="SUBMIT" VALUE=" Login ">
</FORM>
</CENTER>
</BODY>
</HTML>
As you can see, there is nothing fancy about this document. There are two things worth mentioning in this code. First, the ACTION attribute of the FORM is identified as /ch26/main.idc. After the user clicks the Login button, this .idc file is executed. In the main.idc file, the user's identification is authenticated against the database. Second, the user logon INPUT field is given the NAME EmployeeID. In the main.idc file, this field name (in the form of a variable) is used in the database query. Listing 26.3 shows the main.idc file.
Listing 26.3. The main.idc file.
Datasource: webentrySQL
Username: sa
Template: main.htx
RequiredParameters: EmployeeID
SQLStatement:
+SELECT FirstName, LastName
+ from employees
+ where employeeid = %EmployeeID%
As you can see, the EmployeeID field was used in the SQLStatement to get the FirstName and LastName user entries. In .idc files, field names that are passed from HTML form documents are surrounded by percent (%) signs. The Template field is specified to tell the Web server to use the resulting fields from SQLStatement to populate the HTML extension file main.htx.
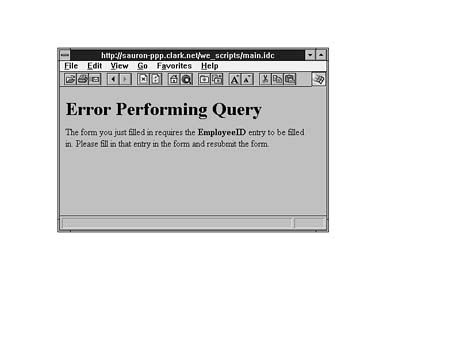
Also, note in the main.idc file listing that I used the RequiredParameters
field. By specifying the EmployeeID entry, you can do some initial field
validation prior to connecting to the database and executing your database query.
If the EmployeeID field is left blank when the form is submitted, the IIS
returns an error message, as shown in Figure 26.35.
FIGURE
26.35. The Error Performing Query window.
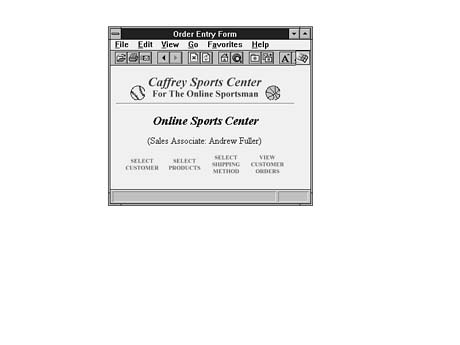
Specify a 2 as the input for the EmployeeID field. The employee's
identification is validated, and the resulting FirstName and LastName
fields are used to populate the main.htx file. Figure 26.36 shows the main.htx
file as rendered by a browser.
FIGURE
26.36. The order-entry form.
Listing 26.4 shows the code that generated the application's main screen.
Listing 26.4. Generating the applications main screen.
<html>
<title>Order Entry Form</title>
<BODY BGCOLOR="#FFFFFF">
<CENTER>
<IMG SRC="/ch26/bsball.jpg" ALIGN="CENTER">
<IMG SRC="/ch26/caffrey.jpg" ALIGN="CENTER">
<IMG SRC="/ch26/bkball.jpg" ALIGN="CENTER">
<HR>

<%begindetail%>
<%if CurrentRecord EQ 0 %>

<h4><EM>Online Sports Center</EM></h4>
<P>
(Sales Associate: <%FirstName%> <%LastName%>)
<P>
<FORM METHOD="POST" ACTION="/ch26/customer.idc?">
<INPUT TYPE="hidden" NAME="EmployeeID" VALUE="<%idc.EmployeeID%>">
<INPUT TYPE="hidden" NAME="CustomerID" VALUE="<%CustomerID%>">
<INPUT TYPE="hidden" NAME="OrderID" VALUE="<%OrderID%>">
<INPUT TYPE="IMAGE" SRC="/ch26/selcust.jpg">
</FORM>

<FORM METHOD="POST" ACTION="/ch26/products.idc?">
<INPUT TYPE="hidden" NAME="EmployeeID" VALUE="<%idc.EmployeeID%>">
<INPUT TYPE="hidden" NAME="CustomerID" VALUE="<%CustomerID%>">
<INPUT TYPE="hidden" NAME="OrderID" VALUE="<%OrderID%>">
<INPUT TYPE="IMAGE" SRC="/ch26/selprod.jpg">
</FORM>

<FORM METHOD="POST" ACTION="/ch26/shipping.idc?">
<INPUT TYPE="hidden" NAME="EmployeeID" VALUE="<%idc.EmployeeID%>">
<INPUT TYPE="hidden" NAME="CustomerID" VALUE="<%CustomerID%>">
<INPUT TYPE="hidden" NAME="OrderID" VALUE="<%OrderID%>">
<INPUT TYPE="IMAGE" SRC="/ch26/shipmeth.jpg">
</FORM>

<IMG SRC="/ch26/viewcust.jpg">

<%endif%>
<%enddetail%>
<%if CurrentRecord EQ 0 %>
<h2>Invalid employee id specified.</h2>
<a href="/ch26/emp_logon.htm">Try Again</a>
<%endif%>
</body>
</html>
The returned query result values (FirstName and LastName) were used in the following line to specify the sales associate's name:
(Sales Associate: <%FirstName%> <%LastName%>)
Note that the application will loop through every row returned from the query for all lines between the <%begindetail%> and <%enddetail%> tags. The CurrentRecord built-in variable is used within a conditional statement to test for the occurrence of the first record (record 0). If, at the end of the loop (just after the <%enddetail%> line), the value of CurrentRecord equals 0, no row results were returned.
Looking at the code for this page, you'll see two things that appear to be out of place. First, I used hidden fields to pass application state information between forms. As noted in earlier chapters, application state is not maintained by the application itself; the developer has to use other methods to maintain application information. Because this application enables users to browse between forms, the values are passed along between the forms as hidden fields. If a field has not yet been filled in or selected by the user, the entry simply remains empty.
The second thing that might look odd about Listing 26.4 is the use of multiple forms within the document. I chose this method simply as a means for giving the user the capability to choose his or her path in the application. Also note that I used image graphics as my INPUT object for each of the forms. This just provides a more presentable means than the standard Submit buttons for submitting a document for processing.
Now select the Select Customer text-image area, and the form is submitted to the customer.idc file for the purpose of selecting currently valid customers from the webentrySQL database. The basic logic for building the next form is replicated across the other forms available with this template application.
Listing 26.5 shows the code for the customer.idc file.
Listing 26.5. The customer.idc file.
Datasource: webentrySQL
Username: sa
Template: customer.htx
RequiredParameters: EmployeeId
SQLStatement:
+SELECT CompanyName, CustomerID
+ FROM Customers
+ ORDER BY CompanyName ASC
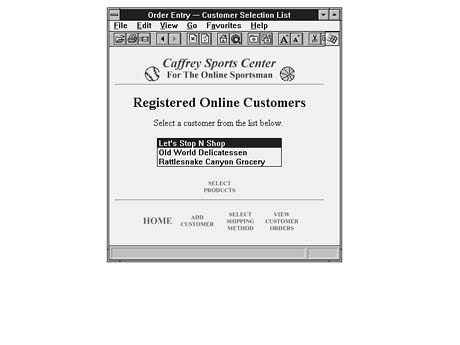
Figure 26.37 shows the Customer Selection List window.
FIGURE
26.37. The Order Entry-Customer Selection
List window.
The CompanyName and CustomerID query result fields are used to populate a SELECT list within the HTML form. Listing 26.6 shows the customer.htx template file that will be populated with the query results.
Listing 26.6. The customer.htx template file.
<html>
<title>Order Entry --- Customer Selection List</title>
<BODY BGCOLOR="#FFFFFF">

<CENTER>
<IMG SRC="/ch26/bsball.jpg" ALIGN="CENTER">
<IMG SRC="/ch26/caffrey.jpg" ALIGN="CENTER">
<IMG SRC="/ch26/bkball.jpg" ALIGN="CENTER">
<HR>
<%begindetail%>

<%if CurrentRecord EQ 0 %>
<FORM METHOD="POST" ACTION="/ch26/products.idc?">
<INPUT TYPE="hidden" NAME="EmployeeID" VALUE="<%idc.EmployeeID%>">
<INPUT TYPE="hidden" NAME="CustomerID" VALUE="<%idc.CustomerID%>">
<INPUT TYPE="hidden" NAME="ProductID" VALUE="<%idc.ProductID%>">

<P>
<center>
<h3>Registered Online Customers</h3>

<p>
Select a customer from the list below.

<p>
<SELECT NAME="CustomerID" SIZE="3">
<%endif%>

<OPTION VALUE="<%CustomerID%>"><%CompanyName%>
<%enddetail%>

<%if CurrentRecord EQ 0 %>
<h4>No customer records found.
Select "Add Customer" below to add a new record.</h4>

<%else%>
</SELECT>

<p>
<INPUT TYPE="IMAGE" SRC="/ch26/selprod.jpg">
</FORM>

<%endif%>
<hr>
<P>
<FORM METHOD="POST" ACTION="/ch26/main.idc?">
<INPUT TYPE="hidden" NAME="EmployeeID" VALUE="<%idc.EmployeeID%>">
<INPUT TYPE="hidden" NAME="CustomerID" VALUE="<%idc.CustomerID%>">
<INPUT TYPE="hidden" NAME="ProductID" VALUE="<%idc.ProductID%>">
<INPUT TYPE="IMAGE" SRC="/ch26/home.jpg">
</FORM>

<IMG SRC="/ch26/addcust.jpg">

<FORM METHOD="POST" ACTION="/ch26/shipping.idc?">
<INPUT TYPE="hidden" NAME="EmployeeID" VALUE="<%idc.EmployeeID%>">
<INPUT TYPE="hidden" NAME="CustomerID" VALUE="<%idc.CustomerID%>">
<INPUT TYPE="hidden" NAME="ProductID" VALUE="<%idc.ProductID%>">
<INPUT TYPE="IMAGE" SRC="/ch26/shipmeth.jpg">
</FORM>

<IMG SRC="/ch26/viewcust.jpg">

</center>
</body>
</html>
As you can see in Figure 26.37, you are presented with a listing of available customers. The user simply can choose a customer from the list and select the Select Products input text image to begin selecting products. The user has the option, with the other selectable text images, to bypass customer selections and move to another form.
Other forms are included with this application that enable users to select products and shipping methods. The software logic is basically the same for these forms as it is for the customer-selection form. This is certainly not a fully functional order-entry application. The big pieces of the puzzle were presented here to give you insight into a possible solution for Web database applications.
In this chapter, you learned how to create and upsize Access databases to the SQL Server database arena. Even though the example focused mostly on Microsoft solutions, you can use much of the same material in different contexts. You can set up ODBC resources that point to multiple distributed databases, for example, and have those databases service any ODBC-capable Web server. For this sample application template, I used IIS to integrate the webentrySQL ODBC resource database (upsized SQL Server) with a Web-based application.
![]()
![]()
![]()
![]()
![]()