In recent months, developers have witnessed an explosion of new Web-related technologies hitting the commercial marketplace as well as being offered freely at numerous Websites. This is especially true in the world of low-cost (or freely available) Web servers, databases, and Web-database gateway software for desktop/personal computers. It now is quite possible to develop a fully functional Website, complete with database applications, on a desktop computer in a matter of hours or days--and often with only a small financial investment.
This chapter presents and describes in detail such a system: The Omniscient Technologies Corporate Employee, Project, and Job Opportunity Web Database System. This system was designed, developed, and tested (including the creation and population of a database) in about one man-day's time. This was accomplished in spite of a lack of in-depth knowledge of the tools and components being used. How is this possible? By taking advantage of increasingly sophisticated features, such as application development wizards typical of the many PC-based tools and software packages, and by using WWW-database gateway software--preprogrammed CGI applications that effectively extend the functionality of HTML and abstract the complexity of much of the actual database access.
The system described in this chapter is part of an information system for a small software development and technical services firm. It originally was conceived as the basis for a corporate intranet, but it provides information of interest to external visitors as well and easily could be extended to provide additional capabilities to a wide variety of external users. This project was undertaken to demonstrate the feasibility of designing and developing a low-cost, PC-based Web database while still providing a high level of functionality, capabilities, and growth potential.
The primary requirements for the initial proof-of-feasibility system were these:
The applications developed initially were intended for internal (intranet) use, but there is no reason why access could not be extended to external users as well.
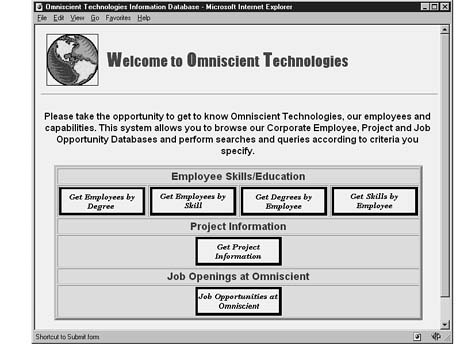
Figure 24.1 shows the Omniscient Technologies Information Database home page. You can see that the current system supports the following types of informational queries:
FIGURE 24.1. The Omniscient Technologies Information Database home page.
As discussed in Chapters 1, "The Internet, World Wide Web, and Intranets," and 2, "Doing Business on the Web," there are several benefits to developing organizational intranets for internal information sharing and Internet applications for use by external users. Databases can play a large role in these systems. Here are a number of potential benefits of the Omniscient Technologies Information database:
The following hardware and software components were used to create the database system:
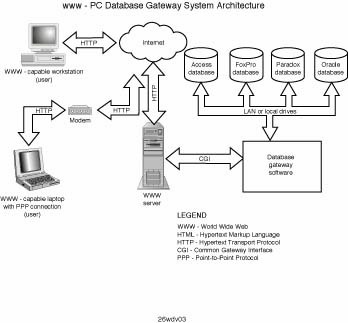
Figure 24.2 illustrates the testbed used to create and test the PC-based WWW database
system.
FIGURE
24.2.The testbed for the PC-based WWW database system.
Microsoft Access 95 Access 95 is a Microsoft relational database product for Windows 95 and NT. It's available as part of the Office Suite of products or separately. Access provides a strong suite of querying capabilities and easily can be programmed by using Visual Basic. Additionally, Access provides OLE and ODBC support, enabling links to spreadsheets, documents, and other databases.
http://www.microsoft.com/msaccessThis site includes case studies, developer information, specifications, and links for downloading free Access add-ins.
O'Reilly WebSite Professional WebSite Professional is a fully functional yet inexpensive Web server product available from O'Reilly & Associates. It comes with a fully functional Web server, complete with graphical setup and administration tools. It also comes with an HTML editor and an enhanced version of the Mosaic Web browser. The server is Windows CGI-compliant, supports CGI scripting and server API programming using Visual Basic (as well as Perl and Java), includes Cold Fusion database connection gateway software, and fully supports the use of security features such as SSL SHTTP and digitally signed certificates. The software runs under Windows 95 and NT.
http://www.ora.com/This site enables you to download a free evaluation copy of the standard WebSite product, as well as the first three chapters of the WebSite documentation and the Windows-CGI specification. After it is downloaded, the server can be installed and operational in a matter of minutes.
CSDC DBGateway DBGateway is a freely available WWW-database gateway software product developed by Computer Systems Development Corporation. Its functionality and use are discussed in detail in subsequent sections.
DBGateway is a freely available database gateway application that provides access to Microsoft Access and FoxPro databases via Web-based applications such as HTML and ActiveX-enabled forms. A gateway is a specialized CGI application that abstracts the details of interaction between a Web server and an application--in this case, a database application. It was developed by Computer Systems Development Corporation in response to the needs of one of its clients. The gateway itself is a 32-bit Visual Basic Windows CGI application that uses and expands on the CGI32.BAS framework introduced in Chapter 18, "The Common Gateway Interface (CGI)." It is an excellent illustration of how powerful Web database systems can be developed by using Visual Basic.
The gateway software runs on the host personal computer, which also serves as a Web server. All database interactions are handled directly between the gateway and the database; no ODBC server is required. Also, the gateway is designed so that the databases being accessed are external to the gateway. This means that databases can be added, removed, or modified without affecting the gateway.
Because the software is a critical component of the system detailed in this chapter, the following sections provide sufficient details about the product for you to understand the code and examples presented later in this chapter.
http://dbgate.csdc.com/
Earlier in this chapter, you looked at a few of the requirements imposed on this development effort. DBGateway provided a means of using a proven and freely available tool. Additionally, it met the criteria of minimizing the programming effort required to implement the system. Given the capabilities of the product to meet my database interface needs, I was able to forego development of custom CGI programs. Instead, all I had to do was use my knowledge of HTML, ActiveX, VBScript, and SQL.
Here are some of the reasons why you might want to consider using DBGateway:
To develop applications using DBGateway, your system must meet the following requirements:
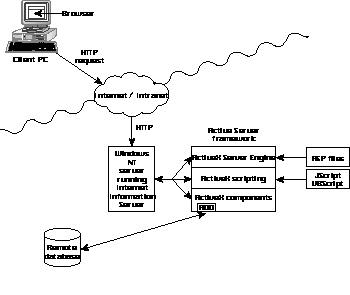
Figure 24.3 shows the general architecture of a PC-based Web database system using
DBGateway.
FIGURE
24.3. A PC-based WWW database system
using DBGateway.
Note that access to remote databases, such as Oracle, Sybase, and Microsoft SQL Server, also could be provided via an Access database by establishing ODBC links between a locally resident Access data source and the remote database. For details on establishing an ODBC link, consult your Microsoft Access software documentation.
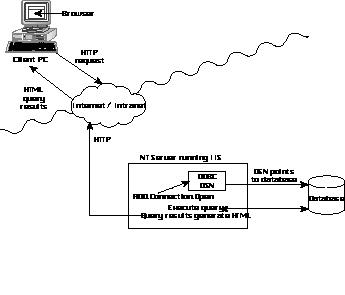
The following sequence of steps details the flow of data in an application using DBGateway:
Figure 24.4 illustrates this data flow and shows the various files that come into
play.
FIGURE
24.4. Data flow in a DBGateway application.
Table 24.1 lists the five basic file types used in applications that employ the
DBGateway product.
Table 24.1. File Types Used in Applications that Use DBGateway.
| File Type | Description |
| DBGate.exe | The gateway executable program that resides in the appropriate cgi-win directory for the Web server in use. |
| Dbgate.ini | Resides in the Web server cgi-win directory and contains information about paths to dbgate executables, the root directory (DBDATAROOT) for databases to be accessed, image and icon files to be used, and SMTP host and port details. |
| Report templates | Specify how the results of a database query are to be formatted in the HTML document returned to a Web client. These files are given an .rpt extension and reside in an rpts subdirectory for the respective database. |
| SQL files | Specify server-side SQL queries. They are given a .sql extension and reside in a sql subdirectory for the respective database. |
| YourDBName.ini | One of these files must accompany each database to be accessed. This file contains database access-control information. |
To be useful and functional parts of a Web database application, gateway products must provide at least basic database query and results-reporting capabilities. The DBGateway product actually provides multiple methods for performing database queries from your HTML forms as well as a strong report-generation capability. DBGateway also provides additional functionality in the form of SMTP mail support and the capability to access secure databases. This section explores DBGateway's functionality in greater detail. HTML Embedded SQL Queries DBGateway provides three methods for submitting queries to your database:
This chapter deals only with embedded SQL queries, because they provide the flexibility required for the sample application, and internal queries are not supported on the freeware version I used for these examples. More information on the latter two methods is available in your DBGateway software documentation. Comprehensive examples showing the use of embedded SQL queries are included in later sections of this chapter.
The HTML Embedded SQL Queries method entails the use of HTML <FORM> elements to formulate a desired query that subsequently will be passed to the database being used. Most of the elements used to create a query are HTML hidden <FORM> elements; however, it is possible and quite advantageous to use <FORM> input elements and ActiveX controls as well. This enables you to design highly interactive applications that incorporate user-specified input into the query to be passed to the database.
Because DBGateway uses an enumerated name-designation scheme, elements in the form used to create a SQL query can be split up into different parts of the form. The only restriction is that the design must be such that when DBGateway concatenates the parts of the query (it does so in sequential order), a valid query is formed. In general, these elements are case- sensitive and white-space sensitive.
Although DBGateway provides support for performing queries, record additions, record editing, and record deletions, I only cover queries in this chapter. You can find additional information for record operations in the DBGateway software documentation. The following parameters always are mandatory and almost always are specified as HTML hidden form elements:
| ACTION | Valid value is "SubmitExternalQuery" |
| DBNAME | Valid value is "your-string-here" |
| DBPATH | Valid value is "your-string-here" |
| DBTYPE | Valid values are "ACCESS" or "FoxPro 2.6" |
| DBACTION | Valid values are "Query", "Show", "AddDBRecord", "DeleteDBRecord", or "EditDBRecord" |
| QUERYNAME | Valid value is "your-string-here" |
Finally, when the value of DBACTION is "Query" or
"Show", the following SQL parameters are optional:
| GROUPBYn = | "comma-delimited field names from your database tables" |
| HAVINGn = | "any valid SQL condition" |
| MAXREC = | "an integer > STARTREC" |
| ORDERBYn = | "comma-delimited field names from your database tables" |
| REPORTNAME = | "the name of a report template file (without the .rpt extension)" |
| STARTREC = | "an integer > 0" |
| WHEREn = | "any valid SQL Join condition" |
On a final note, you also might have noticed that in the preceding parameters, no explicit SELECT statement is used. DBGateway includes this statement for you when it formulates the SQL query to pass to the database. Database Reports The preceding section presented a number of the parameters that can be embedded in your HTML to enable SQL queries to be formulated. But what about the data that the database returns from the query? DBGateway handles this in one of two ways. First, if no report format is explicitly specified, DBGateway presents the returned data in a native tabular format. This is a nice feature for prototyping queries. It enables you to fully test a query without having to also worry about formatting the data.
After you can get the query working properly, you can worry about making the output look nice. How do you accomplish this? The second way that DBGateway handles presentation of output is through the use of report template files. The optional REPORTNAME parameter from the preceding section enables you to specify how the field data being specified in the initial query should be formatted for presentation.
Properly written report templates enable returned field data to be formatted in virtually any way that any content of a regular HTML file would be formatted. This means that returned data can be written as free text and have its font and color attributes modified. Additionally, the returned data can be placed into HTML <FORM> input objects such as textboxes, TEXTAREA objects, and scrollable lists, as well as associated with checkboxes and radio buttons. You even could use ActiveX controls. Not only does this enable you to construct very nice data presentations for your users, but it enables you to design applications that cascade queries. In other words, the results of one query are used to give the user choices in a subsequent query, and so on, which enables you to develop extremely powerful applications.
How do these report templates work? DBGateway defines a few tags that extend the functionality of HTML. They are best described by examples, several of which are included in the final sections of this chapter. They're briefly described here for reference. <FIELD> Tag The <FIELD> tag has a single attribute: NAME. The value of the NAME attribute should be a valid field being returned from the previously specified query--for example <FIELD NAME="LastName">. <FIELD> tags are replaced with their corresponding values for every record returned from the database. If a field in the response set is not specified by a <FIELD> tag, it will not be included in the presentation to the user. Additionally, <FIELD> tags that have no correspondence to data being returned are not parsed out; this might confuse some Web browsers, so be aware. <REPORTHEADER> Tags The report header tag pair is composed of the <REPORTHEADER> and </REPORTHEADER> tags. Any <FIELD> tags that occur in this container pair will be assigned the contents of the first record of data returned. <GROUPHEADER> Tags The group header tag pair is composed of the <GROUPHEADER> and </GROUPHEADER> tags. These tags also have a NAME attribute--for example, <GROUPHEADER NAME="group1">. <RECORDHEADER> Tags The record header tag pair is composed of the <RECORDHEADER> and </RECORDHEADER> tags. HTML specified between these tags can be used to enhance the presentation of the returned data. These tags also have a NAME attribute. <RECORD> Tags The record tag pair is composed of the <RECORD> and </RECORD> tags. These tags typically are used to encapsulate <FIELD> tags, which subsequently are replaced with the data records returned from a query. See the examples in the section "The Omniscient Technologies PC-Based Web Database Application," later in this chapter, for specific usage of the record tags. <RECORDFOOTER> Tags The record footer tag pair is composed of the <RECORDFOOTER> and </RECORDFOOTER> tags. These tags also have a NAME attribute. <GROUPFOOTER> Tags The group footer tag pair is composed of the <GROUPFOOTER> and </GROUPFOOTER> tags. These tags also have a NAME attribute. <REPORTFOOTER> Tags The report footer tag pair is composed of the <REPORTFOOTER> and </REPORTFOOTER> tags. Any <FIELD> tags that occur in this container pair will be assigned the contents of the last record of data returned. Additional Functionality DBGateway also provides support for accessing secured databases, as well as using SMTP mail from your application (via Microsoft's ActiveX SMTP control). More information and examples that use these features are available in the DBGateway software documentation.
This section presents an overview of the Omnitech database used in this application. First, you'll step through the process of creating a database and tables using Access and then establishing table relations. Next, you'll look at a listing and a brief explanation of the tables that make up the database. After you see how tables can be created and related, you'll look at the full table relations structure for the Omnitech database.
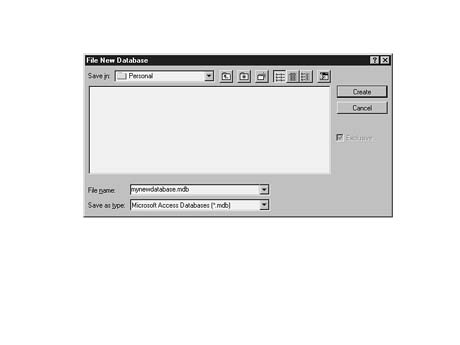
The following step-by-step instructions should provide you with the basic understanding required to build databases and tables using the graphical tools and wizards in Microsoft Access. This example uses Microsoft Access for Windows 95 (Version 7.00).
To build databases and tables using the graphical tools and wizards in Microsoft Access, follow these steps:
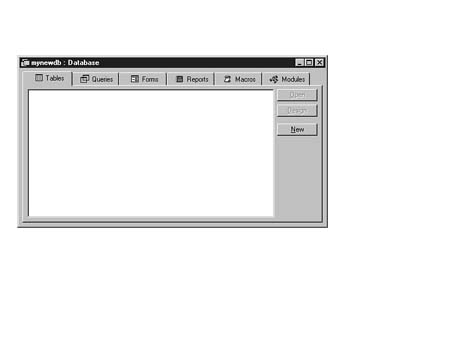
FIGURE 24.6. Creating a new Access database.
FIGURE 24.7. Naming the new database.
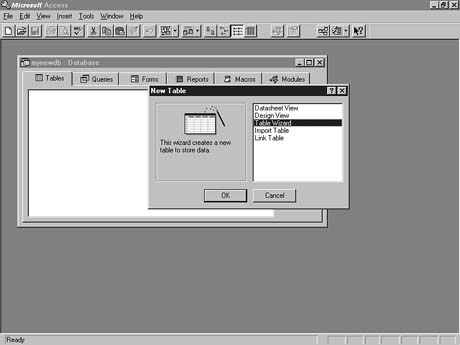
FIGURE 24.8. Creating a new table.
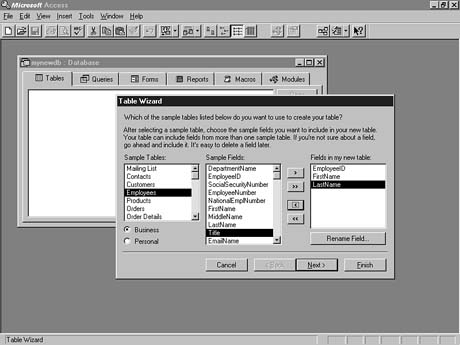
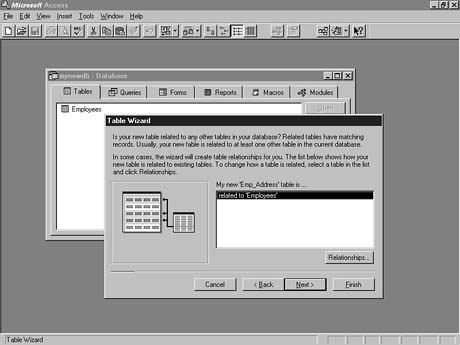
FIGURE 24.9. Using the Table Wizard.
FIGURE 24.10. Specifying fields for the new table using the Table Wizard.
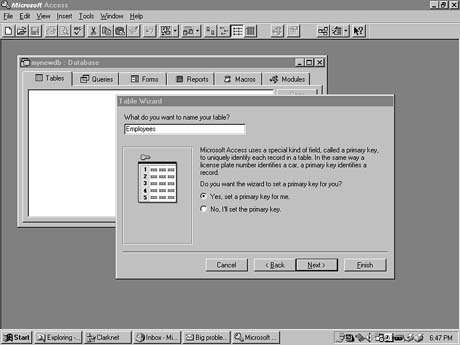
FIGURE
24.11. Specifying the table name and setting
the primary key.
FIGURE
24.12. Specifying how to populate the
new table.
FIGURE 24.13. Populating the new table.
FIGURE
24.14. Invoking the Form Wizard.
FIGURE
24.15. Table relations determined by the
Table Wizard.
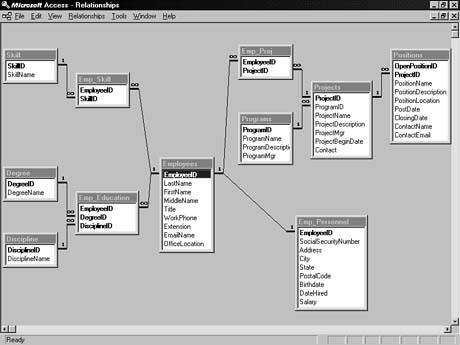
FIGURE
24.16. The table relations diagram.
Details of how relations for tables of a given application vary for each application. Refer to Access's online help documentation for additional details regarding keys, referential integrity, and setting relations to determine how you can further specify these for your application.
Table 24.2 lists the tables that make up the Omnitech database. These
were designed to support the initial informational requirements of the proof-of-feasibility
system; however, care was taken to make the design extensible and to easily enable
the addition of new tables and fields as dictated by future needs and requirements.
Table 24.2. The Omnitech DatabaseConsists ofThese Initial Tables.
| Table | Description |
| Degree | Provides a translation between degree IDs and a degree name (for example, Ph.D.). |
| Discipline | Provides a translation between discipline IDs and a discipline name (for example, Computer Science). |
| Emp_Education | Composed of fields that uniquely identify all the degrees and corresponding disciplines (by IDs) held by each employee. |
| Emp_Personnel | Composed of fields that contain information of a more personal nature, such as Social Security number, home address, and salary. This information was placed in a separate table for additional security and to enable users to link this table to remote data sources (via ODBC) in the future. |
| Emp_Proj | Composed of fields that identify all projects (by ID) in which an employee is involved. |
| Emp_Skill | Composed of fields that uniquely identify all the skills (by ID) held by each employee. |
| Employees | Composed of fields containing basic employee information, such as name, office location, title, and phone number. |
| Positions | Provides a listing of all open positions in the company. Information includes the parent project, position name, description, location, and a point of contact. |
| Programs | Provides a unique listing of all corporate programs (by unique ID) and includes information such as associated program name, description, and manager. |
| Projects | Provides a translation between project IDs and a project name. Also includes project details such as the parent program, project manager, and project description. |
| Skill | Provides a translation between skill IDs and a skill name. |
Now that you've reviewed the appropriate background material and created the database, it's finally time to take a comprehensive look at the entire application. The remainder of this chapter presents complete code listings associated with each of the main applications that can be invoked from the Omniscient Technologies Database home page shown in Figure 24.18.
Note that the code listings and the database presented, both of which are on the
accompanying CD-ROM, comprise a fully functioning Web database system that you can
modify for your own use or requirements. You simply need to make sure that your Web
server is Windows CGI-compliant and that you've properly installed and tested the
DBGateway software.
FIGURE
24.18. The Omniscient Technologies Information
Database home page.
The Omniscient Technologies Information Database home page and subsequent pages presented to the user provide an easy-to-use, interactive, graphical interface that enables users to submit queries to the database with a few mouse clicks. Here's a quick review of the types of queries this proof-of-feasibility system was designed to support:
These queries currently are accessible only by internal users; however, because much of the information available would be of interest to external visitors as well, there would be great benefit in making this application externally accessible. This is a simple matter for the resident system administrator or Webmaster. It also would be easy to extend this application and database to support queries for information on previous proposals, employee résumés, client information, additional project information, and so on. It's up to the site administrator to ensure that proprietary or sensitive information is not made available to the public.
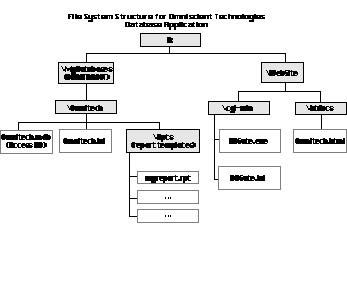
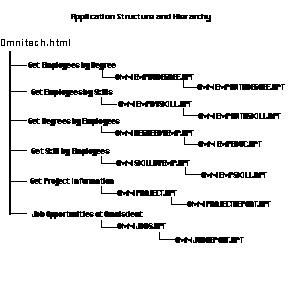
This section presents code listings, explanations, and screen shots for each of
the applications that can be invoked from the home page. Figure 24.19 illustrates
the structure and hierarchy of the applications to be covered.
FIGURE
24.19.The Omniscient Technologies Information Database application
structure and hierarchy of report templates.
.ini Files Your application requires two .ini files: the Dbgate.ini file modified for your environment and the Omnitech.ini file that specifies access information for the Omnitech Access database. Listing 24.1 shows the contents of the DBGate.ini file, and Listing 24.2 shows the contents of the Omnitech.ini file.
Listing 24.1. The DBGate.ini file.
DBGATENAME=/cgi-win/dbgate.exe
DBGATEPATH=D:\WebSite\cgi-win\
DBGATELOGO=/images/smglobe.gif
DBGATEICON=/icons/smglobe.gif
DBDATAROOT=D:\My Databases\
SMTPHOST=
SMTPPORT=
Listing 24.2. The Omnitech.ini file.
DBName=Omniscient Technologies Information Database
DBAName=Drew Kittel
Status=Online
PublicAccess=1
InternalQueryAllowed=0
RecordAddAllowed=1
RecordDeleteAllowed=0
RecordEditAllowed=0
TabularReportAllowed=1
DBAccessBeep=1
WaveName=d:\Program Files\DBGateway\sounds\uho.wav
The Home Page The Omnitech.htm file provides the HTML necessary to generate the home page shown in Figure 24.18. Listing 24.3 shows the HTML content of the Omnitech.htm file.
Listing 24.3. The Omnitech.htm file.
<!  -- Omniscient Technologies Database Main Page -->

<html>
<head>
<title>Omniscient Technologies Information Database</title>
</head>

<body bgcolor="#FFFFFF">
<img src="Globe1.gif" align="middle" hspace="10" width="90" height="90">
<font color="#222FFF" size="6" face="Impact"> <strong>W</strong></font>
<font color="#222FFF" size="5" face="Impact">
<strong>elcome to</strong></font>
<font color="#222FFF" size="6" face="Impact"> <strong> O</strong></font>
<font color="#222FFF" size="5" face="Impact">
<strong>mniscient</strong></font>
<font color="#222FFF" size="6" face="Impact"> <strong> T</strong></font>
<font color="#222FFF" size="5" face="Impact">
<strong>echnologies</strong></font>

<hr>

<p align="center"><font face="Arial">
<strong>Please take the opportunity to get to know Omniscient
Technologies, our employees and capabilities. This system allows
you to browse our Corporate Employee, Project and Job Opportunity
Databases and perform searches and queries according to criteria
you specify.
</strong></font></p>

<div align="center">

<table border="4" cellpadding="2" bgcolor="#D2ECEE">
<tr>
<th colspan="4">
<font color="#0000FF" size="4" face="Arial">
<strong>Employee Skills/Education</strong> </font>
</th>
</tr>

<tr>
<td align="center">
<form action="/cgi-win/dbgate.exe" method="POST">
<input type="hidden" name="ACTION" value="SubmitExternalQuery">
<input type="hidden" name="DBNAME" value="Omnitech">
<input type="hidden" name="DBTYPE" value="ACCESS">
<input type="hidden" name="DBPATH" value>
<input type="hidden" name="QUERYNAME" value="Omnitech">
<input type="hidden" name="DBACTION" value="Query">
<input type="hidden" name="FIELDS0" value="DegreeID, DegreeName">
<input type="hidden" name="FROM0" value="Degree">
<input type="hidden" name="ORDERBY0" value="DegreeID ASC">
<input type="hidden" name="REPORTNAME"  value="OMNIEMPBYDEGREE">
<input type="image" name="" src="d1b1.gif" align="bottom"
Âwidth="150" height="50">
</form>
</td>
<td align="center">
<form action="/cgi-win/dbgate.exe" method="POST">
<input type="hidden" name="ACTION" value="SubmitExternalQuery">
<input type="hidden" name="DBNAME" value="Omnitech">
<input type="hidden" name="DBTYPE" value="ACCESS">
<input type="hidden" name="DBPATH" value>
<input type="hidden" name="QUERYNAME" value="Omnitech">
<input type="hidden" name="DBACTION" value="Query">
<input type="hidden" name="FIELDS0" value="SkillID, SkillName">
<input type="hidden" name="FROM0" value="Skill">
<input type="hidden" name="ORDERBY0" value="SkillName ASC">
<input type="hidden" name="REPORTNAME" value="OMNIEMPBYSKILL">
<input type="image" name="" src="d1b2.gif" align="bottom"
Âwidth="150" height="50">
</form>
</td>
<td align="center">
<form action="/cgi-win/dbgate.exe" method="POST">
<input type="hidden" name="ACTION" value="SubmitExternalQuery">
<input type="hidden" name="DBNAME" value="Omnitech">
<input type="hidden" name="DBTYPE" value="ACCESS">
<input type="hidden" name="DBPATH" value>
<input type="hidden" name="QUERYNAME" value="Omnitech">
<input type="hidden" name="DBACTION" value="Query">
<input type="hidden" name="FIELDS0" value="EmployeeID, LastName, FirstName">
<input type="hidden" name="FROM0" value="Employees">
<input type="hidden" name="ORDERBY0" value="LastName">
<input type="hidden" name="REPORTNAME" value="OMNIDEGREEBYEMP">
<input type="image" name="" src="d1b3.gif" align="bottom"
Âwidth="150" height="50">
</form>
</td>
<td align="center">
<form action="/cgi-win/dbgate.exe" method="POST">
<input type="hidden" name="ACTION" value="SubmitExternalQuery">
<input type="hidden" name="DBNAME" value="Omnitech">
<input type="hidden" name="DBTYPE" value="ACCESS">
<input type="hidden" name="DBPATH" value>
<input type="hidden" name="QUERYNAME" value="Omnitech">
<input type="hidden" name="DBACTION" value="Query">
<input type="hidden" name="FIELDS0" value="EmployeeID, LastName, FirstName">
<input type="hidden" name="FROM0" value="Employees">
<input type="hidden" name="ORDERBY0" value="LastName">
<input type="hidden" name="REPORTNAME" value="OMNISKILLBYEMP">
<input type="image" name="" src="d1b4.gif" align="bottom"
Âwidth="150" height="50">
</form>
</td>
</tr>

<tr>
<th colspan="4"><font color="#0000FF" size="4"
face="Arial"><strong>Project Information</strong></font></th>
</tr>

<tr>
<td align="center" colspan="4">
<form action="/cgi-win/dbgate.exe" method="POST">
<input type="hidden" name="ACTION" value="SubmitExternalQuery">
<input type="hidden" name="DBNAME" value="Omnitech">
<input type="hidden" name="DBTYPE" value="ACCESS">
<input type="hidden" name="DBPATH" value>
<input type="hidden" name="QUERYNAME" value="Omnitech">
<input type="hidden" name="DBACTION" value="Query">
<input type="hidden" name="FIELDS0" value="*">
<input type="hidden" name="FROM0" value="Projects">
<input type="hidden" name="ORDERBY0" value="ProjectID DESC">
<input type="hidden" name="REPORTNAME" value="OMNIPROJECTS">
<input type="image" name="" src="p1b1.gif" align="bottom"
Âwidth="150" height="50">
</form>
</td>
</tr>

<tr>
<th colspan="4"><font color="#0000FF" size="4" face="Arial"><strong>
Job Openings at Omniscient</strong></font></th>
</tr>

<tr>
<td align="center" colspan="4">
<form action="/cgi-win/dbgate.exe" method="POST">
<input type="hidden" name="ACTION" value="SubmitExternalQuery">
<input type="hidden" name="DBNAME" value="Omnitech">
<input type="hidden" name="DBTYPE" value="ACCESS">
<input type="hidden" name="DBPATH" value>
<input type="hidden" name="QUERYNAME" value="Omnitech">
<input type="hidden" name="DBACTION" value="Query">
<input type="hidden" name="FIELDS0" value="*">
<input type="hidden" name="FROM0" value="Positions">
<input type="hidden" name="ORDERBY0" value="PostDate ASC">
<input type="hidden" name="REPORTNAME" value="OMNIJOBS">
<input type="image" name="" src="j1b1.gif" align="bottom"
Âwidth="150" height="50">
</form>
</td>
</tr>
</table>
</div>

<hr>
</body>
</html>
The main purpose of this page is to associate queries and report templates with each of the top-level query applications that can be invoked. The next several sections detail how the gateway formulates these queries, passes these to the database, and subsequently uses report templates to present results to the user. Get Employees by Degree The following code from Omnitech.htm (in Listing 24.3) indicates that the dbgate program will send the Omnitech database an external query after the user clicks the Image button (d1b1.gif):
<form action="/cgi-win/dbgate.exe" method="POST">
<input type="hidden" name="ACTION" value="SubmitExternalQuery">
<input type="hidden" name="DBNAME" value="Omnitech">
<input type="hidden" name="DBTYPE" value="ACCESS">
<input type="hidden" name="DBPATH" value>
<input type="hidden" name="QUERYNAME" value="Omnitech">
<input type="hidden" name="DBACTION" value="Query">
<input type="hidden" name="FIELDS0" value="DegreeID, DegreeName">
<input type="hidden" name="FROM0" value="Degree">
<input type="hidden" name="ORDERBY0" value="DegreeID ASC">
<input type="hidden" name="REPORTNAME"  value="OMNIEMPBYDEGREE">
<input type="image" name="" src="d1b1.gif" align="bottom"
Âwidth="150" height="50">
</form>
Recall from Chapter 11 that an image can be used in the same way the Submit form input type is used. After the user clicks the image, the following SQL query is generated by the gateway and submitted to the database:
SELECT DegreeID, DegreeName
FROM Degree
ORDERBY DegreeID ASC
After the database returns the results to the gateway, the gateway uses specifications in the OMNIEMPBYDEGREE.RPT file to determine how this data will be formatted and presented to the user. Listing 24.4 shows the code for this report template.
Listing 24.4. The OMNIEMPBYDEGREE.RPT file.
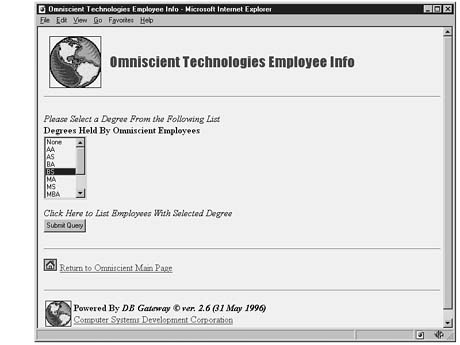
<!-- OMNIEMPBYDEGREE.RPT -->

<REPORTHEADER>

<HEAD>
<TITLE>Omniscient Technologies Employee Info</TITLE>
</HEAD>

<body bgcolor="#FFFFFF">
<img src="/Globe1.gif" align="middle" hspace="10" width="90"
height="90">
<font color="#222FFF" size="5" face="Impact">
<strong>Omniscient Technologies Employee Info</strong></font>

<HR>
<P>
<FORM METHOD="POST" ACTION="/cgi-win/dbgate.exe">
<INPUT type=hidden name="ACTION" value="SubmitExternalQuery">
<INPUT type=hidden name="DBNAME" value="Omnitech">
<INPUT type=hidden name="DBTYPE" value="ACCESS">
<INPUT type=hidden name="DBPATH" value="">
<INPUT type=hidden name="QUERYNAME" value="Employees">
<INPUT type=hidden name="DBACTION" value="Query">
<INPUT type=hidden name="FIELDS0" value="LastName, FirstName, Title,
ÂOfficeLocation, DegreeName, DisciplineName">
<INPUT type=hidden name="FROM0" value="Employees, Emp_Education, Degree,
ÂDiscipline">
<INPUT type=hidden name="WHERE0" value="'Employees.EmployeeID =
ÂEmp_Education.EmployeeID and Emp_Education.DegreeID =
ÂDegree.DegreeID and Emp_Education.DisciplineID =
ÂDiscipline.DisciplineID and `">
<INPUT type=hidden name="WHERE1" value="Degree.DegreeID = ">
<EM>Please Select a Degree From the Following List</EM><BR>
<STRONG>Degrees Held By Omniscient Employees</STRONG><BR>
<SELECT NAME="WHERE2" SIZE="8">
</REPORTHEADER>

<GROUPHEADER NAME="">
</GROUPHEADER>
<RECORDHEADER NAME="">
</RECORDHEADER>
<RECORD>
<OPTION VALUE=" <FIELD NAME="DegreeID"> " ><FIELD NAME="DegreeName"></OPTION>
</RECORD>
<RECORDFOOTER NAME="">
</RECORDFOOTER>

<GROUPFOOTER NAME="">
</GROUPFOOTER>
<REPORTFOOTER>
</SELECT>

<P>
<EM>Click Here to List Employees With Selected Degree</EM><BR>

<INPUT type=hidden name="REPORTNAME" value="OMNIEMPWITHDEGREE">
<INPUT type=submit name="Submit" value="Submit Query">
</P>

<HR>
<P>
<A HREF="/Omnitech.htm"><img src="/Home.gif">Return to Omniscient Main Page</A>
</P>
</FORM>

</BODY>
</HTML>
</REPORTFOOTER>
Figure 24.20 shows the formatted results.
FIGURE
24.20. Query results formatted by the
OMNIEMPBYDEGREE report template.
You should note a few things about the use of this report template. First, it sets up a secondary query to the database--in this case, a fairly complex join across four tables (Employees, Emp_Education, Degree, and Discipline). Next, it uses results from the initial query to create a selection list on the results page. The report template is set up so that a user selection from this list is used to complete the secondary query. After the user makes a selection and clicks the Submit button, the following query is passed to the database:
SELECT LastName, FirstName, Title, OfficeLocation, DegreeName, DisciplineName
FROM Employees, Emp_Education, Degree, Discipline
WHERE `Employees.EmployeeID = Emp_Education.EmployeeID
Âand Emp_Education.DegreeID = Degree.DegreeID and
ÂEmp_Education.DisciplineID = Discipline.DisciplineID
Âand Degree.DegreeID = "user-specified DegreeID"
Finally, OMNIEMPWITHDEGREE is specified as the report template to format results from the secondary query. Listing 24.5 shows the code for this secondary report template.
Listing 24.5. The OMNIEMPWITHDEGREE.RPT file.
<!--OMNIEMPWITHDEGREE.RPT -->

<REPORTHEADER>
<HEAD>
<TITLEOmniscient Employees With Specific Degrees</TITLE>
</HEAD>

<body bgcolor="#FFFFFF">
<img src="/Globe1.gif" align="middle" hspace="10" width="90" height="90">
<font color="#222FFF" size="4" face="Impact">
<strong>Omniscient Technologies Employees With Specific Degrees</strong></font>

<HR>

<CENTER>
<TABLE CELLPADDING="4" BORDER="1">
<TR>
<TH ALIGN=CENTER>NAME</TH>
<TH ALIGN=CENTER>TITLE</TH>
<TH ALIGN=CENTER>OFFICE</TH>
<TH ALIGN=CENTER>DEGREE</TH>
</REPORTHEADER>

<GROUPHEADER NAME="">
</GROUPHEADER>

<RECORDHEADER NAME="">
<TR>
</RECORDHEADER>

<RECORD>
<TD><FIELD NAME="FirstName"> <FIELD NAME="LastName"></TD>
<TD><FIELD NAME="Title"></TD>
<TD><FIELD NAME="OfficeLocation"></TD>
<TD><FIELD NAME="DegreeName"> in <FIELD NAME="DisciplineName"></TD>
</RECORD>

<RECORDFOOTER NAME="">
</TR>
</RECORDFOOTER>

<GROUPFOOTER NAME="">
</GROUPFOOTER>

<REPORTFOOTER>
</TABLE>
</CENTER>

<HR>
<P>
<A HREF="/Omnitech.htm"><img src="/Home.gif">Return to Omniscient Main Page</A>
</P>


</BODY>
</HTML>
</REPORTFOOTER>
Figure 24.21 shows the formatted results.
FIGURE
24.21.Query results formatted by the OMNIEMPWITHDEGREE
report template.
Get Employees by Skill After the d1b2.gif button in the Omnitech.htm code in Listing 24.3 is clicked, the following SQL query is generated by the gateway and submitted to the database:
SELECT SkillID, SkillName
FROM Skill
ORDERBY SkillName ASC
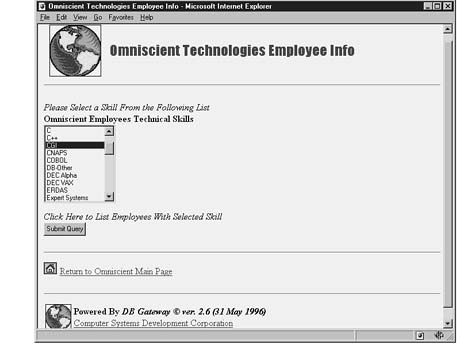
After the database returns the results to the gateway, the gateway uses specifications in the OMNIEMPBYSKILL.RPT file to determine how this data will be formatted and presented to the user.
Figure 24.22 shows the formatted results.
FIGURE
24.22.Query results formatted by the OMNIEMPBYSKILL report
template.
After the user makes a selection and clicks the Submit button, the following query is passed to the database:
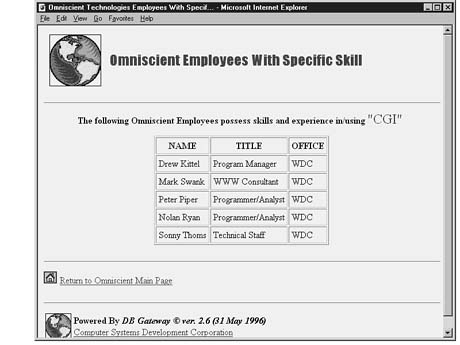
SELECT LastName, FirstName, Title, OfficeLocation, SkillName
FROM Employees, Emp_Skill, Skill
WHERE Employees.EmployeeID = Emp_Skill.EmployeeID and
ÂEmp_Skill.SkillID = Skill.SkillID and
ÂSkill.SkillID = "user-specified SkillID"
Additionally, OMNIEMPWITHSKILL is specified as the report template to format results from the secondary query. Listing 24.6 presents the contents of this report template and illustrates how results of a query can be formatted and returned to the user as an HTML table.
Listing 24.6. The OMNIEMPWITHSKILL.RPT file.
<!--OMNIEMPWITHSKILL.RPT -->

<REPORTHEADER>
<HEAD>
<TITLE>Omniscient Technologies Employees With Specific Skill</TITLE>
</HEAD>

<body bgcolor="#FFFFFF">
<img src="/Globe1.gif" align="middle" hspace="10" width="90" height="90">
<font color="#222FFF" size="5" face="Impact">
<strong>Omniscient Employees With Specific Skill</strong></font>

<HR>

<CENTER>
<STRONG>The following Omniscient Employees possess skills and

experience in/using </STRONG>
<FONT SIZE=+2 COLOR="2222ff"> "<FIELD NAME="SkillName">" </FONT>

<TABLE CELLPADDING="4" BORDER="1">
<TR>
<TH ALIGN=CENTER>NAME</TH>
<TH ALIGN=CENTER>TITLE</TH>
<TH ALIGN=CENTER>OFFICE</TH>
</REPORTHEADER>

<GROUPHEADER NAME="">
</GROUPHEADER>

<RECORDHEADER NAME="">
<TR>
</RECORDHEADER>

<RECORD>
<TD><FIELD NAME="FirstName"> <FIELD NAME="LastName"></TD>
<TD><FIELD NAME="Title"></TD>
<TD><FIELD NAME="OfficeLocation"></TD>
</RECORD>

<RECORDFOOTER NAME="">
</TR>
</RECORDFOOTER>

<GROUPFOOTER NAME="">
</GROUPFOOTER>

<REPORTFOOTER>
</TABLE>
</CENTER>

<P>
<HR>
<P>
<A HREF="/Omnitech.htm"><img src="/Home.gif">Return to Omniscient Main Page</A>
</P>

</BODY>
</HTML>
</REPORTFOOTER>
Figure 24.23 shows the formatted results.
FIGURE
24.23.Query results formatted by the OMNIEMPWITHSKILL report
template.
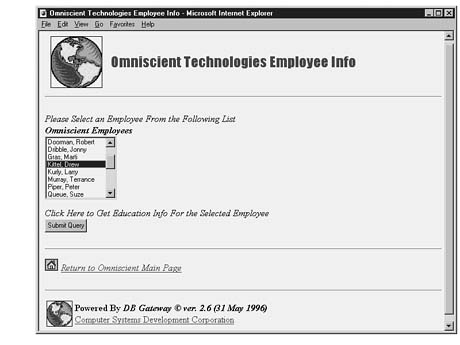
Get Degrees by Employee After the d1b3.gif button in the Omnitech.htm code in Listing 24.3 is clicked, the following SQL query is generated by the gateway and submitted to the database:
SELECT EmployeeID, LastName, FirstName
FROM Employees
ORDERBY LastName
After the database returns the results to the gateway, the gateway uses specifications in the OMNIDEGREEBYEMP.RPT file to determine how this data will be formatted and presented to the user.
Figure 24.24 shows the formatted results.
After the user makes a selection and clicks the Submit button, the following query is passed to the database:
SELECT LastName, FirstName, Title, OfficeLocation, DegreeName, DisciplineName
FROM Employees, Emp_Education, Degree, Discipline
WHERE Employees.EmployeeID = Emp_Education.EmployeeID and
ÂEmp_Education.DegreeID = Degree.DegreeID and
ÂEmp_Education.DisciplineID = Discipline.DisciplineID and
ÂEmployees.EmployeeID = "user-specified EmployeeID"
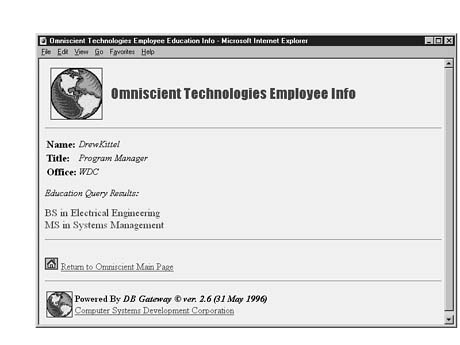
Additionally, OMNIEMPEDUC is specified as the report template to format
results from the secondary query. Figure 24.25 shows the formatted results.
FIGURE
24.24. Query results formatted by the
OMNIDEGREEBYEMP report template.
FIGURE
24.25. Query results formatted by the
OMNIEMPEDUC report template.
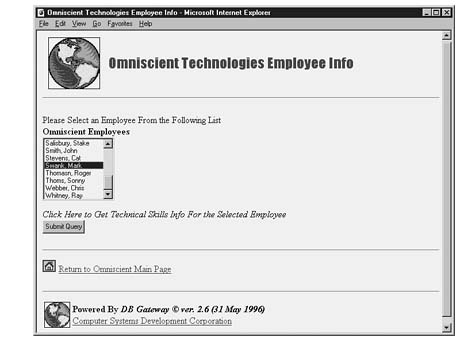
Get Skills by Employee After the d1b4.gif button in the Omnitech.htm code in Listing 24.3 is clicked, the following SQL query is generated by the gateway and submitted to the database:
SELECT EmployeeID, LastName, FirstName
FROM Employees
ORDERBY LastName
After the database returns the results to the gateway, the gateway uses specifications in the OMNISKILLBYEMP.RPT file to determine how the data will be formatted and presented to the user.
Figure 24.26 shows the formatted results.
FIGURE
24.26. Query results formatted by the
OMNISKILLBYEMP report template.
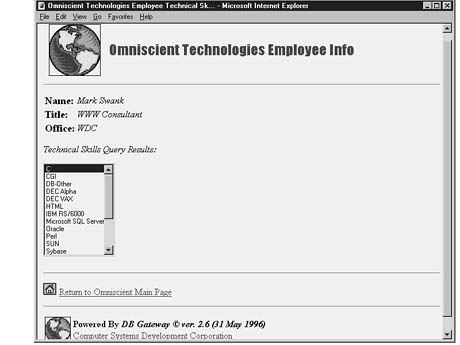
After the user makes a selection and clicks the Submit button, the following query is passed to the database:
SELECT LastName, FirstName, Title, OfficeLocation, SkillName
FROM Employees, Emp_Skill, Skill
WHERE = `Employees.EmployeeID = Emp_Skill.EmployeeID and
ÂEmp_Skill.SkillID = Skill.SkillID and
ÂEmployees.EmployeeID = "user-specified EmployeeID"
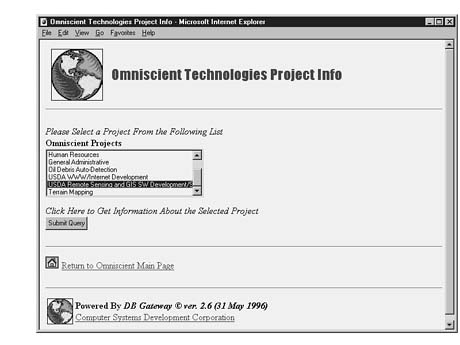
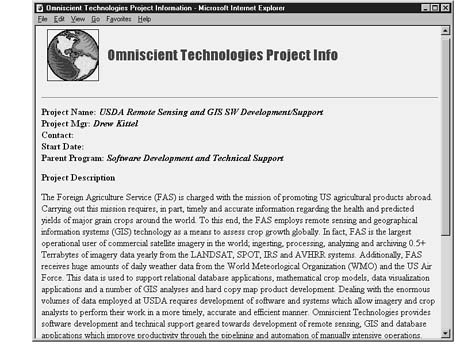
Additionally, OMNIEMPSKILL is specified as the report template to format results from the secondary query. Figure 24.27 shows the formatted results. Get Project Information After the p1b1.gif button in the Omnitech.htm code in Listing 24.3 is clicked, the following SQL query is generated by the gateway and submitted to the database:
SELECT *
FROM Projects
ORDERBY ProjectID DESC
FIGURE 24.27. Query results formatted by the OMNIEMPSKILL report template.
After the database returns the results to the gateway, the gateway uses specifications in the OMNIPROJECTS.RPT file to determine how this data will be formatted and presented to the user.
Figure 24.28 shows the formatted results.
FIGURE
24.28. Query results formatted by the
OMNIPROJECTS report template.
After the user makes a selection and clicks the Submit button, the following query is passed to the database:
<INPUT type=hidden name="FIELDS0" value="Projects.*, ProgramName">
SELECT Projects.*, ProgramName
FROM Projects, Programs
WHERE `Projects.ProgramID = Programs.ProgramID and
ÂProjects.ProjectID = "user-specified ProjectID"
Additionally, OMNIPROJECTREPORT is specified as the report template to
format results from the secondary query. Figure 24.29 shows the formatted results.
FIGURE
24.29. Query results formatted
by the OMNIPROJECTREPORT report template.
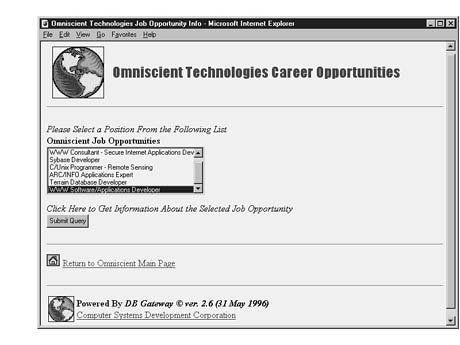
Job Opportunities at Omniscient Technologies After the j1b1.gif button in the Omnitech.htm code in Listing 24.3 is clicked, the following SQL query is generated by the gateway and submitted to the database:
SELECT *
FROM Positions
ORDERBY PostDate ASC
After the database returns the results to the gateway, the gateway uses specifications in the OMNIJOBS.RPT file to determine how this data will be formatted and presented to the user.
Figure 24.30 shows the formatted results.
FIGURE
24.30. Query results formatted
by the OMNIJOBS report template.
After the user makes a selection and clicks the Submit button, the following query is passed to the database:
<INPUT type=hidden name="FIELDS0" value="Projects.*, ProgramName">
SELECT Projects.*, ProgramName
FROM Projects, Programs
WHERE `Projects.ProgramID = Programs.ProgramID and
ÂProjects.ProjectID = "user-specified ProjectID"
Additionally, OMNIJOBREPORT is specified as the report template to format results from the secondary query. Listing 24.7 presents this report template and illustrates how results of a query can be formatted and returned to the user as a scrollable HTML <TEXTAREA> object. Such use of <TEXTAREA> objects to present textual data can be very important if you are making documents available that consist of several pages, such as project and program descriptions, proposals, and so on.
Listing 24.7. The OMNIJOBREPORT.RPT file.
<!-- OMNIPROJECTREPORT.RPT -->

<REPORTHEADER>
<HEAD>
<TITLE>Omniscient Technologies Job Opportunity Information</TITLE>
</HEAD>

<body bgcolor="#FFFFFF">
<img src="/Globe1.gif" align="middle" hspace="10" width="90" height="90">
<font color="#222FFF" size="5" face="Impact">
<strong>Omniscient Technologies Career Opportunities</strong></font>
<HR>

</REPORTHEADER>

<GROUPHEADER NAME="">
<STRONG>Position/Title: <EM><FIELD

NAME="PositionName"></EM></STRONG><BR>
<STRONG>Project Name: <EM><FIELD NAME="ProjectName"></EM></STRONG><BR>
<STRONG>Location: <EM><FIELD NAME="PositionLocation"></EM></STRONG><BR>
<STRONG>Open Date: <EM><FIELD NAME="PostDate"></EM></STRONG> <BR>
<STRONG>Close Date: <EM><FIELD NAME="ClosingDate"></EM></STRONG><BR>
<STRONG>Contact: <EM><FIELD NAME="ContactName"> at <FIELD

NAME="ContactEmail"></EM></STRONG><BR>
<FORM>
</GROUPHEADER>

<RECORDHEADER NAME="">
<P>
<EM>Position Description:</EM><BR>
</P>
</RECORDHEADER>

<RECORD>
<TEXTAREA ROWS="8" COLS="65"><FIELD

NAME="PositionDescription"></TEXTAREA>
</RECORD>

<RECORDFOOTER>
</RECORDFOOTER>

<GROUPFOOTER NAME="">
</FORM>
</GROUPFOOTER>

<REPORTFOOTER>

<HR>
<P>
<A HREF="/Omnitech.htm"><img src="/Home.gif">Return to Omniscient Main Page</A>

</BODY>
</HTML>
</REPORTFOOTER>
Figure 24.31 shows the formatted results.
FIGURE
24.31. Query results formatted
by the OMNIJOBREPORT report template.
What We Haven't Shown You DBGateway also provides the capability to add, delete, and modify records. The previous examples easily could be extended to incorporate additional <FORM> input objects, such as text-input boxes, which would allow privileged users to retrieve and modify employee records, update program information, and add entries for new projects and job opportunities. Secure transactions for such a system could be provided through the use of SSL, SHTTP, and authentication technologies such as public key encryption, certificates, and digital signing--all of which are supported by professional-quality Web servers such as WebSite Professional.
http://www.rsa.com/
Additionally, the mail capabilities and support previously mentioned could be incorporated to enable visitors to sign guest logs, provide immediate feedback about your site, or respond to job opportunities directly to the cognizant point of contact. The number of additional things you can accomplish could fill another couple of chapters in this book. The DBGateway software documentation contains all the details necessary to expand on the skills you've learned in this chapter.
In this chapter, you examined a full-fledged Web database application using a variety of new tools.
The chapter began with a systematic look at the requirements, benefits of, and components required for building a PC-based Web database system. Along the way, you were introduced to DBGateway, an extremely capable software application that enables you to easily and quickly develop WWW database applications without requiring more knowledge than the HTML you already know. Next, you saw a detailed, step-by-step account of using the graphical tools provided with Microsoft Access to build a database. You then examined the tables and relationships for the Omnitech database that is the heart of the application presented in this chapter. Finally, you delved deeply into the actual application. You looked at a full accounting of all queries currently implemented and using report templates not only to present results of a query, but also to form the basis of a secondary query that incorporates user input.
![]()
![]()
![]()
![]()
![]()