This chapter and the next chapter focus on topics that you must have a basic understanding of in order to develop Internet database applications. Chapter 9, "Visual Basic 5 Data Access Features," provides an overview of Visual Basic data access options. This chapter focuses on the foundation required to build ActiveX server components--classes and objects.
This chapter covers how to create a class in Visual Basic and add properties and methods to the class. If you are familiar with creating classes in Visual Basic, you should review this section because new class features added in Visual Basic 5, such as interfaces and friend methods, are discussed. This chapter also covers how Visual Basic classes and objects fit into the big picture of ActiveX technologies. Several code examples are given in this chapter, including an HTML table data presentation class and an example of using the Microsoft Internet Explorer 3.0 as an ActiveX component.
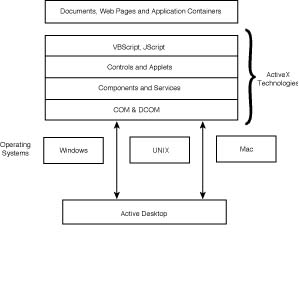
So what exactly is ActiveX? It turns out that ActiveX is not just a single thing.
The textbook definition of ActiveX is a set of integrated technologies that enable
software components in a networked environment to interoperate using any programming
language. The ActiveX component strategy is shown in Figure 8.1.
FIGURE
8.1. ActiveX component strategy.
If you are a seasoned Visual Basic programmer, you might think this sounds familiar, similar to OLE (Object Linking and Embedding). OLE, which dealt with software component reuse, still exists, but much of OLE's functionality has been integrated into ActiveX, with some changes to increase component performance and limit size. ActiveX is designed to work in a network environment such as the Internet, and it is an open standard. The general goals of ActiveX are to provide packages of software that can be
The bottom line is that ActiveX is a set of technologies that makes code reuse simple whether you are in a client/server environment or an Internet environment.
ActiveX is based on Microsoft's COM (Component Object Model) and DCOM (Distributed Component Object Model). COM and DCOM provide the underlying interfaces that allow ActiveX components to run anywhere. ActiveX components and controls are COM objects. Other elements of ActiveX are as follows:
As a Visual Basic programmer, you need no introduction to ActiveX controls. After all, Visual Basic's flexibility relies heavily on using controls. So, how do ActiveX controls differ from the standard OLE (OCX) controls? For starters, ActiveX controls expose a simpler COM interface and are 50 percent to 75 percent smaller than their counterpart OLE controls. The smaller size of the control makes for faster download times in Internet-enabled applications. To further aid download time, ActiveX controls support asynchronous downloading. ActiveX controls automatically install and register themselves on a PC and are safe for scripting and execution. You will learn more about ActiveX controls, as well as how to write your own ActiveX controls, in Chapter 16, "Creating ActiveX Controls for the Web with VB 5."
An ActiveX component is an object or objects exposed by an application or component that can be controlled programmatically by other applications. ActiveX components are a shift in Visual Basic developer terminology. ActiveX components were referred to in previous versions of Visual Basic as OLE servers. So remember that an OLE server is now an ActiveX component. If you are not familiar with ActiveX components (OLE servers), pay close attention to this chapter, which shows you how to create classes--the foundation of exposed objects found in ActiveX components. You learn how to turn your classes into ActiveX components in Chapter 22, "Writing Server-Side Applications with VB 5 ActiveX Components."
ActiveX documents are non-HTML documents that users can view and edit in a browser. ActiveX documents support features such as menu merging, toolbars, forms, and printing support. Visual Basic 5 applications and forms can be converted into ActiveX documents. You learn more about ActiveX documents, as well as creating an ActiveX database application in an intranet environment, in Chapter 15, "Creating ActiveX Documents for the Web with VB 5."
ActiveX scripting allows Web authors to build Web applications by piecing together ActiveX components. You can use scripting in Web applications to control objects or validate user input. Currently, ActiveX scripting includes Visual Basic scripting (VBScript) and JScript. VBScript is a subset of the full-blown version of Visual Basic. Many of the examples used throughout this book make use of VBScript. VBScript is covered in detail in Chapters 12 through 15. JScript is Microsoft's version of JavaScript, which was created by Netscape Communications.
Unless you have been on another planet for the last year or so, you have heard of Java. Java is the programming language, created by Sun Microsystems, that enables applications to execute on any platform, which makes it a great language for Internet applications. A Java applet is a Java code component created to provide additional capabilities in a Web page. ActiveX supports Java applets. As a matter of fact, ActiveX treats Java applets like ActiveX controls. By treating Java applets like ActiveX controls, Microsoft extends the capabilities of a Java applet, enabling Java applets to talk to other Java applets or other ActiveX controls. The Java Virtual Machine in ActiveX is also an ActiveX control, which means that Java applets could be used by other applications besides a browser.
Prior to object-oriented programming, reusable code was implemented via cut-and-paste (which is not a great solution) and code libraries. Code libraries consisted of functions and procedures that programmers could use over and over without having to rewrite them. Code libraries work well in many cases, but the problems with code libraries become apparent as you begin to build and maintain several applications.
Suppose you are building an application to rate your favorite Websites. The application should have data elements defined, such as a variable called Default_Site. As you start to develop the application, you find that the code library does not contain all the functions you need. You are required to write your own functions to perform special validation on your data elements. Another problem arises when other developers begin to help you with your project. You have no way to restrict what they can and can't do with the data elements you have defined. (In other words, the data is not tied in any way to your validation routines.) Also, large code libraries can be difficult to use when poorly documented or extremely large.
To help remedy the problems associated with standard module programming practices, Visual Basic 4 introduced the class module. A class module is a template for Visual Basic objects. Class modules contain functions and procedures (methods in class terminology) and data elements (properties in class terminology) and provide encapsulation. Encapsulation is an object-oriented programming term to describe a unit that contains both data and code. Using encapsulation, you can control what values the data items accept or what actions can be performed on the data items. An object is an instance of the class (the actual representation used in code). In Visual Basic, objects are created from classes by obtaining a reference of the class. For example, you have a class called CFile. To use the class, you would create an object of the CFile class using the keyword New, shown in the following code snippet:
Dim oLogFile as CFile
Set oLogFile = New CFile
Object-oriented programming, referred to as OOP, is a programming practice that models the real world. Applications are designed around objects, and objects can consist of other objects. For instance, you can create an automobile object that consists of a tire object, an engine object, and so on. If you are not already familiar with OOP or would like to learn more, Macmillan Computer Publishing offers many fine books that go into great detail about OOP, such as Visual Basic 5.0 Unleashed by Sams Publishing, VB 5.0 Interactive Course by Waite Group Press, or Doing Objects in Microsoft Visual Basic 5.0 by Ziff-Davis. The purpose here is to introduce OOP concepts found in Visual Basic.
Visual Basic has many object-oriented features, such as encapsulation and method overriding. Because you can create classes that support encapsulation using Visual Basic, you should use standard object-oriented design methodologies to create your applications. However, Visual Basic lacks the one truly object-oriented language feature--inheritance. Inheritance allows programmers to create new classes while inheriting all the methods and properties of other classes (including the code). Inheritance provides a very powerful method of code reuse. Visual Basic does not provide inheritance, but it does provide another model of code reuse--the ActiveX component model.
Using the ActiveX component object model (COM), you can create objects (components) that can be used by other applications. Programmers can build your component's functionality into their applications without having to rewrite the code. Although code inheritance works only with the language in which the class is created, the ActiveX component object model works with any programming language that supports ActiveX, such as Microsoft Access, Borland Delphi, or Powersoft's PowerBuilder. The ActiveX component model is a very powerful model for object reuse and has proven to be very popular and successful. After all, every custom control you use in a Visual Basic program is an example of the ActiveX component object model at work!
For the programmer who is comfortable with procedural programming practices, or for the beginner who is wondering why he should use classes and objects in Visual Basic programming, the following sections give you a few reasons. Reusability Code reuse is much simpler when you use classes in Visual Basic applications--especially compared to passing around code libraries with instructions on how to use each function and the required setup code, as well as the old practice of cut and paste. With Visual Basic, you can write a class and document the class's features using the object browser (discussed later in this chapter). After the class is defined, coded, and tested, you can begin to use it in your applications as well as pass it around to colleagues. You will be surprised how easy it is to reuse classes. (I've used the same class for file I/O in three different books, all different applications!) After all, the setup code for using a class is always the same. You create an instance of the class, set properties, and invoke methods. To make your class reusable across multiple languages as well as add distributed computing functionality and Web distribution, you can turn the class into an ActiveX component (which is discussed in detail in Chapter 22). To a Visual Basic programmer, the code required to use an ActiveX component is the same as using a class. Maintainability Using classes and objects (ActiveX components) in your code eases program maintenance. If you need to change or modify the class or components, as long as you don't change the interface (by removing properties or methods), you don't have to worry about modifying all the code that uses the class or components. You make changes to the class, test the changes, and recompile the project. If you change an ActiveX component (object) without changing the interface, the code maintenance is much simpler. Test and recompile the component and replace the old component with the new one. All the applications that use the component do not need to be recompiled! Simplifies Programming How many times have you built an application to system requirement specs, only to have the users change the requirements at the last minute? This can be a daunting task when using procedural programming practices. What if your application has to keep track of several objects through various states? Have you ever tried tracking several objects using global variables, arrays, or databases? Across multiple forms? Applications can get complex very quickly! Classes simplify object tracking or use of multiple objects because each instance of the object contains the data (properties) for that particular instance of the object. You can create as many objects as you like and use collections to simplify multiple-object use.
Now that you know the textbook definition of a class and a few good reasons to use classes, let's walk through the steps required to create a Visual Basic class. Before getting started, you need to decide on the type of class you want to build. I recently had to build several different types of HTML tables with DAO (data-access objects) recordsets. I found that with the current toolset there was no easy way to test and tweak the VBScript and HTML used to generate the tables. That's about to change. In the following sections, you build a class called the DAOHTMLTable class. The class constructs HTML tables from DAO recordsets and predefined table formats.
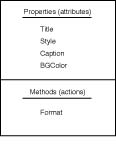
Before you can begin to create the class, you first must decide what attributes
and actions the class has. Attributes become class properties, and actions become
class methods. A high-level diagram of the DAOHTMLTable class is shown in
Figure 8.2.
FIGURE
8.2. The DAOHTMLTable
class.
For the DAOHTMLTable class, shown in Figure 8.2, the following properties have been defined:
The DAOHTMLTable class has only a single method--Format. When the Format method is executed, an HTML table is dynamically generated using the DAO recordset passed to the method.
In this section, you walk through the steps necessary to create a class using Visual Basic 5. You create the DAOHTMLTable class, shown in Figure 8.2, and an application to test the class. The test application creates an instance (object) of the DAOHTMLTable class and enables you to set the object properties such as the HTML table caption, the style of the HTML table, and the background color of the HTML table page. The test application uses the Access database--BIBLIO.mdb--that ships with Visual Basic. A DAO recordset based on the following SQL statement is created:
SELECT Titles.Title, Titles.ISBN, Authors.Author, Titles.[Year Published],
Publishers.[Company Name] FROM (([title author] INNER JOIN Titles
ON [title author].ISBN = Titles.ISBN) INNER JOIN Authors
ON [title author].Au_ID = Authors.Au_ID) INNER JOIN Publishers
ON Titles.PubID = Publishers.PubID Where Titles.[Year Published] >
1993 ORDER BY Titles.Title;
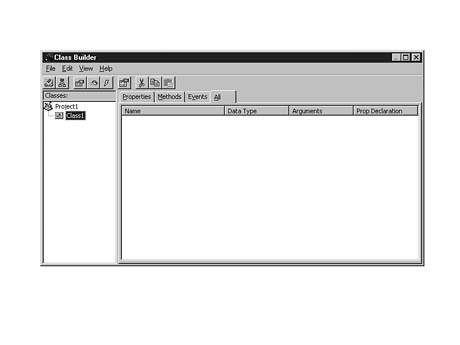
The Format method of the object generates the HTML used for the table. The HTML is saved to a file (using the CFile class) and then loaded into a browser control for viewing. The DAOHTMLTable class and the application to test the class can be found on the CD-ROM that accompanies this book. The project name is HTMLTest.VBP. Using the Class Builder Utility Start a new project called HTMLTest in Visual Basic. To add a class to the project, you can select Project from the Visual Basic menu and then select Add Class, or you can use a new graphical utility called the Class Builder Utility, which ships with Visual Basic 5. The Class Builder Utility is a Visual Basic add-in. (You must register the add-in before you can use it.)
When you have registered the Visual Basic add-in, perform the following steps:
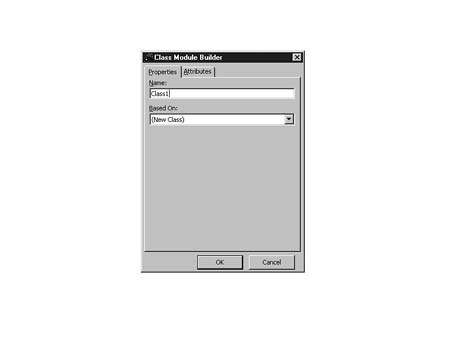
To add a new class, click the Add New Class button, shown in Figure 8.3. The Class
Module Builder dialog box appears, as shown in Figure 8.4.
FIGURE
8.3. The Class Builder Utility dialog
box.
FIGURE
8.4. The Class Module Builder dialog box.
Name the new class by entering the class name in the Name textbox, shown in Figure 8.4. For this example, type DAOHTMLTable. You will use this name to create objects (instances of the class). To add text comments about your class use the Description textbox found on the Attributes tab of the Class Module Builder dialog window, as shown in Figure 8.4. Adding Properties Properties are the attributes of the class. In the DAOHTMLTable example, the properties are as follows (in case you forgot):
The simplest way to add a property is to declare a public variable in the class module declaration section, like this:
Public Style as Byte
This creates a class property Style with a Byte data type. The problem with creating a property using a public variable is that anyone can supply values to the property without the class validating whether or not the value supplied is valid. For instance, in the case of the Style property, the example only supports values from 0 to 2. What's to prevent a user from setting the value to 5? The idea of validating an object's data and not allowing the user to directly modify the object's data is a part of encapsulation called data hiding.
Visual Basic enables you to perform true data encapsulation and data hiding by using public property procedures and private variables. A property procedure is the attribute interface exposed to applications using your class. The actual data used by the class is stored in the class declaration module as private. By declaring the variables private, only functions and procedures within the class can directly modify these values. Applications using your class must use the property procedures to change the object's properties, allowing you to add validation code before setting the object's data values. Before discussing how to add a property procedure, let's look at how the property Style is implemented in the DAOHTMLTable class. The first step is to declare the private data member for the Style property in the class declaration section as follows:
Private mbytStyle As Byte Style of the HTML table to generate
To define the interface to the user's public property Style, the class property procedures Let (or Set) and Get are created.
When the value of the Style property is changed, the Let procedure is invoked. The code for Let is as follows:
Public Property Let Style(ByVal bytNewStyle As Byte)
    If bytNewStyle > MAX_TABLE_VALUE Then
        mbytStyle = STANDARD_TABLE
    Else
        mbytStyle = bytNewStyle
    End If
End Property
Notice that the value passed in is defined as Byte. The property procedure also checks the value being passed in. If it exceeds a valid table style value (the constant MAX_TABLE_VALUE), the value passed in by the user is overridden and set to the default. Finally, the private (hidden) variable mbytStyle is set to the value passed in. To retrieve the property value, the Get procedure is called. The following code snippet is for the Get procedure for the property Style:
Public Property Get Style() As Byte
    Style = mbytStyle
End Property
The Get property procedure is very simple, setting the Style property to the value of the private variable mbytStyle.
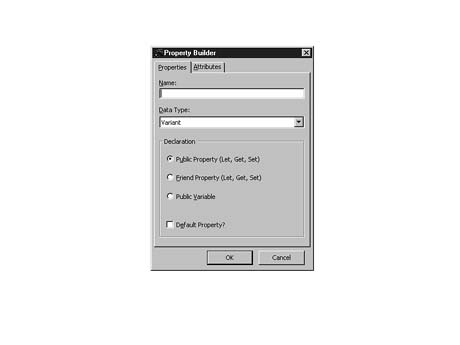
To add a property procedure using the Class Builder Utility, shown in Figure 8.3,
click the Add New Property to Current Class tool button. The Property Builder dialog
box, shown in Figure 8.5, appears.
FIGURE
8.5. The Property Builder dialog
box.
Type the name of the property in the Name textbox (shown in Figure 8.5). Use the
Data Type drop-down listbox to select a valid data type for your property. The proper
Let or Set property procedure will be generated based on the data
type selected. Using the Property Builder dialog box, select the type of property
procedure you want to create. You've already learned about public property procedures
and public variables. Friend property procedures are covered in detail in Chapter
22. Friend property procedures look like regular property procedures when used within
a class in a Visual Basic project. However, if you use Friend property procedures
in a reusable ActiveX component, the Friend property procedures are not visible to
other applications (which means they are not part of the class's interface). New
to Visual Basic 5 is the capability to designate a default property for your class.
Like a default property on a custom control, if you set an object to a value without
specifying a property, the default property is used. To add a text description about
the property or associate a help file with the property, use the Attributes tab of
the Property Builder dialog box. The code for the remaining DAOHTMLTable
class properties is shown in Listing
8.1.
Listing 8.1. Property procedures and private variables for DAOHTMLTable.
`Class Private Variables
Private mstrTitle As String   `Title of HTML page
Private mbytStyle As Byte     `Style of the HTML table to generate
Private mstrCaption As String `Caption of HTML page
Private mstrBGColor As String `Color for the Table background

`Class Constants
`   HTML Table Styles Supported
Private Const STANDARD_TABLE As Byte = 0
Private Const LIST_TABLE As Byte = 1
Private Const TABLE_PER_ROW As Byte = 2
Private Const MAX_TABLE_VALUE As Byte = TABLE_PER_ROW

Public Property Get BGColor() As String
    BGColor = mstrBGColor
End Property

Public Property Let BGColor(ByVal strNewColor As String)
    mstrBGColor = strNewColor
End Property

Public Property Get Title() As String
    Title = mstrTitle
End Property

Public Property Let Title(ByVal strNewTitle As String)
    mstrTitle = strNewTitle
End Property

Public Property Get Caption() As String
    Caption = mstrCaption
End Property

Public Property Let Caption(ByVal strNewCaption As String)
    mstrCaption = strNewCaption
End Property
Adding Methods Methods are the actions your object can perform. Class methods
are no different from the functions and procedures you create in standard modules,
except they are in a class module packaged with the data. You can add a class method
by using the Visual Basic main menu. Select Tools and then Add Procedure from the
drop-down list. To add a method using the Class Builder Utility, click the Add New
Method to Current Class tool button (as you saw in Figure 8.3). The Method Builder
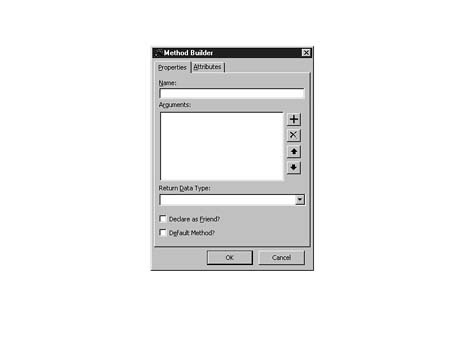
dialog box appears, as shown in Figure 8.6.
FIGURE
8.6. The Method Builder
dialog box.
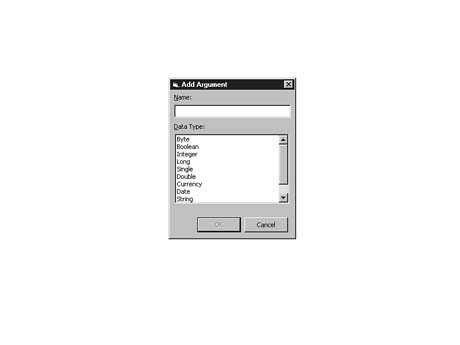
Enter the name of the method in the Name textbox. To add arguments, click the
+ sign, and the Add Argument dialog box appears, as shown in Figure 8.7.
FIGURE
8.7. The Add Argument dialog box.
To add an argument, enter the argument name, select the data type, and click the OK button. Use the X sign to remove a selected argument, and use the arrow buttons to move an argument up or down.
To make the method a function (so that it returns a value), select the return data type in the Return Data Type combo box on the Method Builder dialog box (refer to Figure 8.6). The Declare as Friend? checkbox makes the method a Friend. Friend methods are similar to Friend property procedures in that they can be used within a Visual Basic project with the class but can't be used by other applications (because they are not part of the class interface). Checking the Default Method? checkbox makes the method the default for the class. To add a text description about the property or to associate a help file with the property, use the Attributes tab of the Property Builder dialog box. The code for the Format method is shown in Listing 8.2.
Listing 8.2. The Format method of DAOHTMLTable.
Public Function Format(recSource As Recordset) As String
Dim strHTMLReturn As String `String to build HTML format
Dim intNumOfColumns As Integer `Number of columns in the recordset
Dim fldRec As Field
Dim colFields As Fields
Dim intCount As Integer `Generic Counter

    strHTMLReturn = ""
    `Set up our HTML String - Start with the basic HTML Document
    strHTMLReturn = "<HTML>" & vbCrLf
    If mstrTitle <> "" Then
        strHTMLReturn = strHTMLReturn & "<HEAD>" & vbCrLf & _
                        "<TITLE>" & mstrTitle & "</TITLE>" & _
                        vbCrLf & "</HEAD>"
    Else
        strHTMLReturn = strHTMLReturn & "<HEAD>" & vbCrLf & _
                        vbCrLf & "</HEAD>"
    End If

    strHTMLReturn = strHTMLReturn & "<BODY>" & vbCrLf
    strHTMLReturn = strHTMLReturn & _
                       "<H2>Example of using a VB class</H2>" & vbCrLf
    strHTMLReturn = strHTMLReturn & "<P>" & vbCrLf

    `Begin the Table format using the TAG Table
    If mbytStyle <> STANDARD_TABLE Then
       strHTMLReturn = strHTMLReturn & _
                         "<TABLE width=100% cellspacing=0 cellpadding=0 "
    Else
        strHTMLReturn = strHTMLReturn & _
                    "<TABLE ALIGN=center FRAME=BOX BORDER=1 BORDERCOLOR=BLACK "
    End If

    `Add the table Background color
    strHTMLReturn = strHTMLReturn & "BGCOLOR = " & mstrBGColor & ">" & vbCrLf

    If mstrCaption <> "" Then
        strHTMLReturn = strHTMLReturn & "<CAPTION><B>" & mstrCaption & _
                        "</B></CAPTION>" & vbCrLf
    End If

    `Basic HTML string is setup - get the Number of Columns
    iNumOfColumns = recSource.Fields.Count - 1 `Make 0 based
    Set colFields = recSource.Fields

    `Generate Table based on the table Style selected
    Select Case mbytStyle

        Case STANDARD_TABLE
            `Check for Column Headers First
            If mblnDisplayHeaders Then
                `Add column Headers
                For Each fldRec In colFields
                    strHTMLReturn = strHTMLReturn & "<TH>" & fldRec.Name
                Next fldRec
                strHTMLReturn = strHTMLReturn & vbCrLf
            End If

            `Add The data rows
            While Not recSource.BOF And Not recSource.EOF
                strHTMLReturn = strHTMLReturn & "<TR>"
                For intCount = 0 To iNumOfColumns
                    strHTMLReturn = strHTMLReturn & "<TD>" & _
                                recSource(intCount) & "</TD>" & vbCrLf
                Next intCount
                strHTMLReturn = strHTMLReturn & "</TR>"
                `Get the Next Record
                recSource.MoveNext

            Wend

        Case LIST_TABLE
             `Add The data rows
            While Not recSource.BOF And Not recSource.EOF
                For intCount = 0 To iNumOfColumns
                    strHTMLReturn = strHTMLReturn & "<TR> <TD align=center> " & _
                                    colFields(intCount).Name & ":</td> <td> " & _
                                    recSource(intCount) & "</TR>" & vbCrLf
                Next intCount

                `Add A Line
                strHTMLReturn = strHTMLReturn & "<HR>" & vbCrLf
                `Get the Next Record
                recSource.MoveNext
            Wend

        Case Else
            `Add The data rows
            While Not recSource.BOF And Not recSource.EOF
                strHTMLReturn = strHTMLReturn & _
                           "<TABLE BORDER BORDERCOLOR=Black>" & vbCrLf

                For intCount = 0 To iNumOfColumns

                    strHTMLReturn = strHTMLReturn & "<TR> <TD width=75> " & _
                                    colFields(intCount).Name & ":</td> <td> " & _
                                    recSource(intCount) & "</TR>" & vbCrLf
                Next intCount

                `Add A Line
                strHTMLReturn = strHTMLReturn & "</Table><HR>" & vbCrLf
                `Get the Next Record
                recSource.MoveNext
            Wend

    End Select

    `End HTML Doc
    strHTMLReturn = strHTMLReturn & "</TABLE>" & vbCrLf & _
                    "</BODY>" & vbCrLf & "</HTML>"
    `Return The string to the calling function
    Format = strHTMLReturn
End Function
Class Initialize and Terminate Events Visual Basic classes have two predefined events--Initialize and Terminate.
The Initialize event occurs when an object (instance of the class) is created. Use the Initialize event to initialize property members and any other startup code required for the class. The Terminate event is fired when the object is destroyed by setting its object reference equal to the Visual Basic keyword Nothing. Use the Terminate event to destroy any objects used and reclaim any memory used by class variables. The Initialize and Terminate event code for the DAOHTMLTable is shown in Listing 8.3.
Listing 8.3. The DAOHTMLTable class Initialize and Terminate event code
Private Sub Class_Initialize()
    `Initialize the object properties
    mstrTitle = ""
    mstrCaption = ""
    mstrBGColor = "White"
    mbytStyle = STANDARD_TABLE

End Sub

Private Sub Class_Terminate()
    `Clear strings used by the Object
    mstrTitle = ""
    mstrCaption = ""
End Sub
The DAOHTMLTable class is complete. Now let's create the form to test the completed class.
To test the DAOHTMLTable class, add a single form to the project. The following form-level variables are used to test the class:
Public gdbBiblio As Database

Public gbnlBrowse As Boolean
The variable gdbBiblio is the Database object used for the Biblio.mdb database. The variable gbnlBrowse is used to determine whether the browser control should perform a navigate method or a refresh method. Because the application always writes the HTML string to the same file, after the file has been loaded, a refresh can be done instead of a navigate to reflect the changes made. The code shown in Listing 8.4 is responsible for loading the combo boxes used in the application and opening the database. The error-handling code in Listing 8.4 is quite interesting and worth a closer look. If the database used in the application, Biblio.mdb, is not located in the same directory as the test application, a dialog box is displayed to allow the user to locate and select the database.
Listing 8.4. The form frmMain load event code.
Private Sub Form_Load()
` Fill the combo list box with HTML table styles supported by
` the class DAOHTMLTable. Open the Access database that ships
` with Visual Basic Biblio.mdb. If the database is not found
` display a dialog box and allow the user to locate the database.
`
Dim strDBPath As String

    On Error GoTo Load_Error

    `Show the form
    frmMain.Show

    ` Set the global browser flag
    gbnlBrowse = False

    `Load the Style List box
    With cboStyle
        .AddItem "Standard"
        .AddItem "List"
        .AddItem "Table Each Row"
        .ListIndex = 0
    End With

    `Load the Background color List Box
    With cboColor
        .AddItem "White"
        .AddItem "Gray"
        .AddItem "Red"
        .AddItem "Blue"
        .AddItem "Yellow"
        .AddItem "Green"
        .ListIndex = 0
    End With


    strDBPath = App.Path & "\Biblio.mdb"

Try_Again:
    `Open the database
    Set gdbBiblio = OpenDatabase(strDBPath)

Load_Exit:
    `Check if the database was opened correctly
    If (gdbBiblio Is Nothing) Then
        `Database Not opened - Alert User and quit the application.
        MsgBox "Unable to open the database Biblio.mdb. Application exiting.", _
                vbCritical, "Open Database Error"
        Unload frmMain
        Set frmMain = Nothing
        End
    End If

    Exit Sub

`
`Error handler - look for DAO error - database not found
Load_Error:

    `Look for File not found error
    If Err.Number = 3024 Then
        `Display the Common dialog box and allow the
        `user to locate Biblio.mdb
        dlgFile.ShowOpen
        If dlgFile.FileName <> "" Then
            strDBPath = dlgFile.FileName
            Resume Try_Again
        Else
            Resume Load_Exit
        End If
    End If

    `Display Error message
    MsgBox Err.Description, vbCritical, "Form Load Error"
    Resume Load_Exit
End Sub
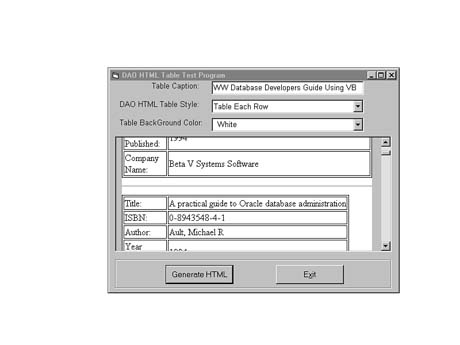
The code that actually creates the DAOHTMLTable object is shown in Listing
8.5. The important aspects of the code are as follows: A DAO recordset is opened
and an instance (object) of the DAOHTMLTable is created using the variable
oHTMLPage and the keyword New. The properties for the object oHTMLPage
are set based on the selection made on the form. The Format method of the
object is used to format the recordset. The returned HTML string from the Format
method is then written to a file. The file is created and saved using a simple Visual
Basic class called CFile. CFile can be found on the CD-ROM that
accompanies this book and is used to perform sequential file I/O. The file generated
is called wwwdvtst.htm, located in the directory from which the test application
is executed. The file is then loaded into the browser control using the navigate
method. The application and an HTML table generated by the DAOHTMLTable
class are shown in Figure 8.8.
FIGURE
8.8. The DAOHTMLTable test application.
Listing 8.5. Generate HTML command button code.
Private Sub cmdFormat_Click()
Const SUCCESS = 1
Dim recTitles As Recordset
Dim oHTMLPage As DAOHTMLTable
Dim strHTML As String
Dim oHTMLFile As CFile
Dim strSQL As String

    Me.MousePointer = vbHourglass

    `Set up the SQL Statement to get all the titles published after 1993
    strSQL = "SELECT Titles.Title, Titles.ISBN, Authors.Author," & _
 "Titles.[Year Published], Publishers.[Company Name] " & _
             "FROM (([title author] INNER JOIN Titles ON " & _
"[title author].ISBN = Titles.ISBN) INNER JOIN Authors ON " & _
             "[title author].Au_ID = Authors.Au_ID) INNER JOIN Publishers" & _
" ON Titles.PubID = Publishers.PubID " & _
            "Where Titles.[Year Published] > 1993 " & _
            "ORDER BY Titles.Title;"

    `Open the Recordset
    Set recTitles = gdbBiblio.OpenRecordset(strSQL)

    `Create a DAOHTML Object
    Set oHTMLPage = New DAOHTMLTable

    `Set the Caption
    With oHTMLPage
        .Caption = txtCaption
        .Style = cboStyle.ListIndex
        .Title = "SAMS WWW DB Developers Guide Using Visual Basic"
        .BGColor = cboColor.Text
        strHTML = .Format(recTitles)
    End With

    `Create a file to save the HTML string to.
    Set oHTMLFile = New CFile
    With oHTMLFile
        .FileName = App.Path & "\wwwdvtst.htm"
        .IOMode = "Output"
        .IOType = "SEQUENTIAL"
        .OpenFile
        If .Status = SUCCESS Then
            .WriteAll (strHTML)
        End If
        .CloseFile
    End With
    Set oHTMLFile = Nothing

    `Display the File in the WebBrowser Object
    `If previously displayed then just refresh
    If gbnlBrowse Then
         WebBrowser.Refresh
    Else
        WebBrowser.Navigate App.Path & "\wwwdvtst.htm"
    End If

    `Make the Browser Visible
    WebBrowser.Visible = True

    `Close the recordset
    recTitles.Close
    Set recTitles = Nothing
End Sub
Test the application with different colors and table formats. Examine the code, especially the code segments that create and use objects based on Visual Basic classes. You can modify the Format method to add your own HTML table formats.
As mentioned earlier, Visual Basic does not allow you to reuse code by inheriting
properties and methods from another class. (Of course, you can always cut and paste.)
However, with Visual Basic 5, you can define a template for a class that describes
methods and properties of the class without defining how the method or property is
implemented (which means you use no code). You can then use these class templates
to inherit the methods and properties of the template when creating other classes.
After you have inherited the behavior of the class template, you then add the code
to determine how the method and properties will be implemented. These reusable class
templates are called interfaces. Besides describing methods and properties of a class,
interfaces enable you to perform another object-oriented feature in Visual Basic
called polymorphism. In OOP, polymorphism allows classes to have the same method
or property, and the caller does not need to worry about the object type before calling
the method. For example, a pencil object and a pen object, based on the SketchTool
interface, both have a DrawLine method. Polymorphism is attained because
you don't have to know which object (pen or pencil) of the derived SketchTool
object is calling the DrawLine method. To create an interface, add a class
module to a project and then define property procedures and methods without defining
any code. Listing 8.6 shows an interface with a DrawLine method and a property
called Color.
Listing 8.6. An example of a Visual Basic interface.
Public Sub DrawLine()

End Sub

Public Property Get Color() As Variant

End Property

Public Property Let Color(ByVal vNewValue As Variant)

End Property
To use an interface, declare a new class, and in the class module declarations section,
add the Visual Basic keyword Implements with the name of the interface.
For example, the following line of code uses the SketchTool interface:
Implements SketchTool
After you add the keyword Implements, you can add the implementation code for the properties and methods described by the interface. Interfaces are very powerful features that enable a programmer to define the behavior and members of a class without defining how they are implemented.
This chapter has primarily concentrated on using Visual Basic 5 to create your
own classes and use objects based on those classes. Besides using the classes you
create, Visual Basic and the ActiveX environment contain a very rich environment
of reusable objects. In this section, you create an application that uses objects
exposed by the Microsoft Internet Explorer. (Yes, sometimes applications such as
Microsoft Excel, Word, and Access supply objects.) The easiest way to view reusable
components installed on your machine that you can use in your applications is to
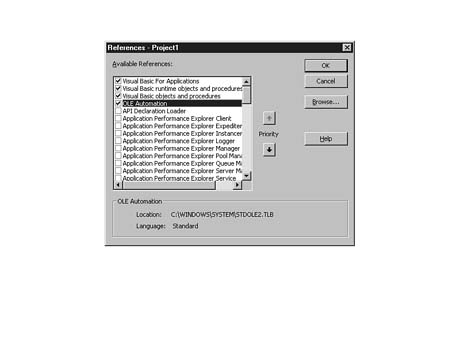
view the References dialog box, shown in Figure 8.9, which can be reached by selecting
the Project menu selection on the Visual Basic main menu.
FIGURE
8.9. The Visual Basic References dialog
box.
The References dialog box lists all the available ActiveX components (which were
OLE servers in previous versions of Visual Basic) on your machine. To use a component
in your Visual Basic program, you must first check the box by the component's name
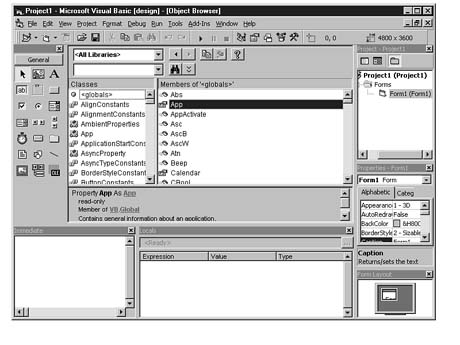
in the Visual Basic References dialog box. To view objects, methods, and properties
of objects, forms, or classes in your Visual Basic project, use the Object Browser
shown in Figure 8.10.
FIGURE
8.10. The Visual Basic Object Browser
dialog box.
The Object Browser enables you to easily determine the available properties and methods of an object. The Object Browser also provides descriptions of the objects, properties, events, and methods.
Using objects exposed by applications or ActiveX components is the same as creating and using objects with Visual Basic classes. The general steps to using an ActiveX component are as follows:
When you have added a reference to the object you want to use, you can declare a variable to create the object. Whenever possible, you should declare the object variable using the actual object type of the object you are creating. For example, the following line of code declares an object variable of the type InternetExplorer:
Public moIE As InternetExplorer
Declaring a variable with the proper object type enables Visual Basic to determine the variable object type at compile time, not at runtime. Using the proper object type also enables Visual Basic to check the methods and properties used in your code with the object's exposed interface, valid methods, and properties at compile time instead of at runtime. Resolving the object type of a variable at compile time is called early-binding. As stated earlier, use early-binding whenever possible to take advantage of object validation and much better performance when creating objects. The alternative to early-binding is late-binding. Late-binding occurs when you declare a variable with the generic data type of Object. For example, the following code snippet defines a variable using the Object data type:
Public moIE As Object
Because the variable is declared using the generic Object data type, Visual Basic does not resolve the object type until the object is created, which is at runtime and not design-time. Because Visual Basic does not know the data type of the object, the properties and methods used in your code cannot be validated at compile time and could result in a runtime error if you use an invalid property or method. Remember to use early-binding whenever possible; resolving a variable's object type at runtime is costly! Use the generic Object tag only when you don't know the types of objects you will be creating.
Creating an instance of an ActiveX component (exposed object) is the same as creating an object of a Visual Basic class. Use the Visual Basic keyword New. The following example demonstrates using the keyword New to create an instance of the Internet Explorer object:
Public moIE As InternetExplorer
`Create an instance of the Internet Explorer.
    Set moIE = New InternetExplorer
You can also use the function CreateObject to create a new object (but the keyword New is the preferred method).
When you are finished using the object created by the ActiveX component, you need to destroy the object reference using the Visual Basic keyword Nothing, as in the following code snippet:
Set moIe = Nothing
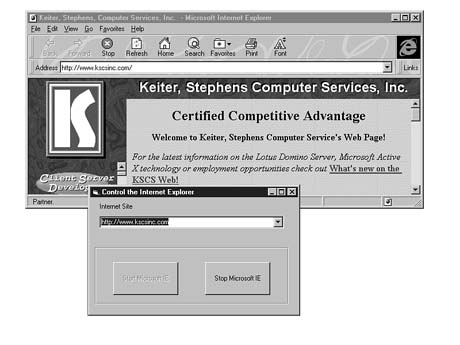
In this section, you examine a Visual Basic application that uses ActiveX components (objects). The application does the following:
The application project file is called cntrlie.vbp and is located on the accompanying CD-ROM. To run the application requires Internet Explorer 3.0 or greater and Visual Basic 5. To use the application, perform the following steps:
FIGURE 8.11. The application cntrlie controlling the Internet Explorer.
Before moving on to the next chapter, let's take a quick look at the code, shown
in Listing 8.7.
Listing 8.7. Code for the Visual Basic project cntlrie.
Public moIE As InternetExplorer
Private Sub cboSite_Click()
Dim strURL As String

    `Combo box clicked

    If cboSite.Text <> "" Then
        strURL = cboSite.Text
        moIE.Navigate strURL
    End If
End Sub

Private Sub cmdStart_Click()
    `Create an instance of the Internet Explorer.
    Set moIE = New InternetExplorer

    `Make the Internet Explorer Visible
    moIE.Visible = True

    `Goto the home site

    `Enable the combo box
    cboSite.Enabled = True
    cmdStop.Enabled = True
    cmdStart.Enabled = False


End Sub

Private Sub cmdStop_Click()

    `Execute the Quit method
    moIE.Quit

    `Destroy our reference
    Set moIE = Nothing
    cmdStop.Enabled = False
    cmdStart.Enabled = True

End Sub

Private Sub Form_Load()
    `Load the combo box with some
    `important book and developers sites as
    `well as ActiveX examples.

    cboSite.AddItem "http://www.microsoft.com"
    cboSite.AddItem "http://www.mcp.com/mcp"
    cboSite.AddItem "http://www.kscsinc.com"
End Sub
An instance of the Microsoft Internet Explorer is created with the following lines of code:
`Create an instance of the Internet Explorer.

    Set moIE = New InternetExplorer
When you have an object instance of the Internet Explorer, you need to make the object visible using the Visible property. The following line of code makes the Internet Explorer visible:
moIE.Visible = True
After the Internet Explorer is visible, the application invokes the GoHome method to go to the designated home page of your Internet Explorer. The following code navigates to the selected Website:
If cboSite.Text <> "" Then
        strURL = cboSite.Text
        moIE.Navigate strURL
The following code snippet closes the Internet Explorer and cleans up the object reference:
`Execute the Quit method
    moIE.Quit

    ` Destroy our reference
    Set moIE = Nothing
In this chapter, you have seen an overview of ActiveX and the various technologies that make up ActiveX. You learn more about ActiveX and ActiveX scripting in Chapters 12 through 14. Chapters 16 and 17 cover creating ActiveX controls and ActiveX documents in great detail.
The most important bit of knowledge you could gain from this chapter is an understanding of how to create Visual Basic classes and how to use classes and components in code. This chapter serves as the foundation for creating and using ActiveX components, especially server components. Creating ActiveX components from Visual Basic classes is discussed in detail in Chapter 22.
The next chapter, "Visual Basic 5 Data Access Features," is the building block for understanding the different data access methods you will use in your database Web applications.
![]()
![]()
![]()
![]()
![]()